
- Integrating AAMS Into Another Project
- State Machine Integration
- State Machine Step 5: Open your character Blueprint
- State Machine Step 6: Add the player interface
- State Machine Step 7: Copy the required interface nodes
- State Machine Step 8: Add AAMS input mappings to your IMC
- State Machine Step 9: Add the required Actor Components
- State Machine Step 10: Set up movement
- State Machine Step 11: Add the State Component input functions
- State Machine Step 12: Add the desired Actor Components
- State Machine Step 13: Add the interaction inputs
- State Machine Step 14: Set up the Stats Component
- State Machine Step 15: Add the desired inputs
- State Machine Step 16: Retarget the animations
- State Machine Step 17: Choose whether to use the retargeted AAMS Animation Blueprint as your base
- State Machine Step 18: Add the animation interfaces
- State Machine Step 19: Add the interface functions
- State Machine Step 20: Set up the character references
- State Machine Step 21: Add the required AAMS functions to your Animation Blueprint
- State Machine Step 22: Set up the Animation Layers
- State Machine Step 23: Integrate the Anim Graph
- Motion Matching Integration
- Motion Matching Step 5: Set up your character for the AAMS Motion Matching example
- Motion Matching Step 6: Set up the Retargeter
- Motion Matching Step 7: Create the character Blueprint
- Motion Matching Step 8: Add your retargeter to the generic retarget Animation Blueprint
- Motion Matching Step 9: Add your character to the player controller character swap setup, if desired
- Additional Setup and Reference
Integrating AAMS Into Another Project #
Try this interactive tutorial and go step by step!
Step 1: Create the AAMS project #
Open Epic Games Launcher and create a new AAMS project using your project’s Unreal Engine version.
For these steps, screenshots, and this walkthrough, I am using UE 5.7 and the Third Person template with the Combat variant. The process will work the same in UE 5.5 and up.
Step 2: Prepare your project before migrating AAMS #
Before making any changes to your project, back it up so you have a working copy before adding AAMS or any other project into it.
Open your project and prepare it for AAMS. Before migrating AAMS, you need to set up your project by enabling required plugins, adding collision trace channels, and creating physical surfaces. If you skip this step, you may have to fix collisions and physical materials one by one later, and you may also run into issues with missing plugins.
Open Edit > Project Settings.
Under Project Settings > Engine > Collision, create these Trace Channels:

- VineWall — Default Response: Ignore
- Movement — Default Response: Ignore
- Ledge — Default Response: Ignore
Under Project Settings > Engine > Physics, create these Physical Surfaces in this exact order:
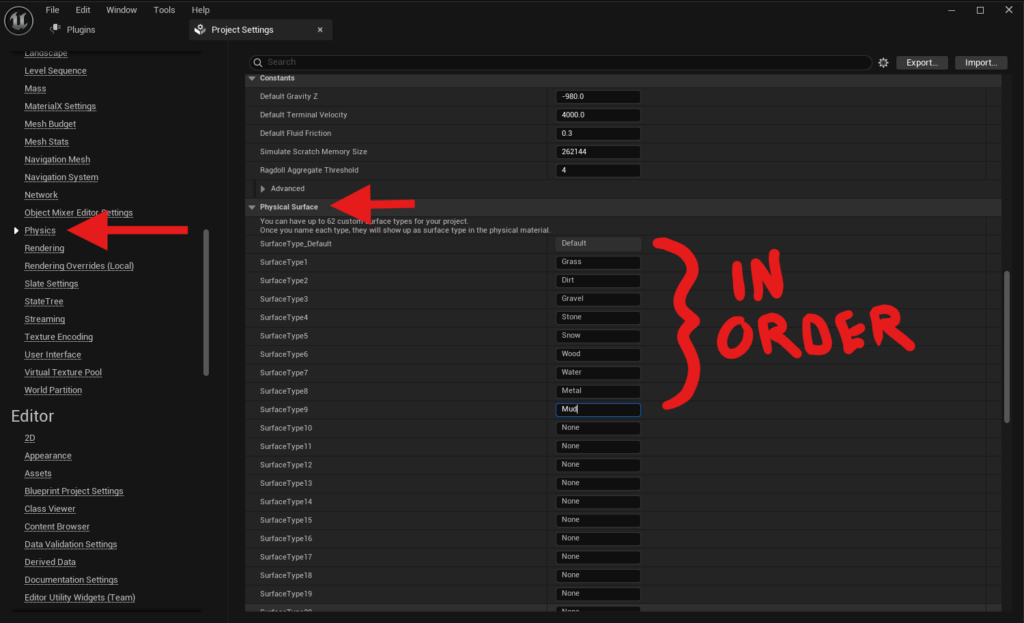
- Grass
- Dirt
- Gravel
- Stone
- Snow
- Wood
- Water
- Metal
- Mud
Next, open Edit > Plugins and enable:
- Animation Warping
- Motion Warping
Motion Warping is required for AAMS to function correctly.
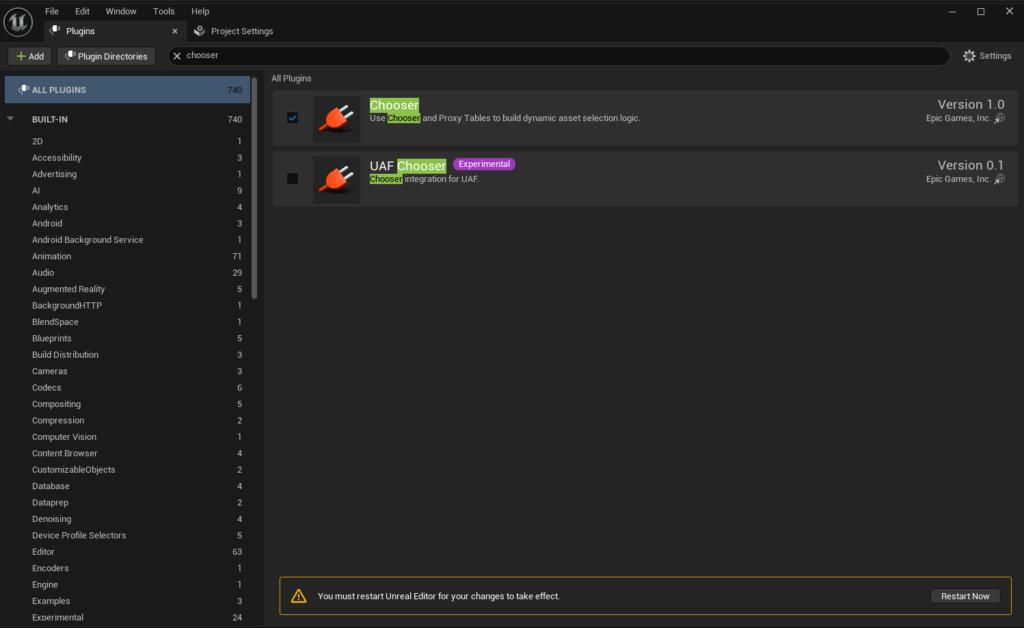
If you plan on using the Motion Matching character in AAMS, also enable:
- Pose Search
- Chooser
- Blend Stack
- Motion Trajectory
After enabling the plugins, restart your project. Your project is now ready for AAMS to be migrated into it.
Step 3: Migrate AAMS into your project #
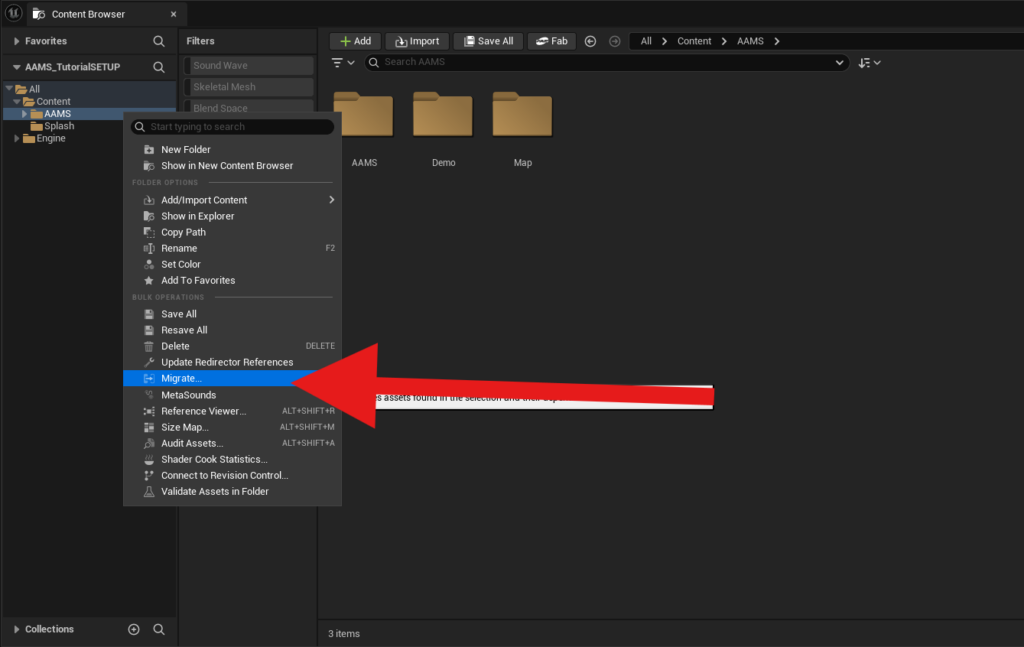
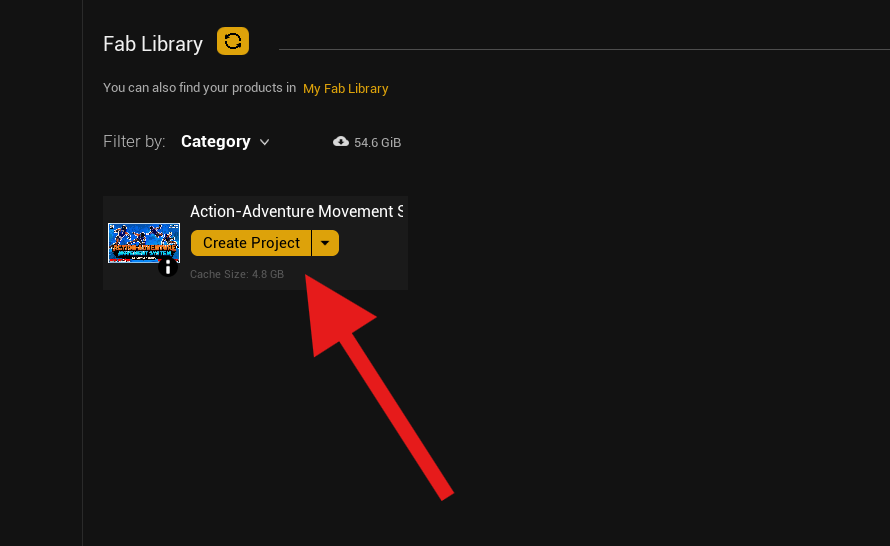
Open the AAMS project you created. In the Content Browser, right-click the AAMS folder and select Migrate from the popup menu.
In the Asset Report window, press OK, then locate the Content folder of your project.
Make sure you always migrate projects into the project’s Content folder for them to work correctly.
Press Select Folder and wait for the assets to finish migrating. Once the migration is complete, close the AAMS project and open your project.
Step 4: Verify the Collision Channels Data Table #
You will need to verify that the Collision Channels are correct. I made a Data Table to make this task simple so you do not have to go into each Blueprint and check every instance where collisions are referenced.
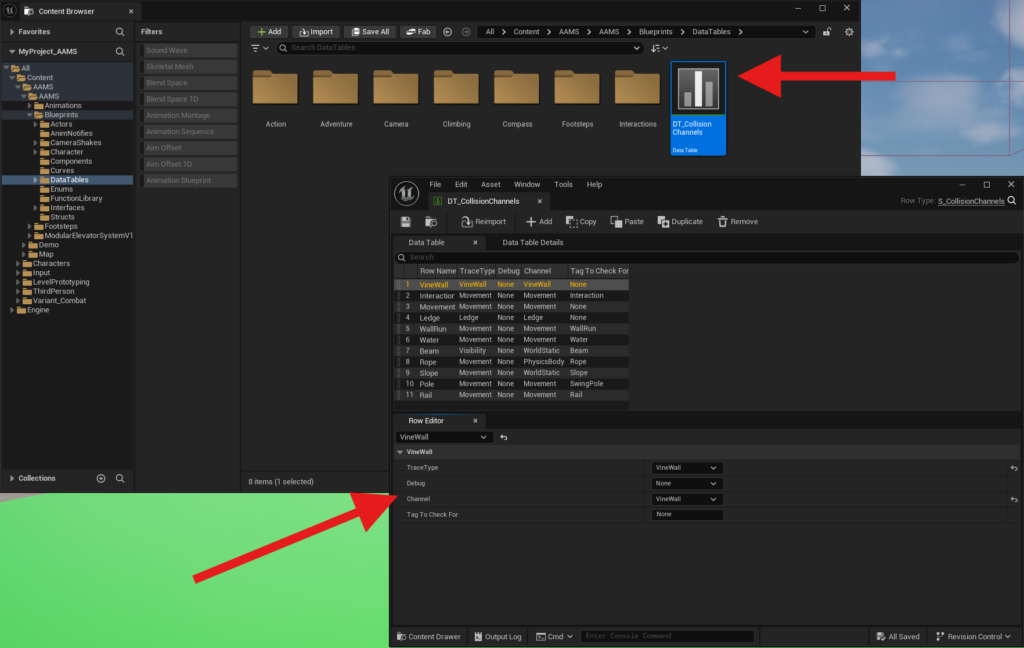
Locate the Data Table folder in AAMS and open DT_CollisionsChannels. Check that the rows are set the same as the following. If you already had collisions set in your project or forgot Step 2, your collisions may be incorrect and will need to be adjusted to match:
VineWall #
- Trace Type: VineWall
- Channel: VineWall
- Tag to Check For: None
Interaction #
- Trace Type: Movement
- Channel: Movement
- Tag to Check For: Interaction
Movement #
- Trace Type: Movement
- Channel: Movement
- Tag to Check For: None
Ledge #
- Trace Type: Ledge
- Channel: Ledge
- Tag to Check For: None
WallRun #
- Trace Type: Movement
- Channel: Movement
- Tag to Check For: WallRun
Water #
- Trace Type: Movement
- Channel: Movement
- Tag to Check For: Water
Beam #
- Trace Type: Visibility
- Channel: WorldStatic
- Tag to Check For: Beam
Rope #
- Trace Type: Movement
- Channel: PhysicsBody
- Tag to Check For: Rope
Slope #
- Trace Type: Movement
- Channel: WorldStatic
- Tag to Check For: Slope
Pole #
- Trace Type: Movement
- Channel: Movement
- Tag to Check For: SwingPole
Rail #
- Trace Type: Movement
- Channel: Movement
- Tag to Check For: Rail
Choose Your Integration Path #
If you are planning on using the Motion Matching example for your character, I recommend using ABP_AAMS_MotionMatching and BP_ExampleCharacter_MotionMatching as the base foundation for your system, then adding your other mechanics to it. While it is possible to retarget and add the Motion Matching mechanics to your character, it takes a lot of setup and is not recommended unless you are already advanced and familiar with Motion Matching in Unreal Engine.
If you are using the Motion Matching example for your project, move on to Motion Matching Step 5 and I will show you how to add your character meshes to AAMS. If you are planning on using the State Machine (traditional) example as your character and adding it to your existing Animation Blueprint, move on to State Machine Step 5.
State Machine Integration #
State Machine Step 5: Open your character Blueprint #
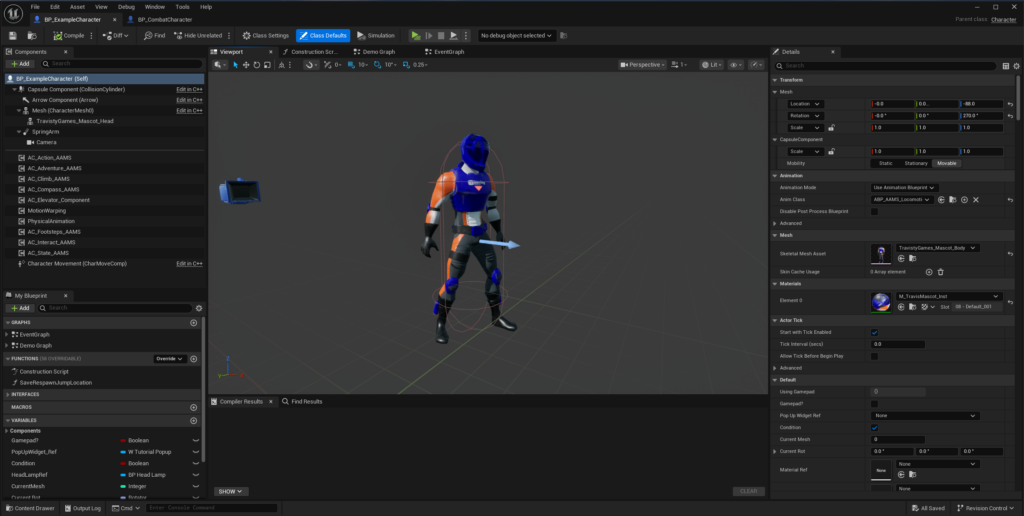
In the Content Browser, locate your character’s Blueprint, for example MyCharacter, and open it.
Also open BP_ExampleCharacter in the StateMachine folder from the migrated AAMS folder for reference.
Having both Blueprints open will make it easier to copy and integrate the necessary elements from the AAMS example character into your own character.
State Machine Step 6: Add the player interface #
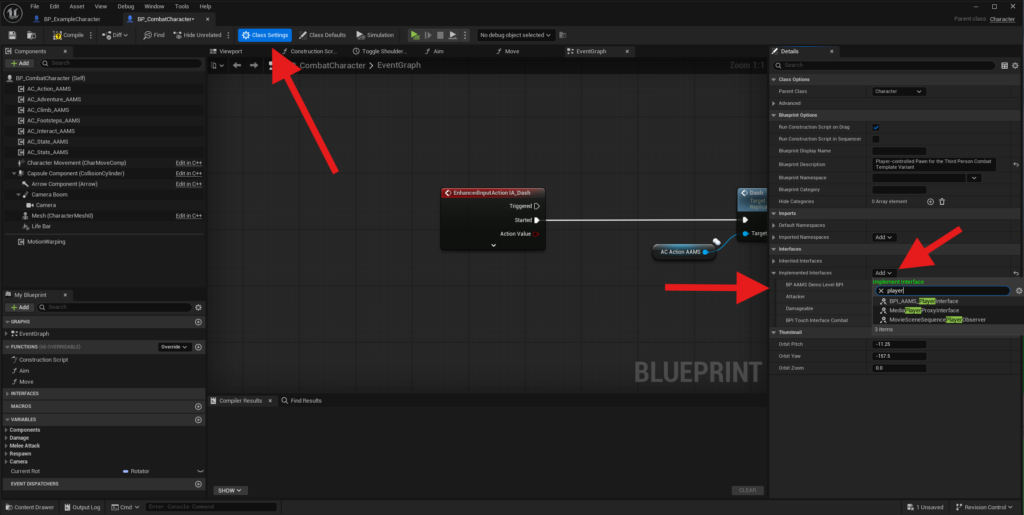
Add the BPI_AAMS_PlayerInterface to your character.
In your character’s Blueprint, go to Class Settings in the top toolbar of the Blueprint Editor.
In the Details panel, under Interfaces, click Add.
Search for BPI_AAMS_PlayerInterface and select it to add the interface to your character.
You can also open BP_AAMS_DemoLevel_DPI, as it includes additional examples found in the Demo Level.
Note: Interfaces allow communication between different Blueprints and components in Unreal Engine.
Compile and Save.
State Machine Step 7: Copy the required interface nodes #
Before starting this step, make sure you compiled your character Blueprint after adding the new interfaces so they are added and ready to be used.
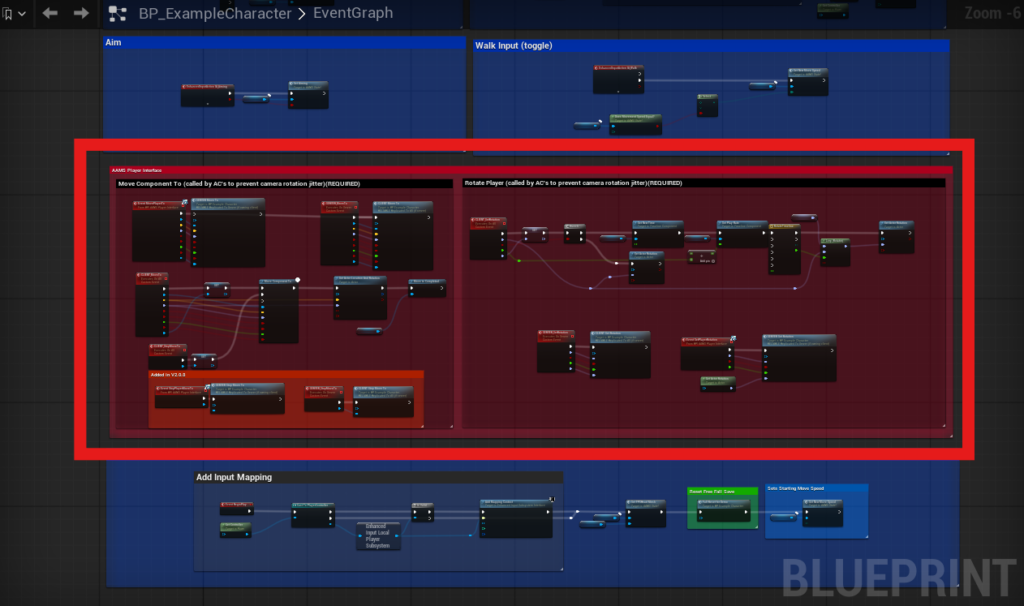
Now navigate to BP_ExampleCharacter and locate the red commented area called “AAMS Player Interface.” This area contains required nodes needed to make most AAMS mechanics work. Occasionally, when using tick-based movement nodes like Move Component To inside Actor Components, movement and camera updates can become out of sync and cause jittering. This setup helps prevent that jitter by placing the logic directly inside the character Blueprint.
Select the entire red commented area in the Example Character and copy it. Then navigate to your character Blueprint and paste it into your character’s graph.
You can create a sub-graph called AAMS to keep everything organized by clicking the plus sign next to Graphs in the My Blueprint panel.
After pasting the nodes into your character Blueprint, you will need to right-click the Actor Component variable and the Current Rot variable and create them as variables.
Then select the pasted Timeline and press F2 on your keyboard to rename it to RotateTimeline (with no space between the words). When you paste a Timeline from one Blueprint to another, Unreal recreates it as a new Timeline and usually gives it a default name such as Timeline. Make sure it is named exactly RotateTimeline so the references work correctly without you having to go back and replace them manually.
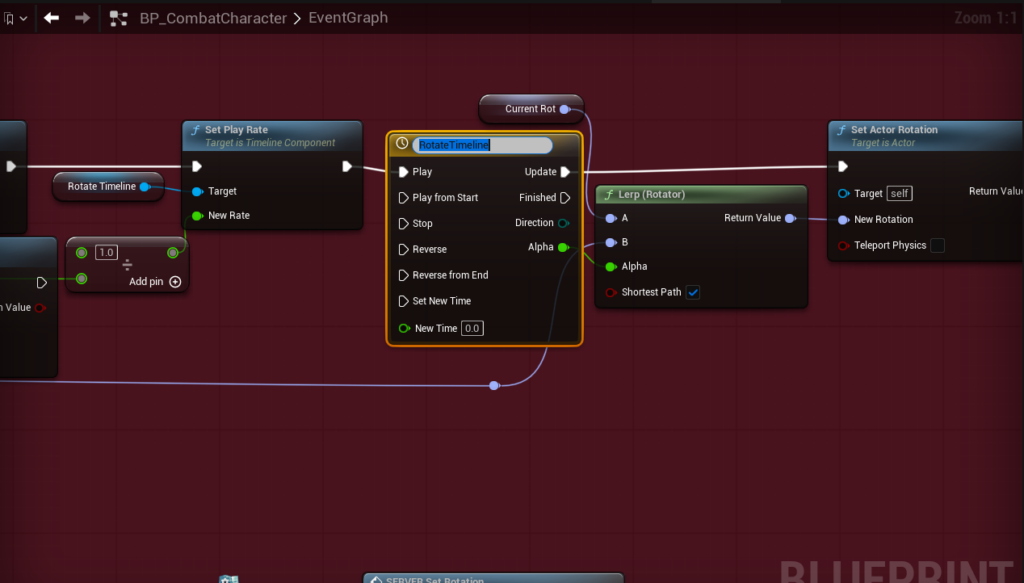
Compile and Save.
State Machine Step 8: Add AAMS input mappings to your IMC #
If you already have input mapping set up for your character, open your IMC (Input Mapping Context) asset and add the AAMS input mappings.
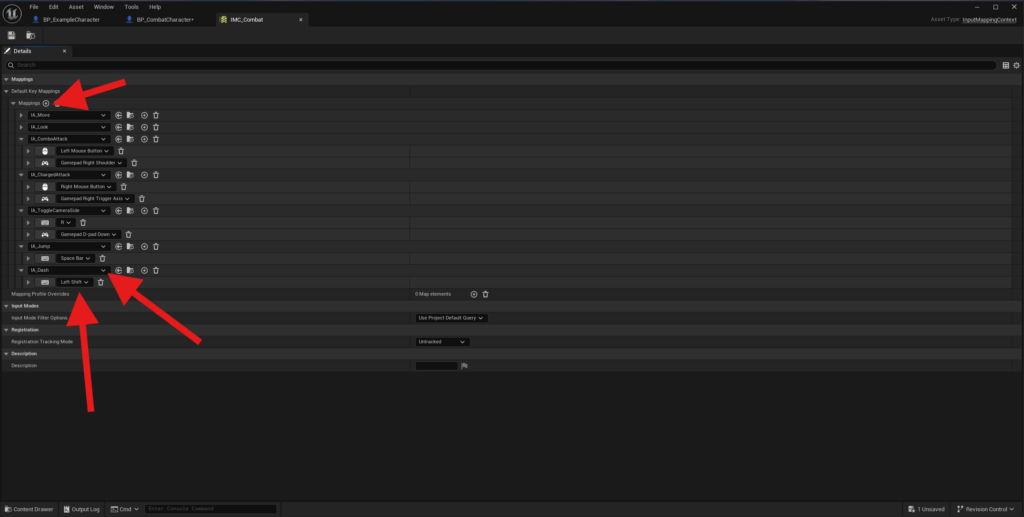
You only need to add the input mappings that are needed for your game.
State Machine Step 9: Add the required Actor Components #
In your character Blueprint, click Add Component at the top of the Components panel.
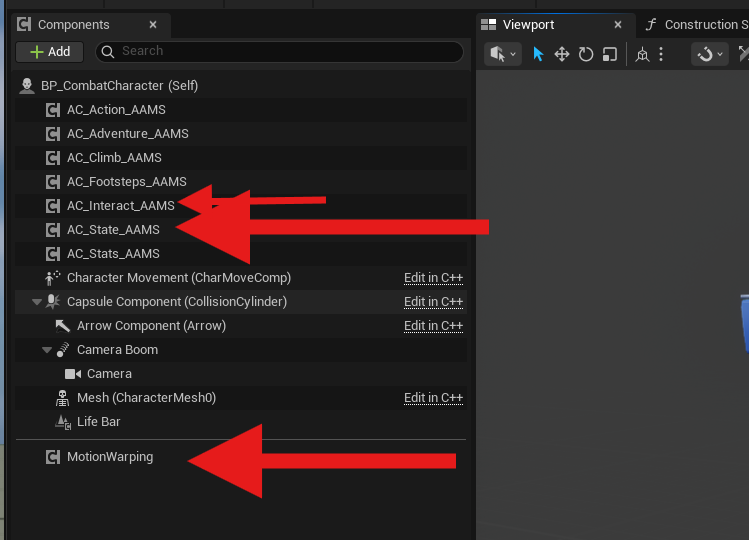
Search for AAMS_State and add AC_State_AAMS to your character. This component is required for handling different player states such as sprinting, jumping, and other movement-related states.
If you want to use AAMS’s interaction system, also search for AAMS_Interact and add AC_Interact_AAMS the same way.
If you plan to use your own interaction system instead, you will need to manually integrate the InitiateInteract event into your own system.
State Machine Step 10: Set up movement #
Using the newly added State component reference, pull off the Determine Movement pure function and add it to the character’s Add Movement Input setup for both Left/Right and Forward/Back inputs.
Locate the Add Movement Input nodes.
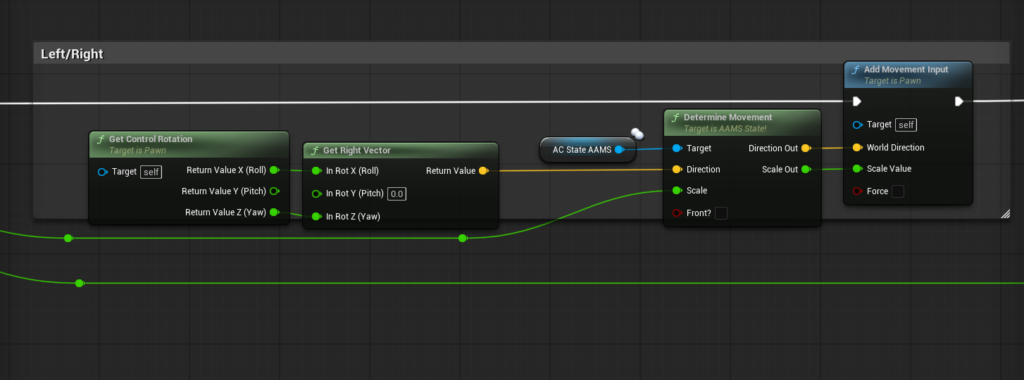
For the Left/Right inputs:
- Set the Determine Movement function’s Direction input to the Get Right Vector return value.
- Set the Scale input to Action Value X.
- Leave the Front? input unchecked.
- Connect the Direction Out vector output to the Add Movement Input node’s World Direction input.
- Connect the Scale Out output to the Add Movement Input node’s Scale Value input.
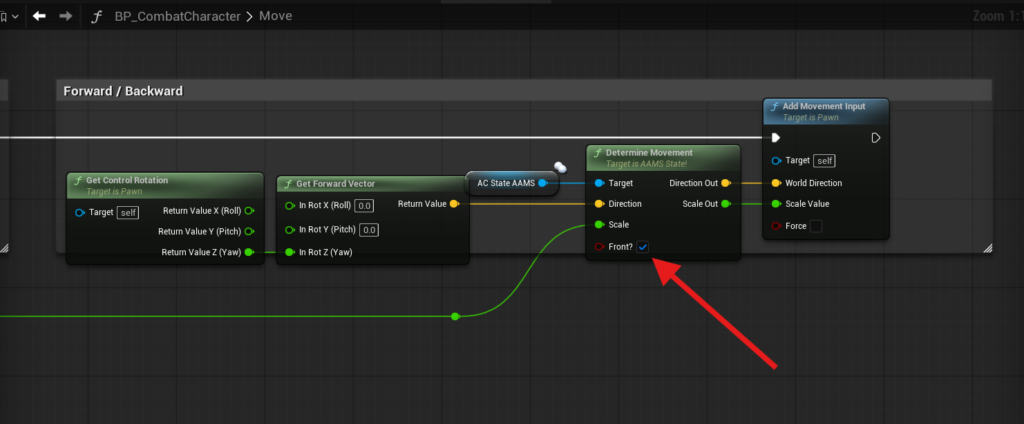
For the Forward/Backward inputs:
- Connect the Get Forward Vector return value to the Determine Movement function’s Direction input.
- Connect Action Value Y to the Scale input.
- Set the Front? input to True.
If you are making a Side Scroller, set the Left/Right Determine Movement Front? input to True and the Forward/Backward Front? input to False. For regular full movement, Front should be used for forward movement.
If you are using another system that does not use Add Movement Input nodes and instead uses an Actor Component function call, you can hook up Determine Movement the same way by passing the Vector Out and Scale Out values into your move function.
The Determine Movement function checks the current movement state and outputs the proper direction and scale values for that state. If the Movement State is set to None, it will return the same values that were passed in.
From your Move input action’s Completed branch, add a call to the Completed Move function and set the Actor input to a reference to Self.
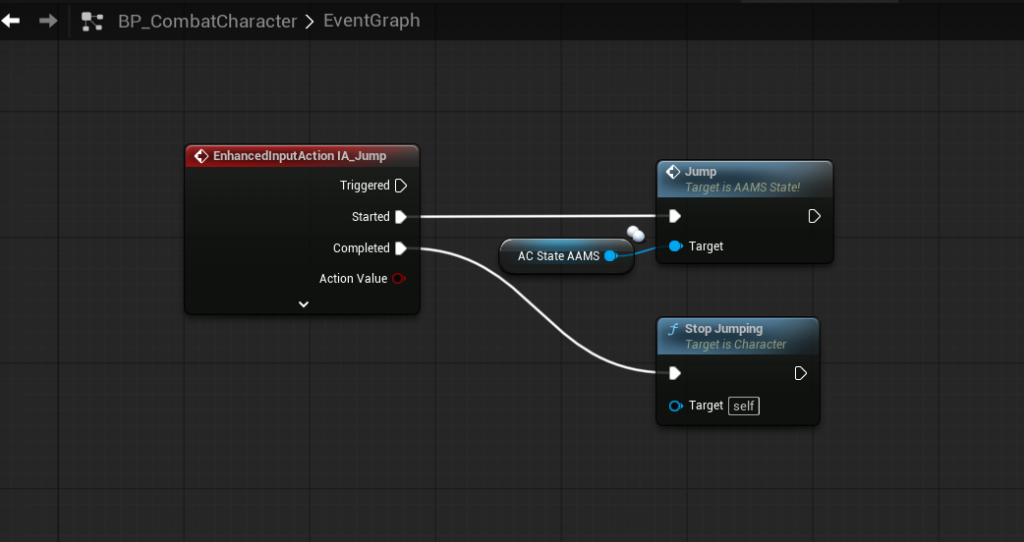
State Machine Step 11: Add the State Component input functions #
In your character Blueprint, update your input setup so it uses the associated AAMS State functions.
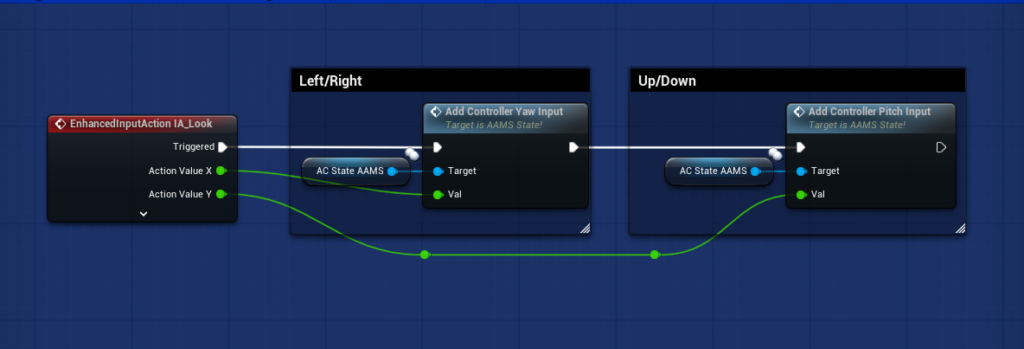
First, replace your camera Look nodes with the Add Controller Yaw Input and Add Controller Pitch Input functions from the State component reference. These functions help support character look offsets and ensure the input is replicated correctly.
Next, replace your current Jump node with the Jump function from the State component reference.
If you want to use Crouching, Sprinting, or Walk/Jog inputs, you will need to add those Input Actions to your IMC, then add those inputs to your character Blueprint.
For Crouching #
- Add your Crouch IA to the IMC.
- In your character Blueprint, pull off the Started branch of that input action.
- Using the State component reference, call the Crouch function.
For Sprinting #
- Add IA_Sprint to your IMC.
- From the Triggered branch, call Toggle Sprint from the State component reference with On/Off set to checked.
- From the Completed branch, call the same Toggle Sprint function again, but set On/Off to unchecked.
These functions use the State component to pass the input to the correct Actor Component based on the player’s current state.
For example, when using Sprint, if the character is on the ground and jogging, the input is passed to the Action component, where sprinting is enabled or disabled. If the character is swimming, that same input is passed to the Adventure component, where it increases swim speed instead.
The Jump function works the same way. It sends the jump input to the correct Actor Component for the current situation. For example, if the character is on a Beam, the Adventure component can use that input to jump to another beam. If the character is hanging on a Ledge, the Climb component will use that same input to look for a new ledge jump.
State Machine Step 12: Add the desired Actor Components #
AAMS includes a large number of mechanics that are split across multiple Actor Components. The three main movement categories are Action, Adventure, and Climb. There are also more specialized Actor Components for things like Footsteps, Compass, and Elevator (which includes version 1.0 of the Modular Elevator System).
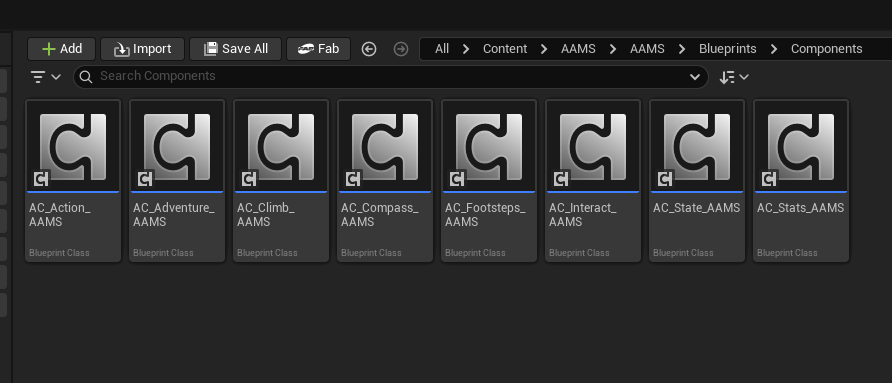
In this step, add the Actor Components that contain the mechanics you want to your character Blueprint the same way you added the State and Interact components.
There is usually no easy reason or need to remove unused mechanics. If you do not want a mechanic, you can normally turn it off, leave its input unmapped, or simply not place its associated actor in the level, and that code will never be used.
If you only want certain mechanics, you only need to add the Actor Components that contain those mechanics, with the exception of the State and Interact components, which are required for this setup.
For example, if you only want Ledge and Vine Wall climbing, you do not need to add the Action or Adventure components. However, if there is a mechanic inside a component that you do not want, you can often disable it in that component’s Details panel. For example, if you do not want Vaulting, which is included in the Climb component, select the Climb component in your character Blueprint and uncheck Allow Vaulting.
Another example: if you want Parachutes, Ropes, and Wall Running from the Adventure component but do not want the rest of its mechanics, you can select the Adventure component and set Free Fall Type to None, then simply avoid placing the other associated actors, such as Swing Poles, Ladders, and Ziplines, in your level. Those mechanics will never be triggered.
If you do not want a mechanic but it exists inside an Actor Component, first check the component’s Details panel to see if there is an option to disable it. If not, check whether it is triggered by an input and remove that input if needed. If it is not input-driven, check whether it requires an associated actor, and if so, do not place that actor in your level.
Action Component (AC_Action_AAMS) #
Contains most ground-based mechanics:
- Jump / Double Jump
- Hard Landings
- Dash
- Slide / Jump Wall
- Push Objects
- Sprint
- Crouching
- Sliding
- Dodging / Rolling
Adventure Component (AC_Adventure_AAMS) #
Contains mostly traversal and aerial mechanics, and most of these mechanics require an associated actor:
- Swimming
- Ladder
- Zipline
- Grappling Hook
- Wall Run
- Parachute
- Slope Slide
- Free Fall
- Beams
- Climbable Ropes
- Swing Poles
- Rail Grinding
Climb Component (AC_Climb_AAMS) #
Contains climbing mechanics:
- Vine Wall
- Ledge
- Vaulting / Parkour
State Machine Step 13: Add the interaction inputs #
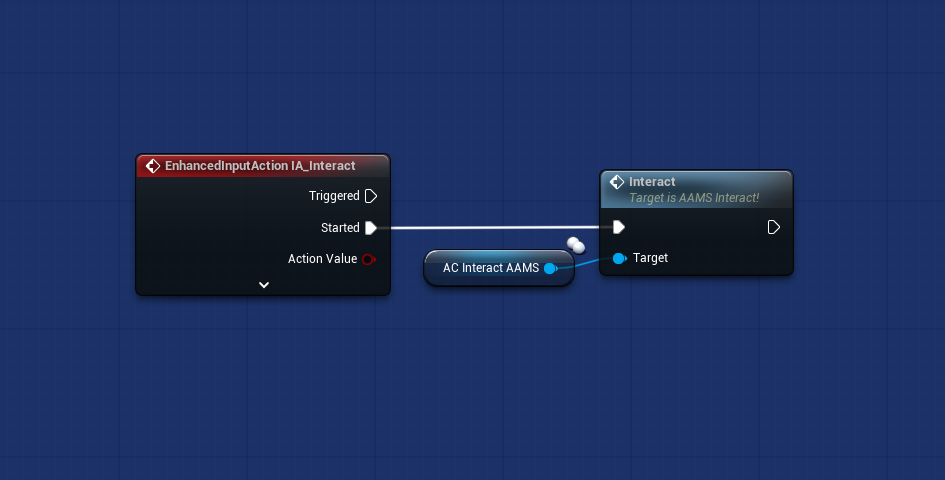
If you are using the AAMS interaction system, add IA_Interact to your IMC, then add the Enhanced Input Action IA_Interact to your character Blueprint.
Using the Interact component reference, call the Interact function and connect it to the Started branch of the IA_Interact input action. This function triggers the interaction events inside the Interact component, allowing the player to use things like doors, ladders, ropes, and other AAMS interaction actors.
If you are using your own interaction system instead, you will need to make sure your system calls InitiateInteract_BPI (Message) and sets your player as the Player Ref.
The AAMS interaction actors use the BPI_AAMS_InteractObject interface and rely on the InitiateInteract_BPI event to begin interactions. For example, with a ladder, the ladder gets the Player Ref from that event, uses it to set the ladder’s owner, and then triggers the climb event in the Adventure component.
State Machine Step 14: Set up the Stats Component #
If you want to use the AAMS Stats Component, add it to your character Blueprint or your Player Controller by searching for AAMS_Stats in the Add Component window. After adding it, Compile your Blueprint.
Next, select the Stats Component. In the Details panel, click the plus sign next to Base Stats. This will add a new Base Stat entry with the Stat set to None and the values set to 0.0 by default.
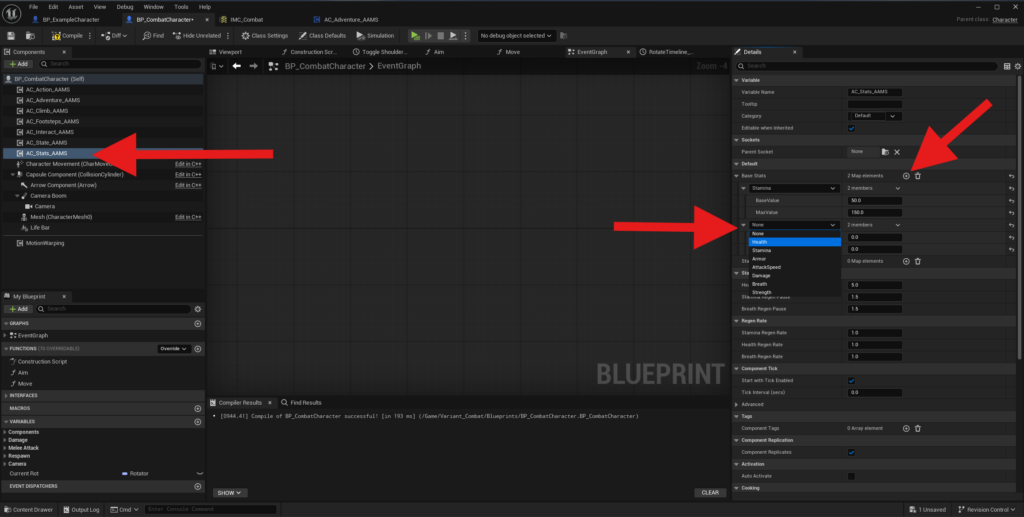
Use the None dropdown to choose the stat you want to assign a base value to, such as Health. After selecting the stat, set both the Base Value and the Max Value.
- Base Value is the amount the player starts with.
- Max Value is the highest amount that stat can reach.
You can set this up in different ways depending on your game. For example, you might give the player a Max Health of 100 and start them at 100 for full health, or you could start them at 50 and let them increase that value over time.
Repeat these same steps for each stat you want to add.
Stat Alerts let you trigger events when a stat reaches a certain value. For example, in the demo level there is a Breath alert that triggers when Breath drops below a set amount, causing warning music and flashing effects to let the player know they are running out of breath. The Health example in the demo level flashes the screen red to alert the player that they are close to death.
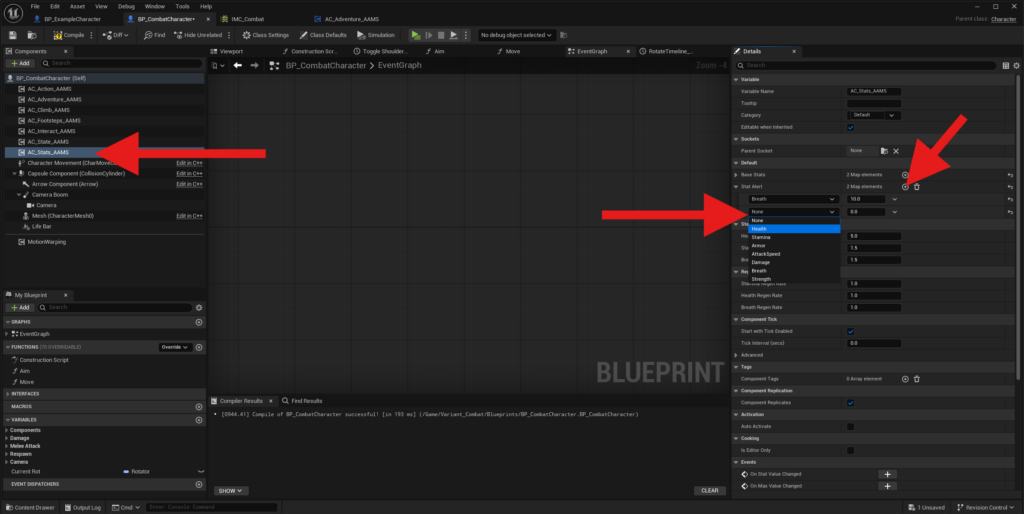
To set this up, click the plus sign next to Stat Alert, then choose the stat you want to monitor and the value at which the alert should trigger.
In the Events section of the Details panel, click the plus sign next to Stat Alert to create the event that will fire when that alert is triggered.
You can set up the other stats events the same way:
- Use On Dead to create an event for things like killing the player or respawning them.
- Use On Stat Needed to trigger an event when the player does not have enough of a stat to perform an action, such as showing a popup message or playing an animation to let the player know they do not have enough of that stat.
State Machine Step 15: Add the desired inputs #
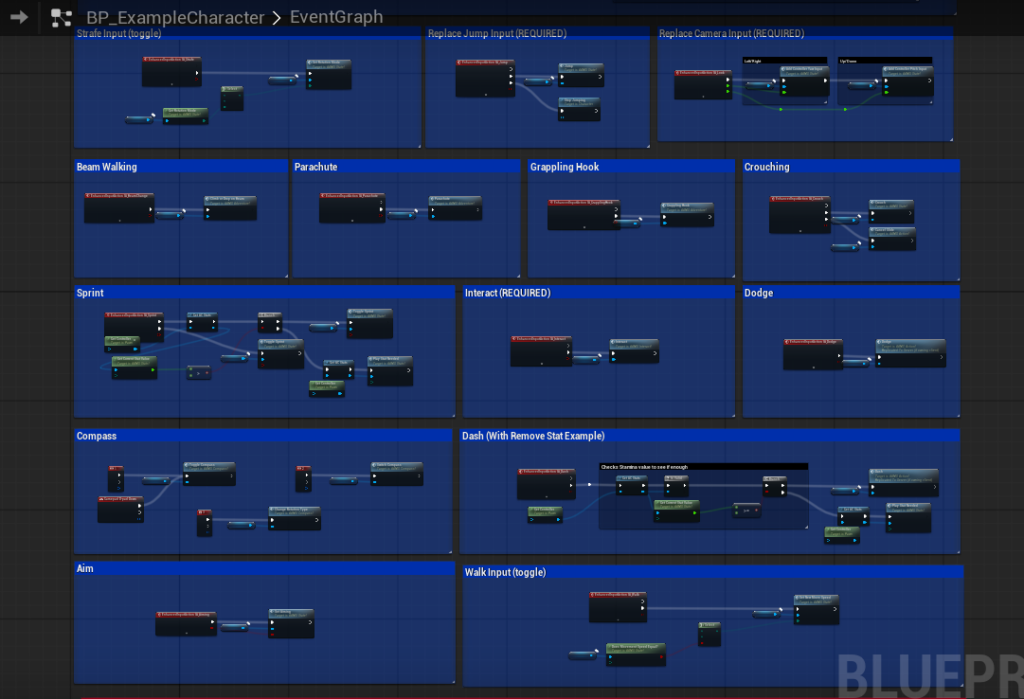
The last step you will need to complete in your character Blueprint to set up AAMS mechanics is adding the inputs you want to use.
Use the Example Character as a reference to see:
- which input function you need to call, such as Dodge vs Roll
- which Actor Component that function belongs to
- how stat checks and dispatcher events are set up
Add the desired Input Actions (IAs) to your IMC, then add those same inputs to your character Blueprint along with their associated AAMS input functions.
Make sure you are using the correct execution branch for each input event, such as Triggered, Started, or Completed.
State Machine Step 16: Retarget the animations #
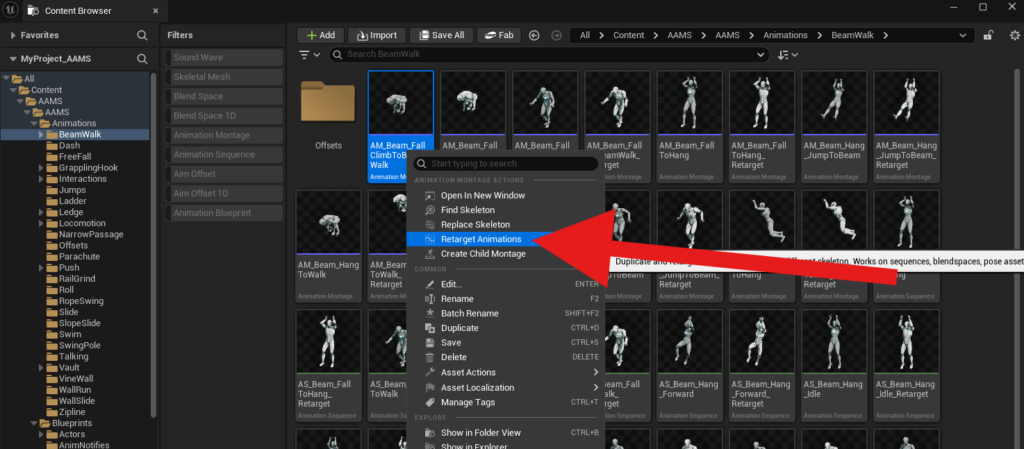
Select a single animation in the AAMS folder, right-click it, and choose Retarget Animations.
In the retarget window, select your Skeletal Mesh as the target. Then select all of the Montages, Blendspaces, Offsets, and Animation Blueprints, except for the two Motion Matching ABPs.
Click Export Animations in the bottom-right corner.
In the next popup window, enable Use Source Path so the retargeted assets stay in the same folder structure and remain clean and organized in your Content Browser.
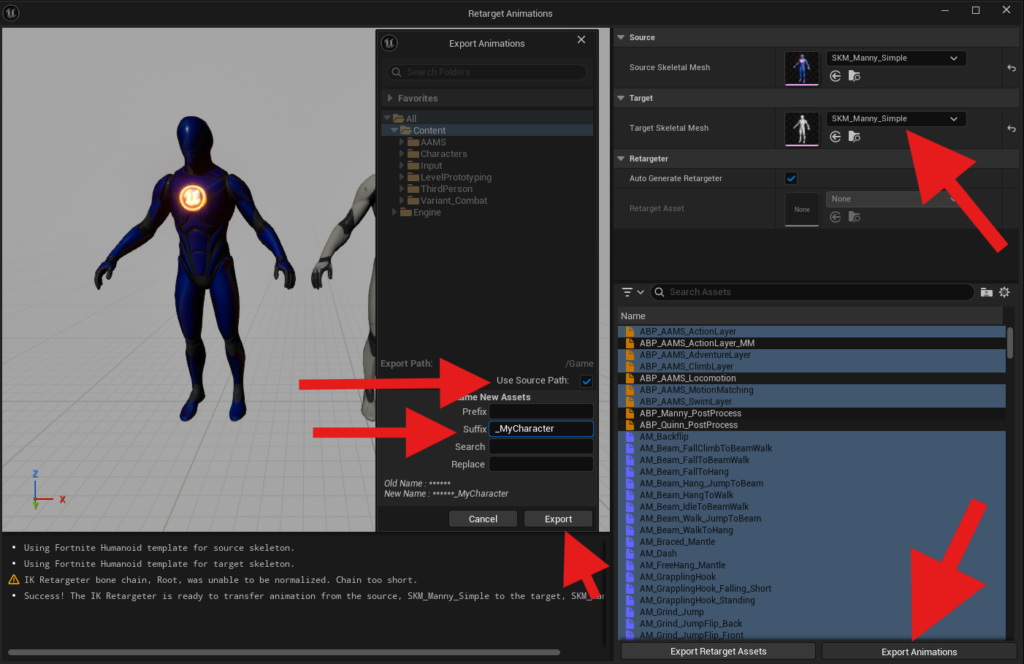
You can also add a suffix to make them easier to tell apart from the original AAMS mesh animations, such as _YourCharacterName.
Then click Export.
This will export all required animations, including the animation sequences. When you retarget assets such as an Animation Blueprint or a Blendspace, Unreal will also retarget the animation sequences referenced inside those assets.
Once the retarget is finished, click Save All.
State Machine Step 17: Choose whether to use the retargeted AAMS Animation Blueprint as your base #
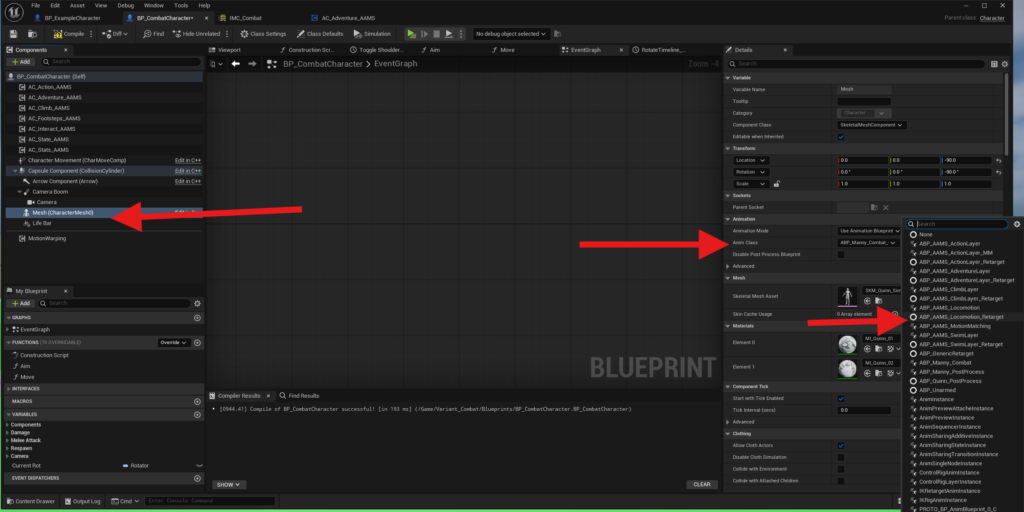
If you want to use the retargeted AAMS Animation Blueprint as your base ABP, open your character Blueprint and select your Mesh (CharacterMesh) in the Components panel. Then, in the Details panel under Animation > Anim Class, set the Anim Class to your retargeted version of ABP_AAMS_Locomotion with your added suffix, for example ABP_AAMS_Locomotion_YourCharacterName. After that, Compile your Blueprint and Save.
If you are using the AAMS ABP as your base, you can skip the next few steps.
If you are not using the AAMS ABP as your base and instead want to integrate AAMS into your own existing Animation Blueprint, keep your current ABP set as the Anim Class and continue to the next step.
State Machine Step 18: Add the animation interfaces #
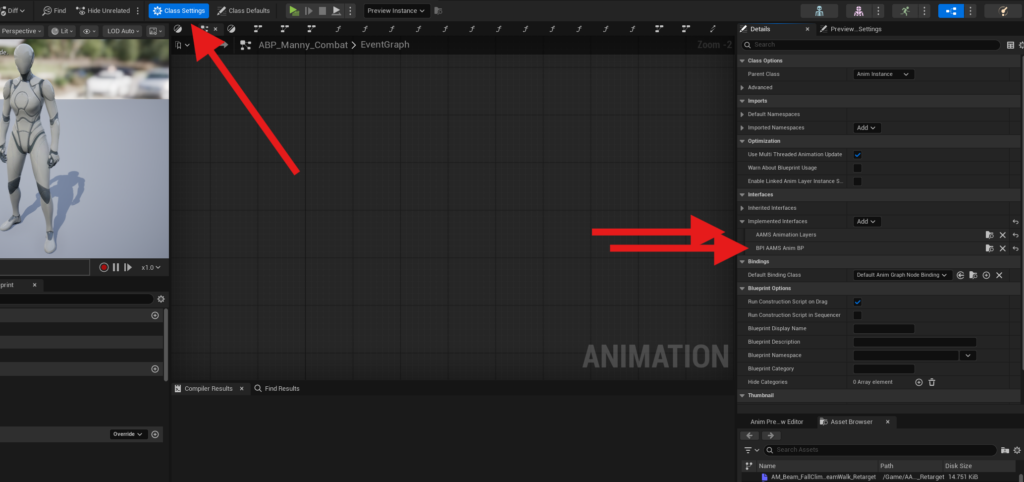
Open your current Animation Blueprint and add the AAMS animation interfaces to it.
Select Class Settings, then in the Details panel under Implemented Interfaces, click Add.
From the dropdown, add:
- BPI_AAMS_AnimBP
- AAMS_Animation_Layers
Then Compile and Save.
BPI_AAMS_AnimBP adds functions to the Animation Blueprint that allow the AAMS Actor Components to communicate with it and change animations and poses.
Make sure to complete this step and compile the Animation Blueprint before continuing.
State Machine Step 19: Add the interface functions #
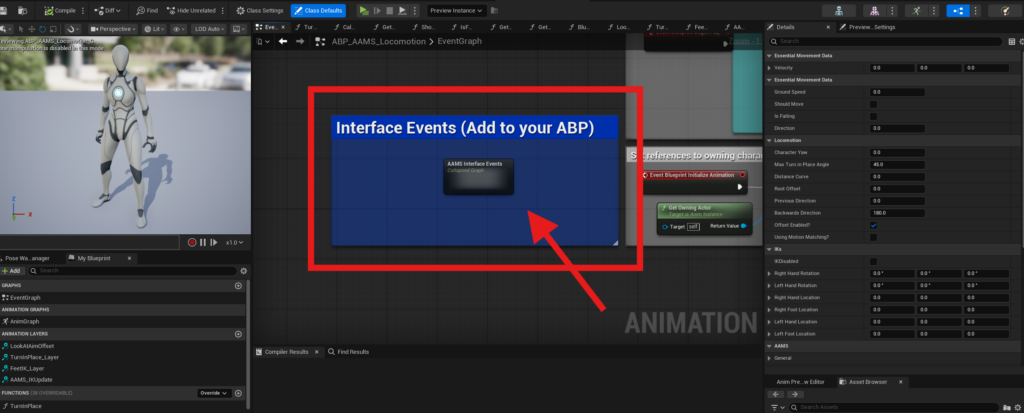
Open ABP_AAMS_Locomotion — not the version you retargeted to your character mesh, but the original one that uses the AAMS skeleton. You will use this Animation Blueprint as the source for copying nodes and functions into your character’s ABP.
If you are using a GASP ABP as your base, use ABP_AAMS_MotionMatching for this section instead.
In ABP_AAMS_Locomotion, open the Event Graph and drag-select the blue commented area called “Interface Events (Add to your ABP)”, then press Ctrl+C to copy it.
Next, open your own Animation Blueprint and go to its Event Graph, or a sub-graph of your choice, then press Ctrl+V to paste the copied collapsed graph.
Open the pasted graph, which will most likely be named something like AAMS Interface Events_2.
Check that the events inside the graph have the proper interface event icons in the top-right corner, like in the screenshot. If you skipped the previous step of adding the interfaces to your ABP, or forgot to Compile before pasting the graph, those icons may not be present. If that happens, the pasted events are no longer true interface events and will not fire correctly.
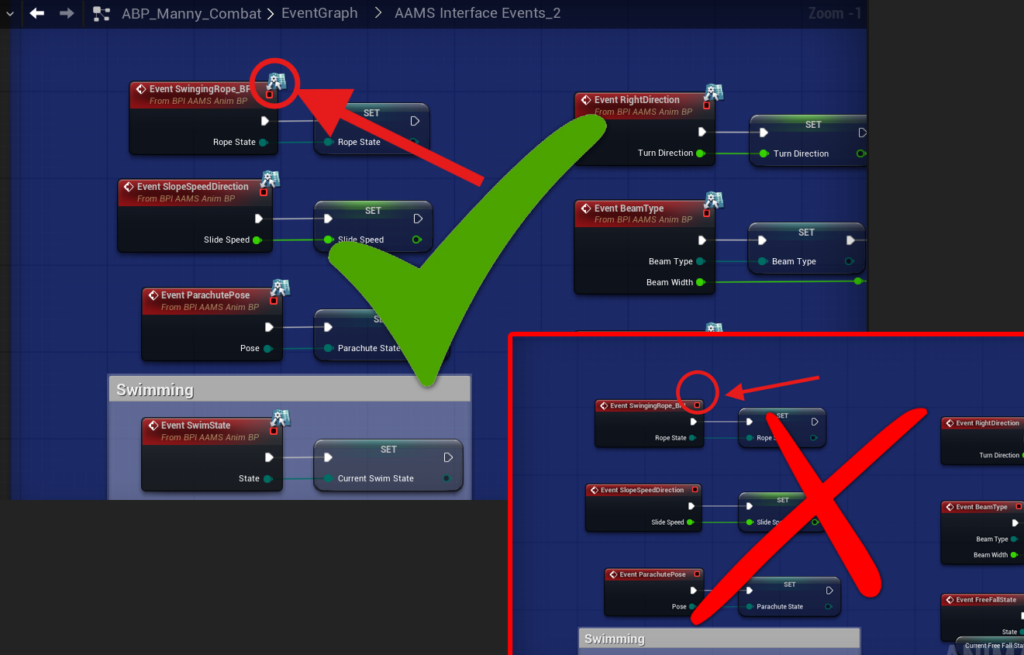
If the icons are not present, do not Compile. Instead, delete the pasted graph, go back and complete the previous step by adding the interfaces to your ABP, Compile, and then retry this step.
After pasting the graph and confirming the events are valid interface events, go through the newly pasted variables inside the Interface Events graph. For each greyed-out variable, right-click it and select Create Variable.
Once all pasted variables have been created, Compile and Save before moving on to the next step.
State Machine Step 20: Set up the character references #
Most Animation Blueprints already have a reference to the character, along with movement variables such as Speed and Direction, so you may not need to set this up if your ABP already includes them.
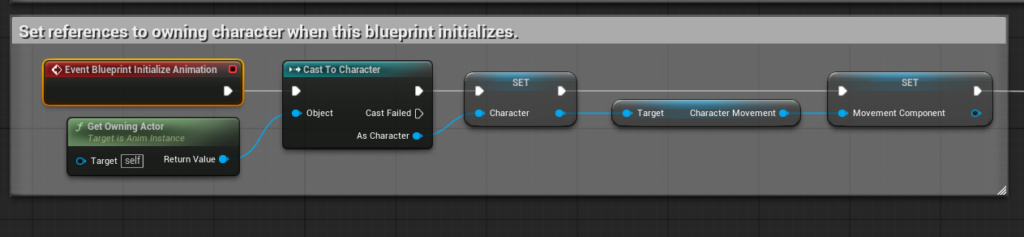
If not, open the AAMS Animation Blueprint you have been using as a reference. In its Event Graph, copy Event Blueprint Initialize Animation, along with its cast to the character and the variables that follow it. Paste them into your own ABP’s Event Graph and create the pasted variables.
After creating your character variables, go back to the AAMS ABP’s Event Graph and copy Event Blueprint Begin Play, along with Get AC State and its binding. Paste those into your ABP and create the Using Rotation Yaw variable.
This binding is used to determine when the animations should rotate with the camera and when they should not. That behavior is controlled by the Camera Settings Data Table, which will be covered in more detail later.
State Machine Step 21: Add the required AAMS functions to your Animation Blueprint #
Now you need to copy the required functions from the AAMS Animation Blueprint into your own ABP.
Open ABP_AAMS_Locomotion and locate the Functions section in the My Blueprint panel. Copy the following functions one at a time by right-clicking the function and selecting Copy, then opening your own ABP, right-clicking in the Functions section, and selecting Paste Function.
TurnInPlace #
Copy and paste TurnInPlace into your ABP, then open the function.
Locate the greyed-out variables, right-click each one, and create them as needed. Any variables that begin with L are local function variables and should already exist inside the function. For the rest, go through them one at a time and create them.
When you get to the Max Turn In Place Angle float, create it, then Compile and set its default value to 45. This is the angle at which the character will turn in place.
If you get a Property Access error in this function, it usually means your character reference is named something other than just Character. If the character reference created from your cast in the Event Graph uses a different name, you will need to update the Property Access to match it.
To fix it:
- Right-click in the function and search for Property Access
- Select it from the popup menu
- Open the Bind dropdown
- Find your character reference in the list
- There will usually be two entries with the same name; hover over the one with the arrow on the right
- From that submenu, choose GetActorRotation
- Connect it to the Break Rotator
You will need to do this for each broken Property Access node you run into later, matching the correct function to the variable needed, such as GetActorRotation, GetActorVelocity, and so on.
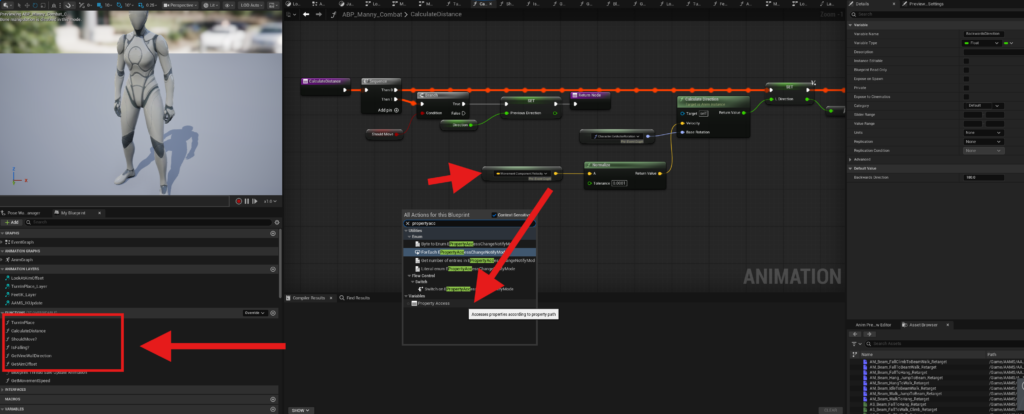
Calculate Distance #
If you are already setting up your own Direction variable, you can skip this function. However, if you want the backward jitter correction included in the AAMS version, I recommend copying and pasting it and disconnecting your current Direction setup.
Copy and paste Calculate Distance, then create the needed variables inside the function.
After that, Compile, then locate the Backwards Direction float and set its default value to 180.
This function is used not only to calculate direction, but also to prevent the backward movement jitter that can happen when the direction rapidly flips between 180 and -180.
If you get Property Access errors in this function:
- For Base Rotation, follow the same steps used in TurnInPlace
- For Velocity, use Movement Component > Velocity in the Property Access dropdown instead of the Character reference
GetMovementSpeed #
If you are already getting your character’s Speed and Velocity, you can skip this step. Otherwise, or if you want the function to be thread safe, copy and paste GetMovementSpeed and create any needed variables.
If you get a Property Access error, use:
- Movement Component Reference > Velocity
ShouldMove? #
Copy and paste the ShouldMove? function.
At this point, the needed variables should already exist. If you get a Property Access error, use:
- Movement Component Reference > GetCurrentAcceleration
IsFalling? #
Copy and paste the IsFalling? function.
If you get a Property Access error, use:
- Movement Component Reference > IsFalling
GetVineWallDirection #
Copy and paste the GetVineWallDirection function, then create the needed variables.
If you get Property Access errors, use:
- Character Reference > GetActorRightVector
- Character Reference > GetActorUpVector
GetAimOffset #
Copy and paste the GetAimOffset function, then create the needed variables.
If you get Property Access errors, use:
- Character Reference > GetBaseAimRotation > Pitch
- Character Reference > GetControlRotation
- Character Reference > GetActorRotation
Blueprint Thread Safe Update Animation #
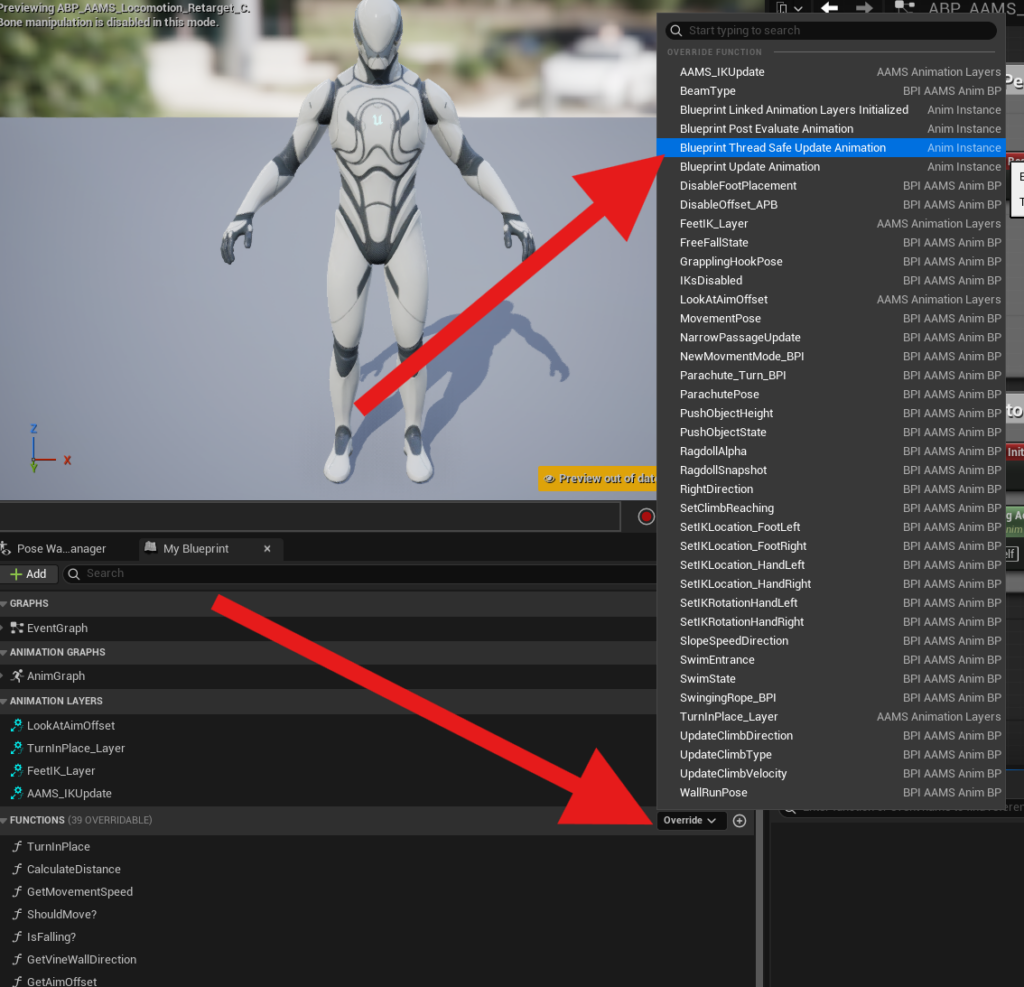
This last function should not be copied directly from the AAMS ABP.
Instead, you need to override it in your own ABP.
In the Functions section, look for the Override dropdown on the right side of the My Blueprint panel. From that dropdown, select Blueprint Thread Safe Update Animation. This will add the function to your Functions list below the pasted functions.
Now go back to the AAMS ABP, open Blueprint Thread Safe Update Animation, and copy all of the nodes inside it. Paste those nodes into your own Blueprint Thread Safe Update Animation function and connect them.
When finished, Compile and check for any errors. Make sure all needed variables are created and all Property Access bindings are working correctly. If anything is missing, the Blueprint will show compile errors.
Save.
State Machine Step 22: Set up the Animation Layers #
Now you need to add the logic inside the Animation Layers that were added with the AAMS_Animation_Layers interface.
In the My Blueprint panel, go to the Animation Layers section and open the four layers in both your own ABP and the AAMS ABP you have been using as a reference.
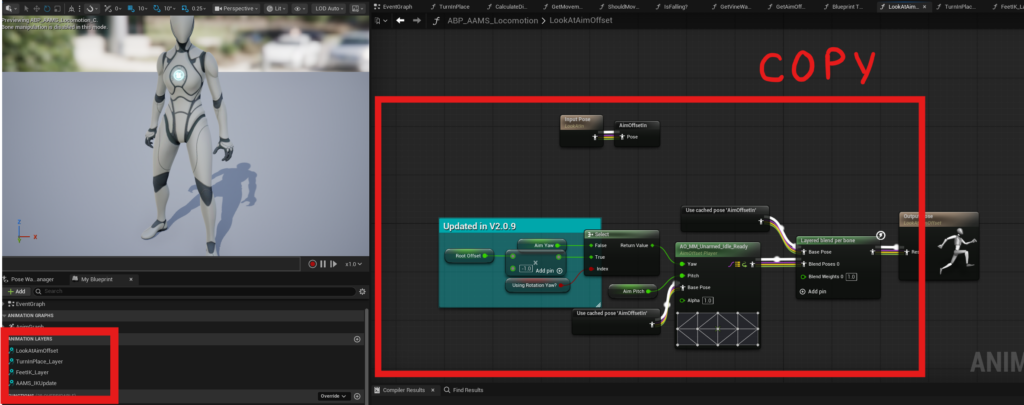
LookAtAimOffset and TurnInPlace_Layer #
- Copy all of the nodes inside each function from the AAMS ABP.
- Paste them into the matching function in your own ABP.
- Connect the Input Pose to the In Cache node, and connect the final node to the Out Pose, just like in the AAMS version.
FeetIK_Layer #
- Copy the nodes from this function the same way and paste them into the matching function in your ABP.
- Connect the input and output poses the same way as the previous layers.
- Inside the function, locate the Control Rig node and select it.
- In the Details panel, find Control Rig Class and change it to a Control Rig that uses your character’s skeleton.
- If you do not already have one, you can create a new Control Rig and copy the nodes from the AAMS Control Rig.
NOTE: After integrating, if you run around and your feet stick to the ground while your arms are moving, the problem is most likely this Control Rig. You will need to make sure it is set to your skeleton.
AAMS_IKUpdate #
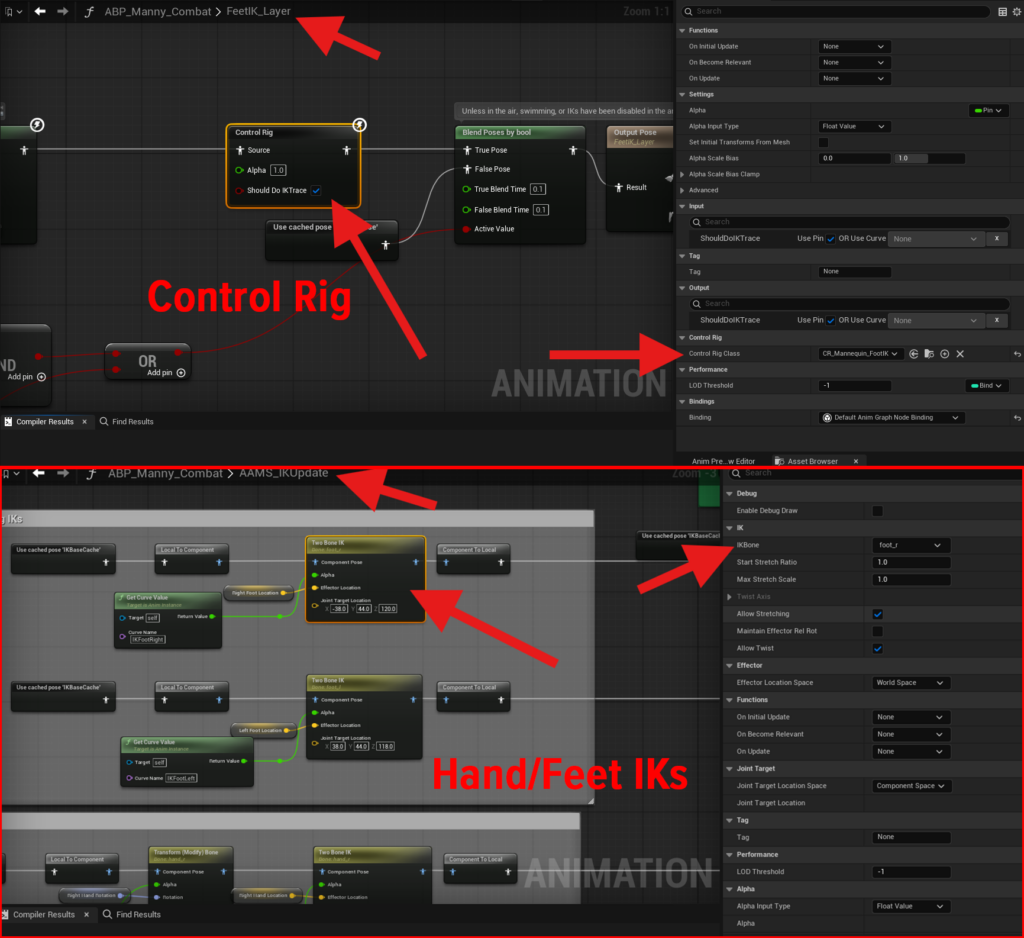
- Copy and paste the nodes from this function the same way as the others.
- Connect the input pose and output pose like in the AAMS version.
- If your skeleton uses the standard UE bone names, or bone names that match the UE skeleton such as foot_r or hand_r, then you do not need to make any additional changes.
- If your skeleton uses a different naming convention, select the Two Bone IK nodes and change the IK Bone setting to match the correct bones on your skeleton. For example, if hand_l does not exist on your skeleton, replace it with the correct name for your left hand bone.
You may notice Get Curve Value nodes in this function that use curve names such as IKHandRight. These curves are set inside the animations that use IK, such as ladders and ledge climbing. The IK locations are also triggered at specific frames in those animations, then the associated Actor Component determines the correct target location and sends it to the Animation Blueprint through the interface functions. The curves in the animations are what actually turn the IK nodes on and off, changing from 0.0 for off to 1.0 for on.
Compile and Save.
State Machine Step 23: Integrate the Anim Graph #
If you look at the ABP_AAMS_Locomotion Anim Graph, you will notice it is broken into four rows.

- The top row is Locomotion
- The second row contains the Linked Anim Graphs
- The third row contains the Upper Body Slot overlay and the Default Slot overlay
- The fourth row contains the Animation Layers
If you are using a GASP ABP, look at ABP_AAMS_MotionMatching to see how it is set up.
Locomotion Row #
The Locomotion row is only needed if your ABP does not already have locomotion, or if you want to use the AAMS locomotion setup. The included locomotion covers walking, jogging, sprinting, and jumping. It does not include the main AAMS mechanics. Mechanics such as swimming and climbing are handled through the Linked Anim Graphs in the second row.
Linked Anim Graphs Row #
The Linked Anim Graphs are used for the looped AAMS animation sequences, such as swimming, vine wall climbing, and other mechanic-specific loops.
You only need to add the Linked Anim Graphs for the Actor Components you are actually using. Just like the Actor Components, they are split into the main categories, except Swim has its own layer. For example, if you are not using the Adventure component, then you do not need the Adventure Layer in your ABP.
You cannot copy and paste the Linked Anim Graphs directly. To add them, open your ABP’s Anim Graph and add each one manually, then bind its variables.
To do this:
- Right-click in the Anim Graph
- Search for Linked Anim Graph
- Select it from the list
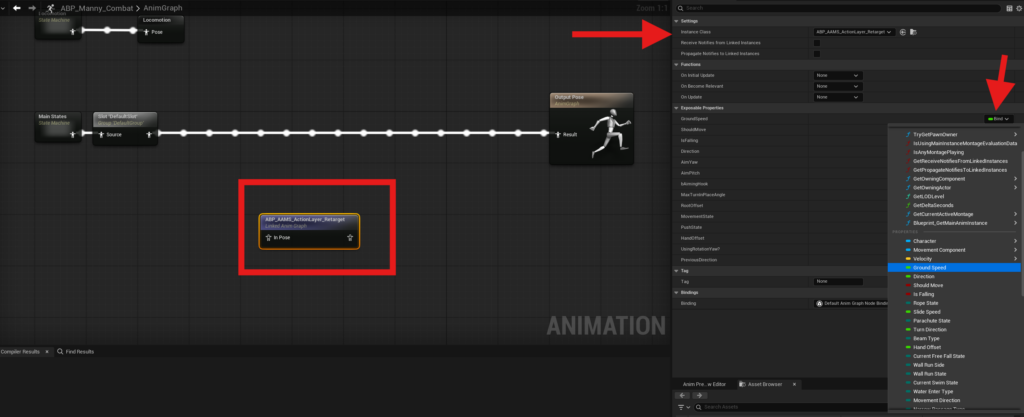
With the node selected, go to the Details panel and set the Instance Class to the Linked Anim Graph you want to use.
Start with the Action Layer. Select the retargeted ABP_AAMS_ActionLayer for your character. Make sure you are selecting the version that was retargeted to your character, not the original AAMS version.
Once selected, the node will expose an In Pose pin. Connect that to your Anim Graph.
Then, while the node is still selected, go to the Details panel and bind the Exposable Properties to the matching variables in your ABP. For example:
- Click the Bind dropdown next to Left/Right
- Scroll to the float variable named Left/Right
- Select it
Repeat this process for all listed properties in the Exposable Properties section.
Then repeat the same setup for the rest of the layers you want to use:
- ABP_AAMS_ActionLayer
- ABP_AAMS_AdventureLayer
- ABP_AAMS_ClimbLayer
- ABP_AAMS_SwimLayer
Upper Body Row #
The Upper Body row contains two important parts, both of which may already exist in your ABP.
The first is Layered Blend Per Bone, which allows animations to affect only part of the body, usually the upper torso. This is useful for things like:
- reloading weapons
- drawing and sheathing weapons
- firing ranged weapons
- drinking potions
The second is the Default Slot. This is required for any Montages to play. If your ABP does not already have a Default Slot, you will need to add it here.
Animation Layers Row #
The last row is the Animation Layers row. These are the same Animation Layers you copied logic into earlier, such as:
- LookAtAimOffset
- AAMS_IKUpdate
- and the others
To add them, drag them from the My Blueprint panel into your Anim Graph and connect them, or copy them from the AAMS ABP and paste them into your own graph.
These should be the last nodes before the Output Pose, because they handle final adjustments such as placing the feet on the ground or aligning the hands to ledges. You do not want later animation nodes changing those final results.
Compile and Save. If you do not have any errors at this point, your ABP should be set up and ready to use.
Next, you will move on to setting up the Animation Data Tables for your character.
Motion Matching Integration #
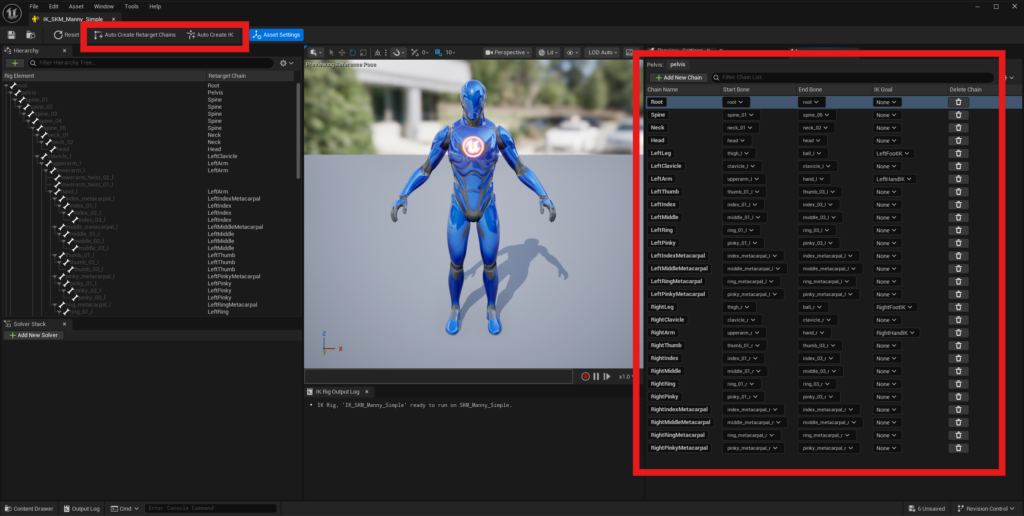
Motion Matching Step 5: Set up your character for the AAMS Motion Matching example #
If you are reading this section, it means you are using the AAMS Motion Matching setup and want to add your own character to it, and you have already completed Steps 1 through 4.
The next steps will show you how to add your character mesh so it can use the animations from AAMS. This is a quick and easy process and can also be used for multiple characters in the same game.
Make sure your character has an IK Rig.
Check the Content Browser to see whether your character’s skeletal mesh already has an IK Rig. If one does not exist, you will need to create one.
To create it:
- Locate your character’s Skeletal Mesh in the Content Browser
- Right-click it
- Hover over Create
- Select IK Rig
Open the IK Rig you just created.
For most skeletons, you can click Auto Create Retarget Chains at the top of the editor, which will automatically generate the chains for you. Then click Auto Create IK next to it.
If your skeleton does not support automatically creating the chains, you will need to manually add the chains and assign the correct start and end bones for each one.
Use IK_SKM_Manny_Simple in the AAMS folder as a reference for the chain names you should use in your rig.
Motion Matching Step 6: Set up the Retargeter #
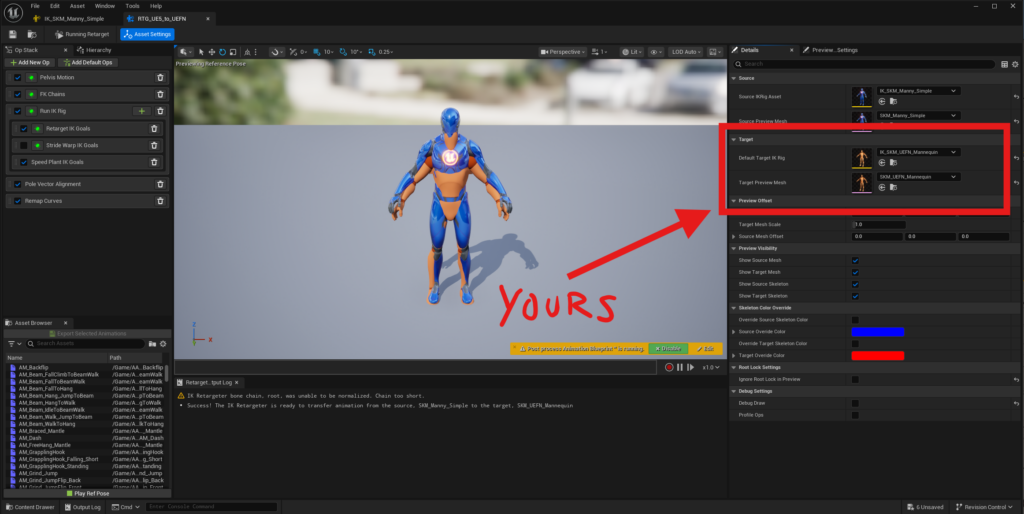
In AAMS/Demo/Characters/Mannequins/Rigs, locate the retargeter RTG_UE5_to_UEFN.
Duplicate this retargeter and rename it to RTG_UE5_to_YourCharacterName, then open it.
Under the Target section:
- Set your character’s IK Rig as the Default Target IK Rig
- Set your character’s Skeletal Mesh as the Target Preview Mesh
Then Save it and Close it.
Motion Matching Step 7: Create the character Blueprint #
Open the RetargetedCharacters folder in AAMS:
AAMS/Blueprints/Character/MotionMatching/RetargetedCharacters
Duplicate CBP_SandboxCharacter_Manny and rename it to match your character, for example CBP_YourCharacterName.
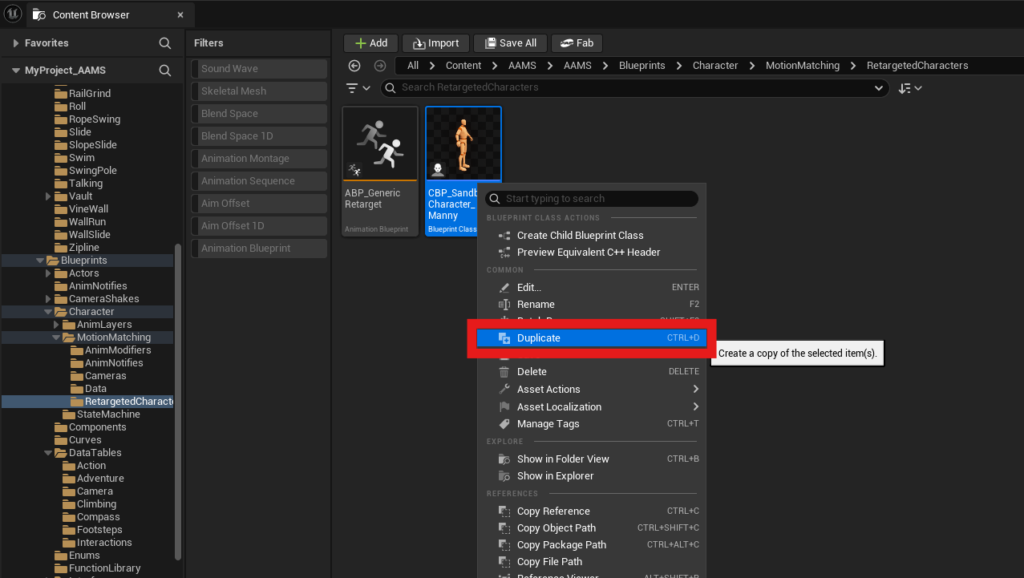
Open the duplicated Blueprint.
Inside the Blueprint, select the Manny mesh and change it to your character’s Skeletal Mesh.
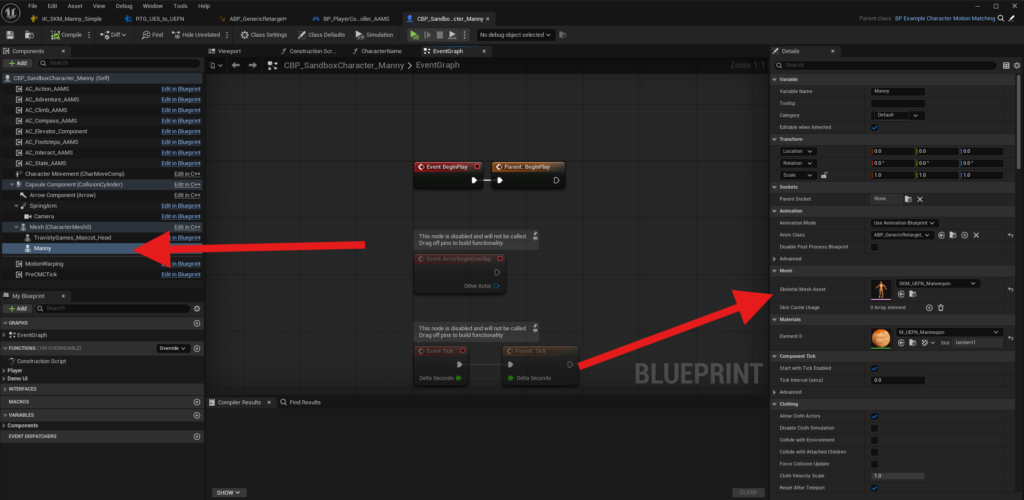
With that same mesh still selected, go to the Details panel and search for tag. Under Component Tags, locate Index [0] and replace RTG_UE5_to_UEFN with the name of the retargeter you duplicated and renamed, for example RTG_UE5_to_YourCharacterName.
Then Compile and Save.
Motion Matching Step 8: Add your retargeter to the generic retarget Animation Blueprint #
In the same RetargetedCharacters folder, open the ABP_GenericRetarget Animation Blueprint.
In the Event Graph, select the IKRetargeter Map variable.
In the Details panel, click the plus sign next to IKRetarget Map. This will add a new element under the existing RTG_UE5_to_UEFN entry.
In the new element:
- Enter the name of the retargeter you duplicated and renamed
- Make sure the name matches exactly, for example RTG_UE5_to_YourCharacterName
- In the dropdown, select your retargeter
Then Compile and Save.
Motion Matching Step 9: Add your character to the player controller character swap setup, if desired #
If you want your character to be included in the Next Character input system, open BP_PlayerController_AAMS and select the Character Class Array.
In the Details panel, you can:
- click the plus sign to add your new character
- use the dropdown arrow next to the current indexes to delete existing entries
- replace an existing character with your own
If you do not want to use the Next Character feature, open BP_PlayerController_AAMS and delete the IA_NextCharacter input.
Additional Setup and Reference #
Animation Data Tables and Motion Warping #
Most of the animation-related Data Tables in the DataTables folder include settings that control how the character lines up during movement mechanics. These tables often contain offset values that adjust the character’s location at specific points in the animation. If your character is smaller or larger than the AAMS example character, these values will often need to be adjusted.
These offsets usually work by moving the character’s root bone relative to a contact point in the world. For example, during a vault or mantle, AAMS may use the top of the wall or ledge as the target point, then apply offset values so the hands, body, and final landing position line up correctly.
How Motion Warping Works #
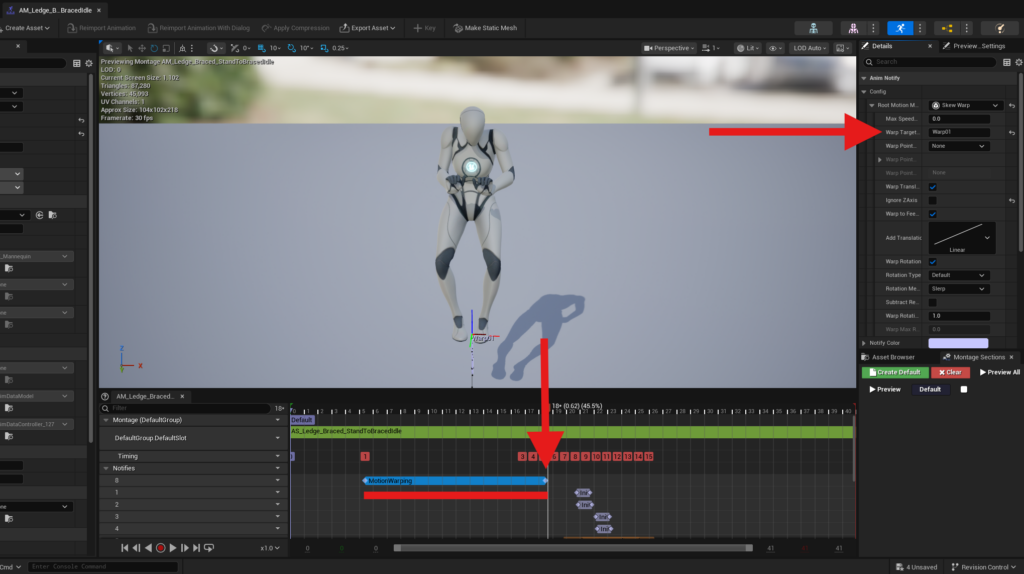
Many AAMS animations use Motion Warping to move the character from their current position to a target location during specific parts of the animation. For Motion Warping to work correctly in your own animations, those animations need to include the proper Motion Warping Anim Notifier States.
A good way to set this up is to open the AAMS version of the animation you are replacing, then copy its anim notifiers into your version and place them in the matching parts of the timeline. For example, if you are replacing the mantle montage, open AM_Braced_Mantle, copy the notifier states, and paste them into your own animation in the same general locations.
The Motion Warping Notifier State moves the character toward the target point by the time the notifier ends. In ledge-based mechanics, that target is usually the top of the ledge, plus or minus any offset values set in the associated Data Table row.
Example: Braced Mantle #
Using Braced Mantle as an example, the montage contains two Motion Warping notifier states named Warp01 and Warp02.
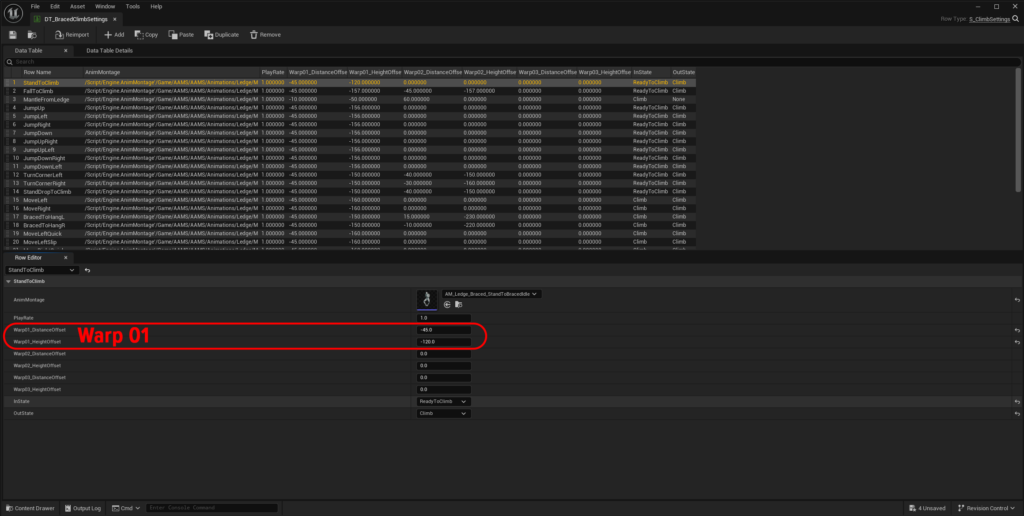
If you open DT_BracedClimbSettings and locate the MantleFromLedge row, you will see:
- the montage reference
- the offset values for Warp01
- the offset values for Warp02
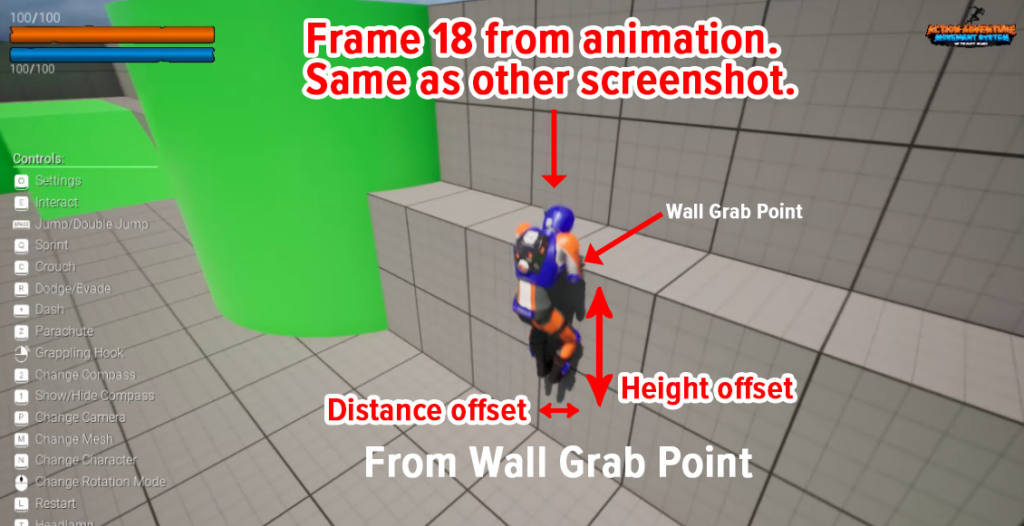
These offsets determine where the character should be positioned relative to the ledge by the end of each warp.
For example:
- If the character ends too low, increase the Height Offset
- If the character ends too far away from the ledge, adjust the Distance Offset
- If the character overshoots or stops too early, test and refine the offsets until the hands and body line up correctly
Shorter animations may only need a single Motion Warp. Longer animations with more movement, such as mantles, often need two or more warps. In a mantle, one warp may lift the character above the ledge, while the second moves them forward and aligns them with the ground.
Adjusting for Different Characters #
When testing retargeted or replacement animations, always test them directly in a level and watch where the character lines up at the end of each Motion Warp section. Pay attention to whether the character needs to move:
- up or down
- forward or backward
- closer to or farther from the target surface
If your character is smaller than the AAMS mannequin, you will usually need to lower the offsets. If your character is larger, you may need to increase them.
General Rule #
If an animation uses Motion Warping:
- Make sure the animation has the correct Motion Warping notifier states
- Make sure the notifier names match the names used in the Data Table, such as Warp01 and Warp02
- Test the mechanic in-game
- Adjust the Data Table offsets until the animation lines up correctly
This setup is used across many of the action and traversal Data Tables, such as DT_BracedClimbSettings, DT_RailGrind, DT_Dodge, and others found in the DataTables folder.