
Introduction to Action Component #
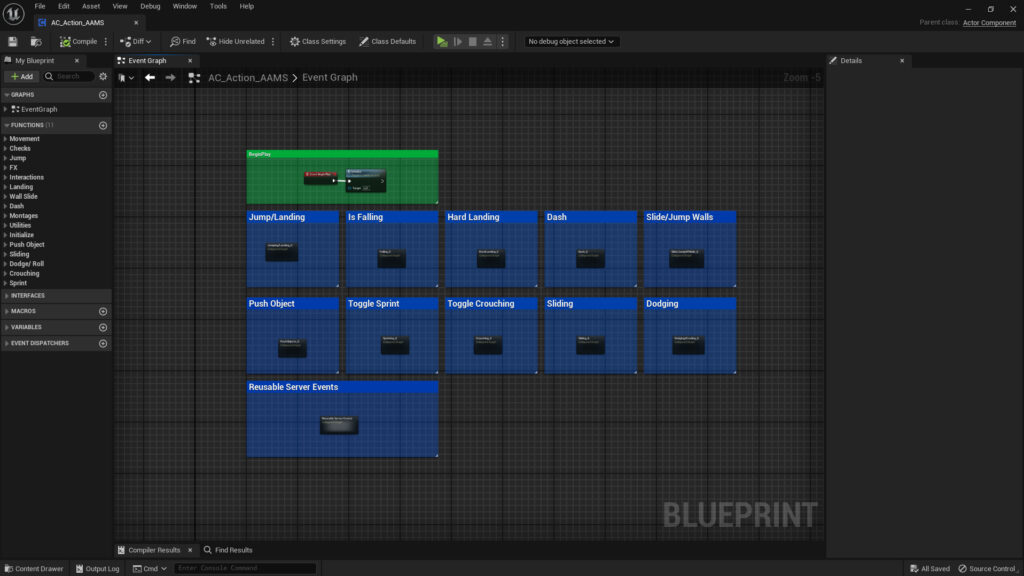
The Action Component is central to the ground-based action and locomotion mechanics in AAMS. These mechanics include Jumping and Double Jumping, Hand Landings (such as fall damage and rolling on landing), Dashing, Dodging and Evading, Sprinting, Crouching, Sliding, Sliding down and Jumping off walls, and Pushing Objects. While the Action Component isn’t required for AAMS, it is strongly recommended to fully utilize these features.
Jumping and Double Jumping #
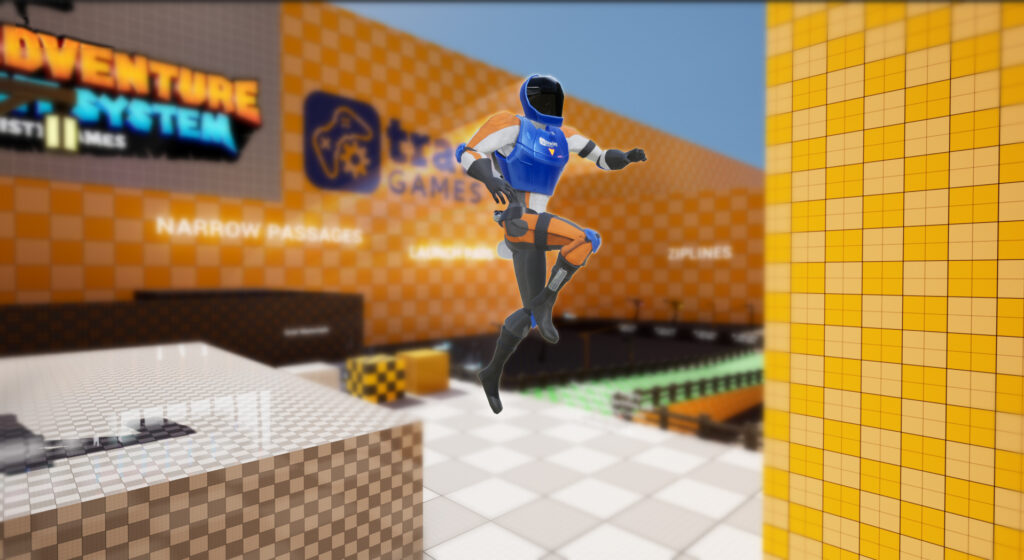
To use the jumping features in AAMS, hook up the Jump event from the State Component (*see the Passing Section of the State Component to learn more about the Jumping function). If jumping is possible, the State Component will pass the jump action to the Action Component, where it will determine whether to perform a jump or double jump based on current conditions, such as whether the character is already falling.
Setting Up Jump #
Implementing Jump: #
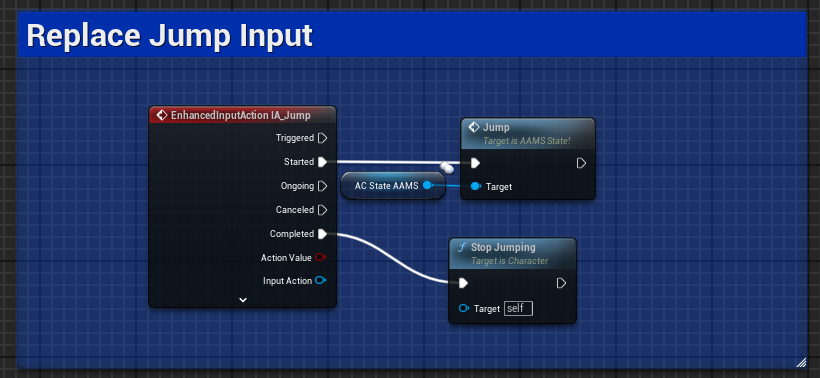
As mentioned above, to utilize the Jump features in AAMS, you’ll need to first add the State Component and the Action Component to your character blueprint. Pull the Jump event from the State Component and connect it to your Jump input action. The jump should work as is, but additional setup may be required depending on the character skeletal mesh used.
Jump Settings: #
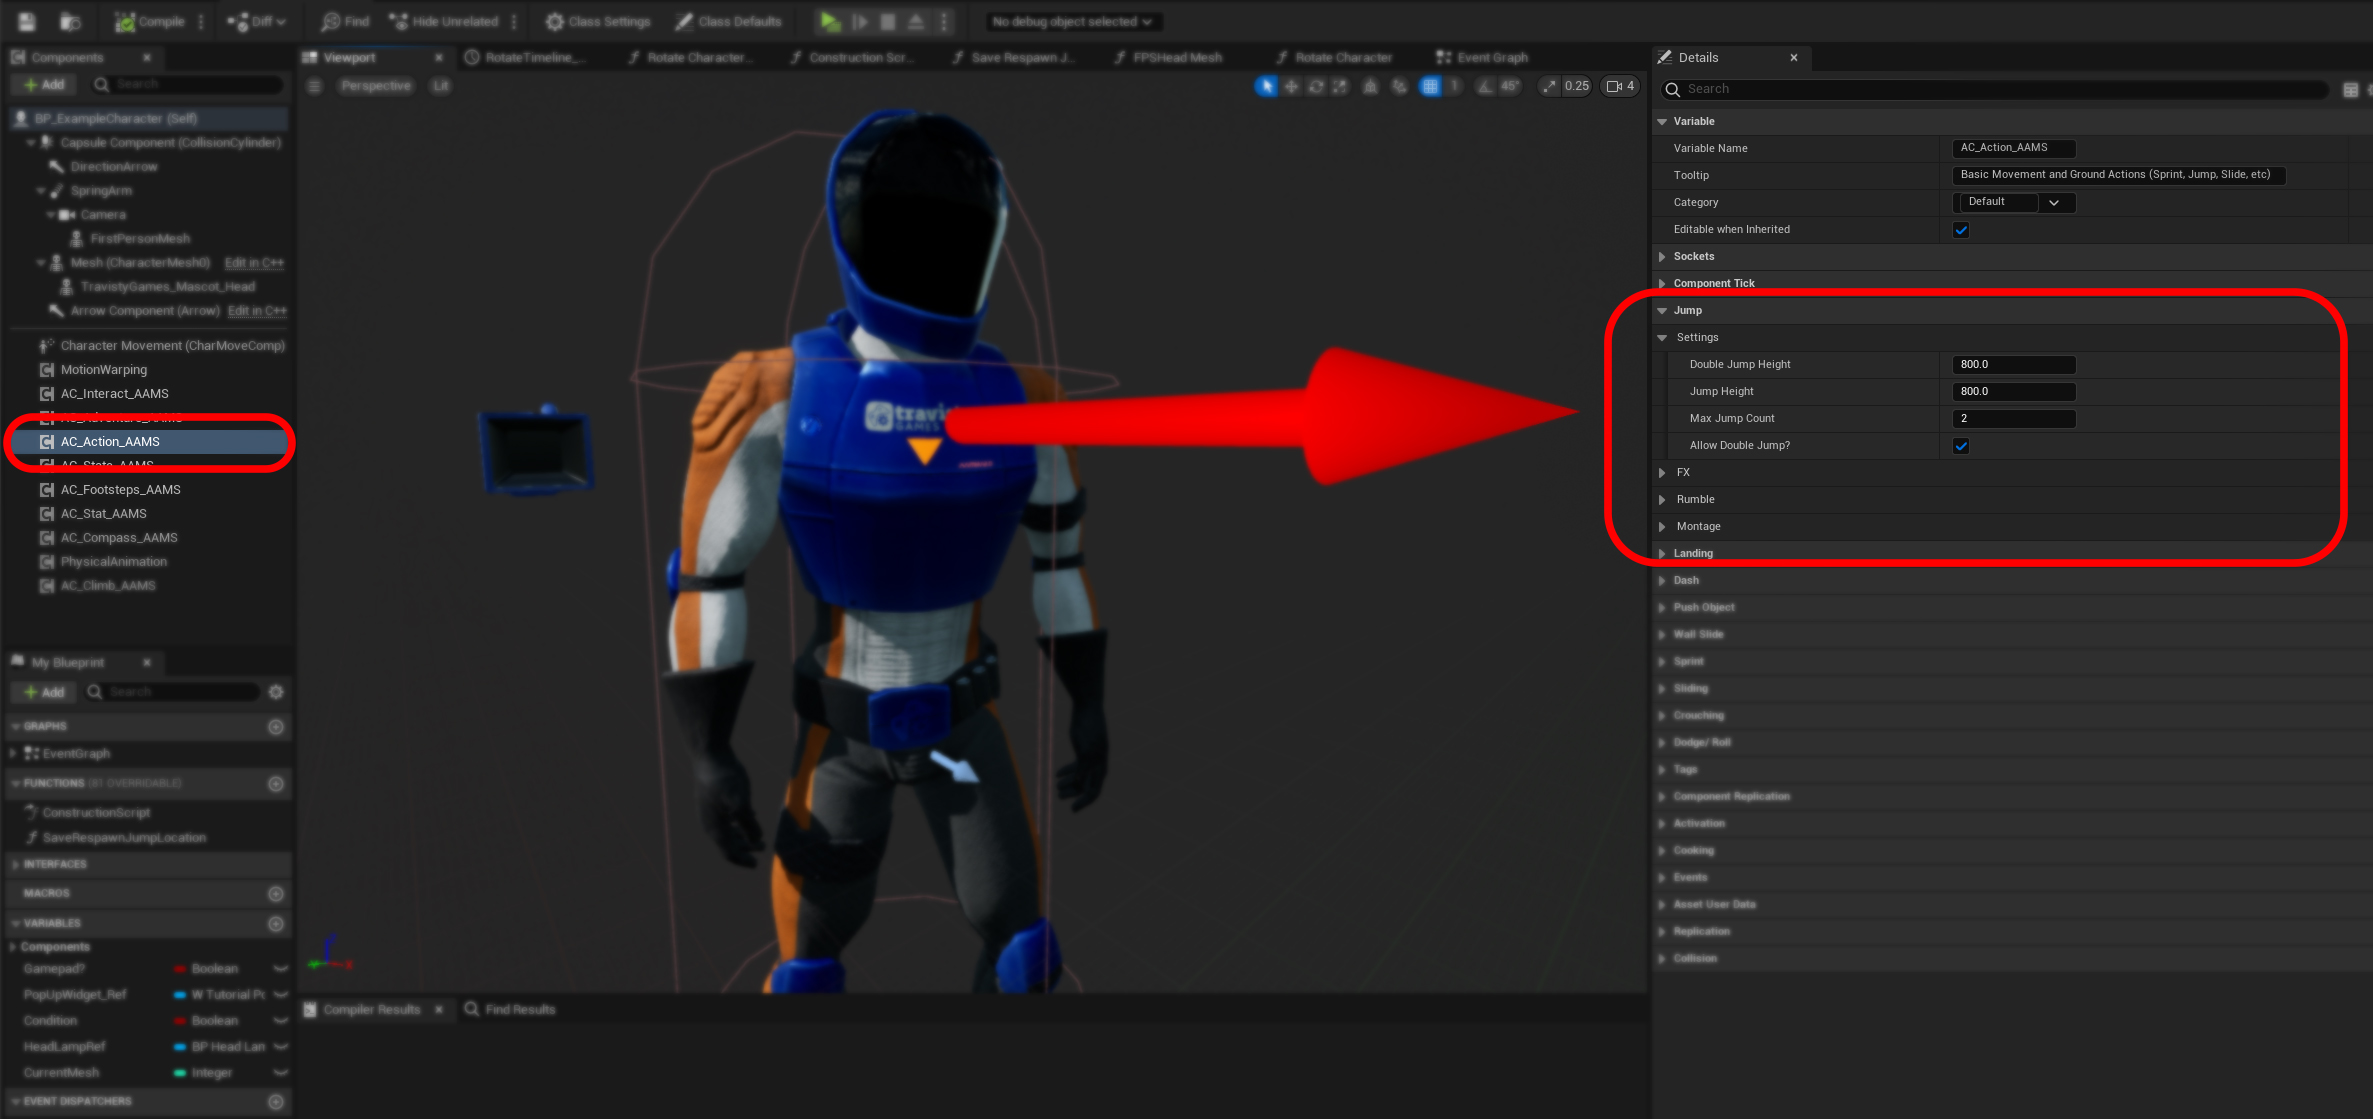
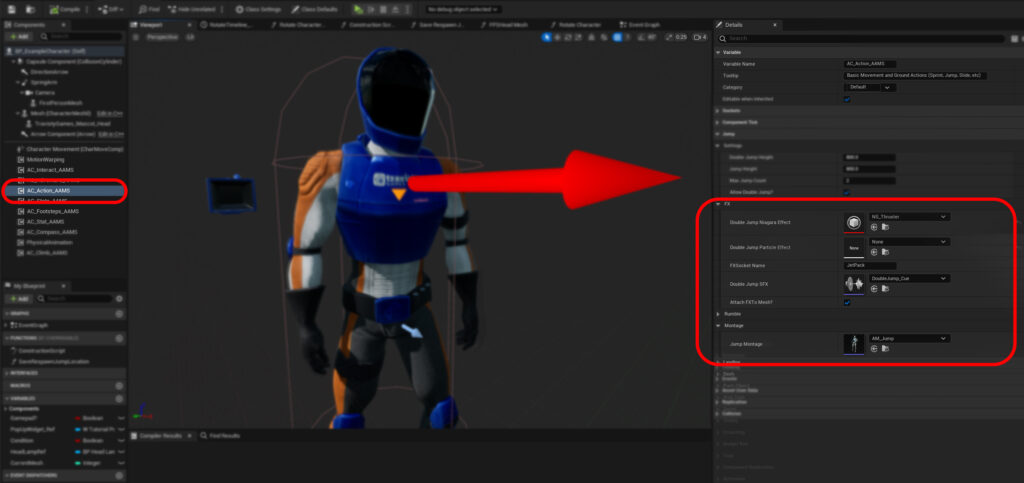
To adjust jump settings, select the AC_Action_AAMS component in your character blueprint, open the Details tab, and scroll down to the Jump dropdown. Under the Settings section, you can modify jump and double jump heights, increase or decrease the max jump count (allowing your character to unlock more jumps), or disable double jumping entirely.
Jump Montage: #
To change the montage that plays when your character jumps, go to the Jump dropdown in the Action Component Details tab of your character blueprint and open the Montage section. Here, you can change the montage or locate the current montage and retarget it if needed.
Jump FX, Camera Shakes, & Controller Rumbles: #
In the same Details tab, you can modify the FX and SFX triggered when double jumping, including the attached socket, camera shake, and controller rumble effects. There are two options for the double jump effects: Niagara and particle effects. If both are selected, only the Niagara effect will play.
Setting Jump Count: #
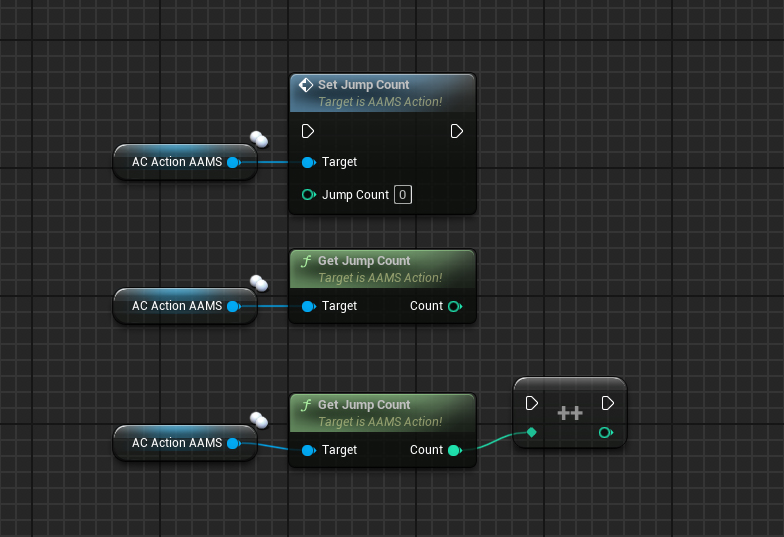
The jump count resets upon landing, but if you need to manually reset the jump count to 0 or add an extra jump, you can pull from the Action Component in your character blueprint and call the Set Jump Count function or the Get Jump Count function.
Hard Landing/Fall Damage #
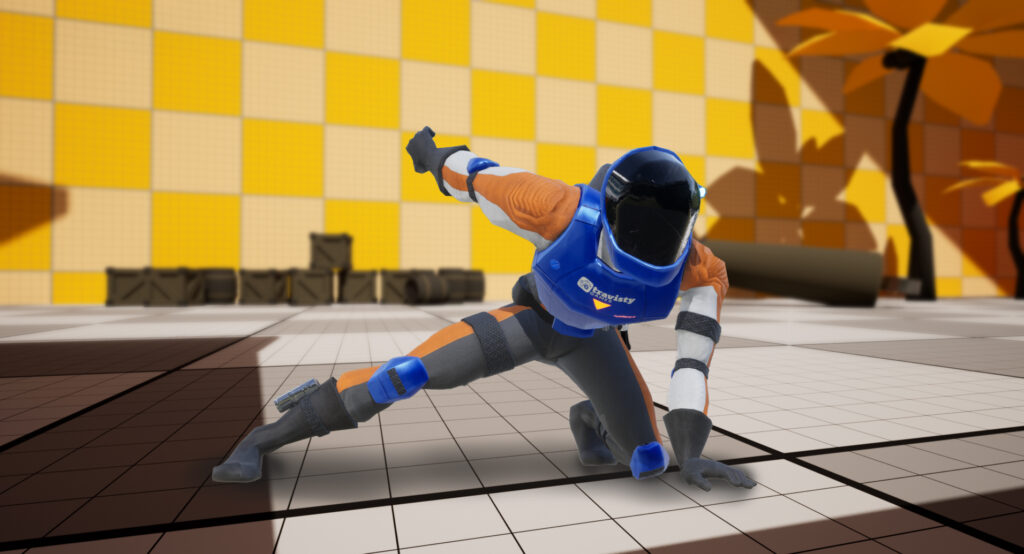
In AAMS, you have the ability to set one of five fall damage or hard landing reactions. The available options are:
- None: Land normally from any height without any special effects.
- Hard Landing: Perform a hard landing montage that prevents the character from moving until recovered.
- Damage: Receive damage based on fall velocity.
- Death: Automatic death upon landing.
- Reset: The character is reset to the last known jump point.
The Fall Damage type can be set using the Fall Damage Type enum in the character blueprint’s Details tab.
Roll Landing #
Roll Landing is a unique type of landing that is not associated with the Fall Damage Type enum. A Roll Landing is triggered when landing after falling with a high forward velocity. A slide stop montage can also complement this action. The Roll Landing montage can be set in the character blueprint’s Details tab.
Hard Fall Settings #
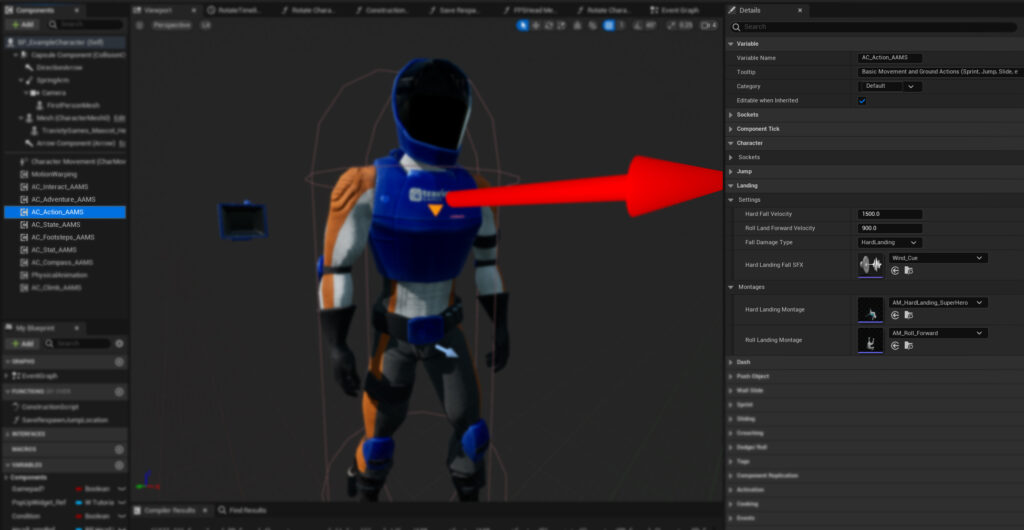
In the Details tab of your character blueprint, you can adjust various settings to achieve your desired results:
- Hard Fall Velocity: The velocity required to trigger a Hard Fall landing.
- Roll Landing Velocity: The forward velocity needed to trigger the forward roll landing.
- Fall Damage Type: The type of fall damage or hard landing reaction to use.
- Hard Landing Fall SFX: The wind sound effect played when fall velocity is reached. Note that this SFX does not play if Free Fall is enabled in the Adventure Component.
- Montages: You can set both the Hard Landing and Roll Landing montages here.
Dash #
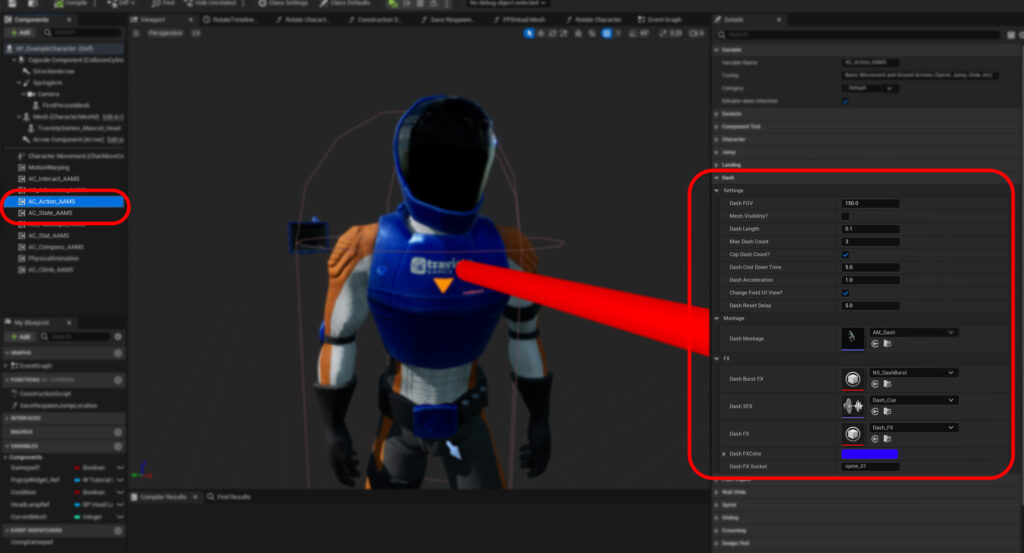
The Dash mechanic allows for a quick burst forward, useful for swiftly reaching a location or escaping from an enemy. Dash settings can be adjusted in the Details tab of the character blueprint. The available settings include:
- Dash Length: The duration of the dash.
- Dash FOV: Adjusts the Field of View for the player camera to create the illusion of increased speed.
- Change Field of View: Toggles the FOV change on and off.
- Mesh Visibility: Sets the visibility of the character mesh and its children during the dash, creating a teleportation effect.
- Cap Dash Count: Limits the number of dashes before the cooldown timer activates.
- Max Dash Count: The maximum number of dashes allowed before the cooldown period starts.
- Dash Reset Delay: The timer that resets the dash count to 0 if the dash is not used within the set time.
- Cooldown Time: The timer that triggers a cooldown widget, preventing dash use until the cooldown is complete.
- Dash Acceleration: Determines how quickly the character accelerates into the dash. The value is multiplied by 10,000,000.0.
Montage #
The Dash montage should be a short animation, approximately the same length as the dash itself.
Dash FX #
Two effects play during a dash: the burst effect and the trail effect. The burst effect occurs at the start location, while the trail effect is attached to the character at the specified socket. The trail effect’s color can also be adjusted. Additionally, a dash burst sound effect plays immediately when the dash is triggered.
Implementing Dash #
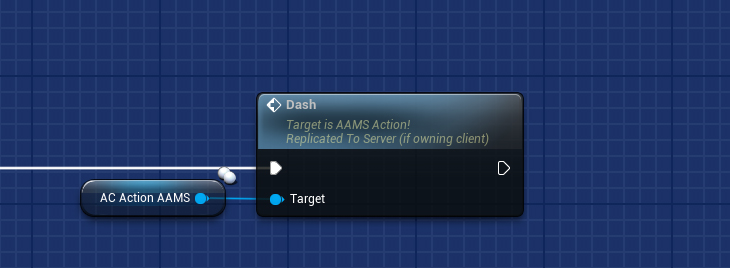
To use the Dash feature in AAMS, add the AC_Action component to your character blueprint. Then, pull off the Dash event from the component and connect it to your dash input action.
Wall Slide and Jump #
Wall sliding enables the ability to attach to a wall, slide down it, or leap off in the opposite direction. This feature is useful for slowing down momentum when falling from a high distance and for reaching locations that would otherwise be inaccessible. Wall sliding and jumping can be found in games like Ninja Gaiden. These features can be disabled in the settings menu if they are unwanted or need to be unlocked.
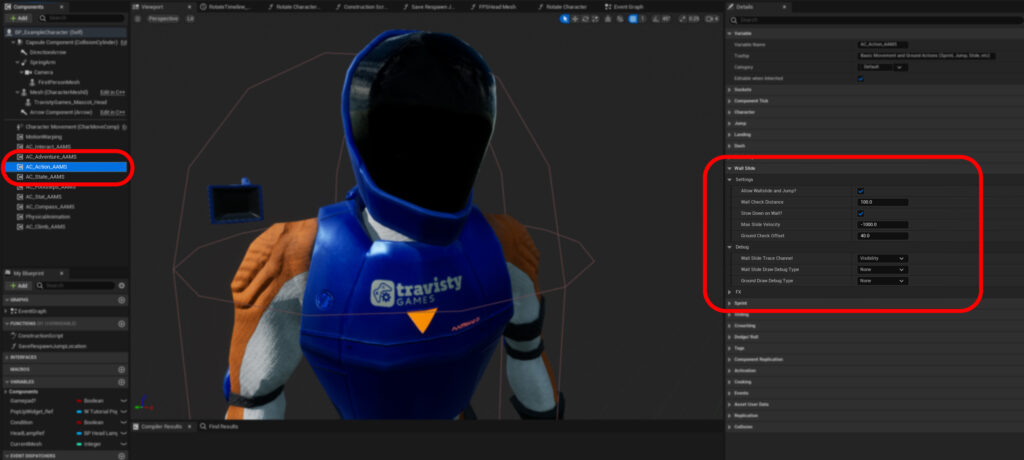
Wall Slide Settings #
- Allow Wall Slide: Toggle wall sliding on or off.
- Wall Distance Check: Trace offset to check for a wall’s presence.
- Ground Check Offset: Distance below the player to check for the ground or blocking obstacles to end the Wall Slide.
- Slow Down on Wall?: Enables the ability to reduce fall speed to a chosen velocity cap.
- Max Slide Velocity: Sets the maximum fall speed when “Slow Down on Wall?” is enabled.
- Debug Settings: Enables trace visibility and sets the trace channel for wall slide checks. If you want only certain walls to be slidable, you can create a Wall Slide Trace Channel and set desired walls to block the Wall Slide channel.
FX #
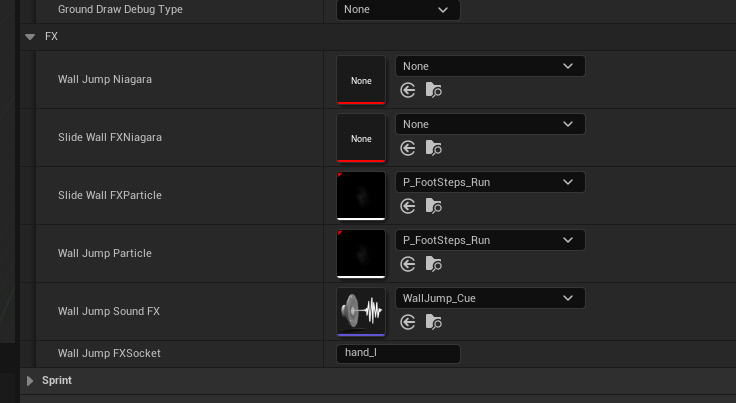
Two different effects are associated with wall sliding and jumping:
- Wall Slide Effect: A looping particle or Niagara effect that activates while actively sliding down the wall.
- Jump Effect: A one-off effect that triggers when jumping off of a wall.
Animations for Wall Sliding #

Wall Sliding employs looped animations within the Animation Blueprint to seamlessly manage character movements while sliding down a wall. The animation setup includes:
- While Sliding: Begins with a brief introductory animation of the character grabbing the wall, which then transitions into a continuous looping wall sliding animation.
- While Jumping: Utilizes the default jumping animation and a falling loop when the character jumps off the wall. This approach ensures smooth transition and movement continuity.
Sprinting #
Sprinting allows the player to quickly escape danger or move rapidly through an area. To implement sprinting in AAMS:
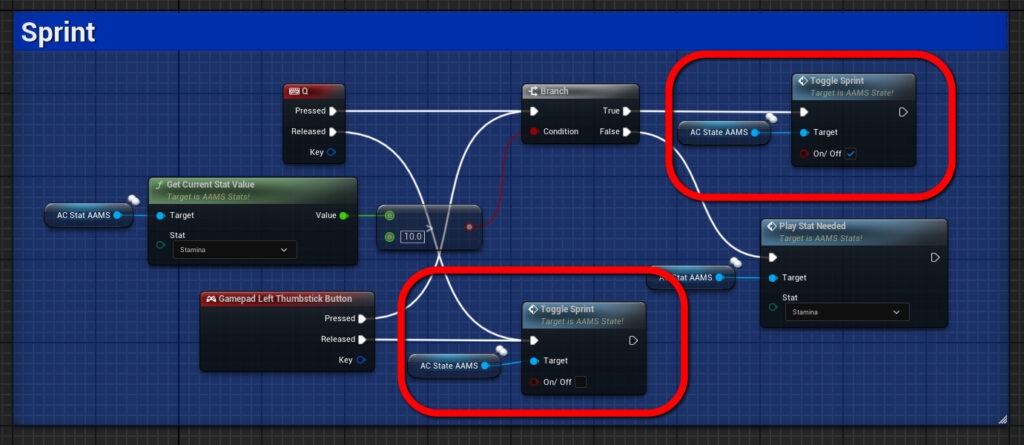
- Setup: Add the AC_Action_AAMS component to your character blueprint.
- Toggle Sprint Function: Pull off the Toggle Sprint function from the component. Set to True to activate sprinting and False to deactivate it. For instance, you could configure sprinting to activate when the sprint key is pressed and stop when it is released.
- Stamina Drain: To simulate stamina drain while sprinting, utilize the On Sprint event. This can be configured to decrement the stamina value as sprinting continues.
For additional details on handling component events, refer to the Event Dispatcher section of the documentation.
Sprint Settings #
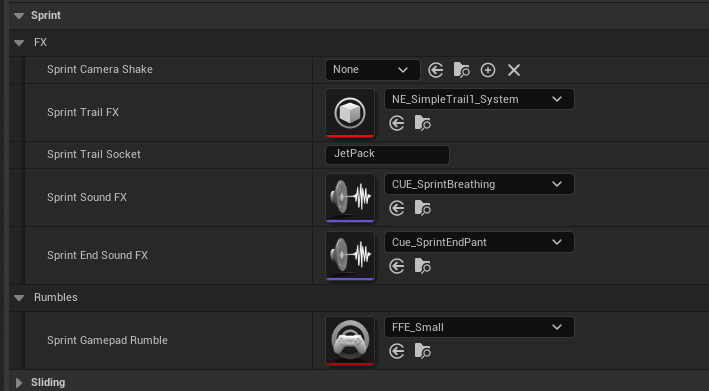
- Effects: Sprint effects and sound effects are looped and will continue until Sprint is toggled off. You can customize these visual and sound effects, as well as the attached bone socket, in your character’s Details tab.
- Sprint Speed: To adjust the Sprint speed, navigate to the Movement Speeds section of the State Component.
Crouching #
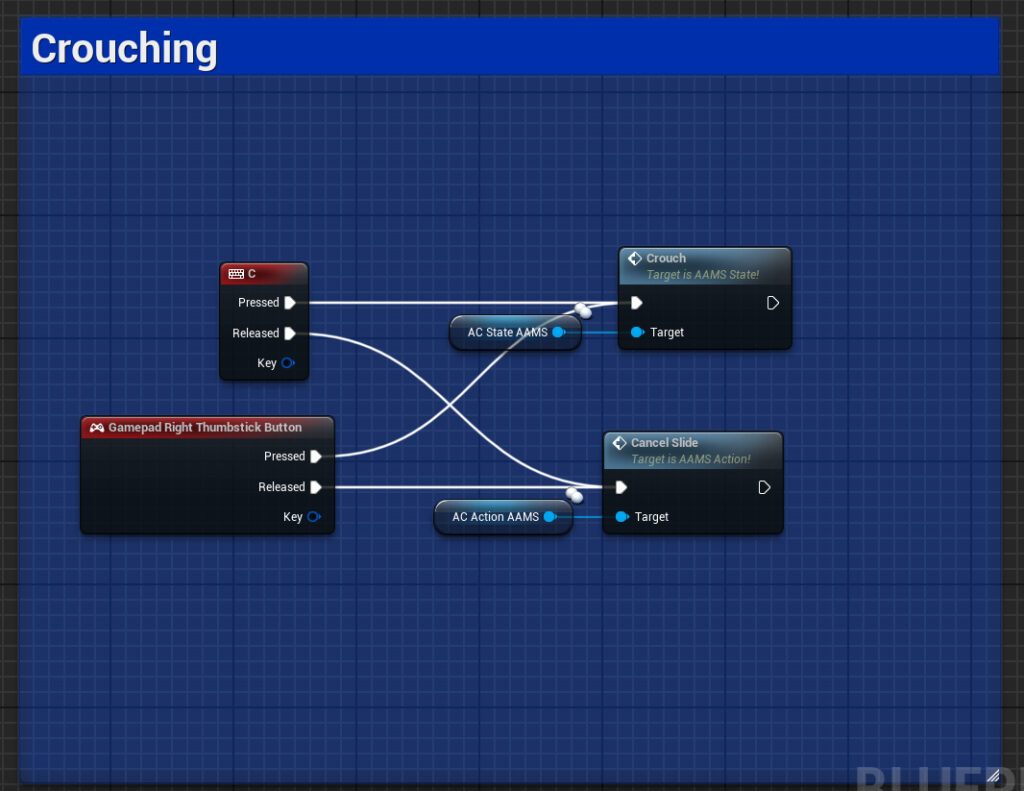
Crouching is a fundamental mechanic in any action-adventure game, allowing players to sneak around or navigate under low obstacles. By integrating the crouching mechanics from the Action Component with the Footsteps Component, your character can be stealth-ready in just a few minutes.
Crouch Settings #
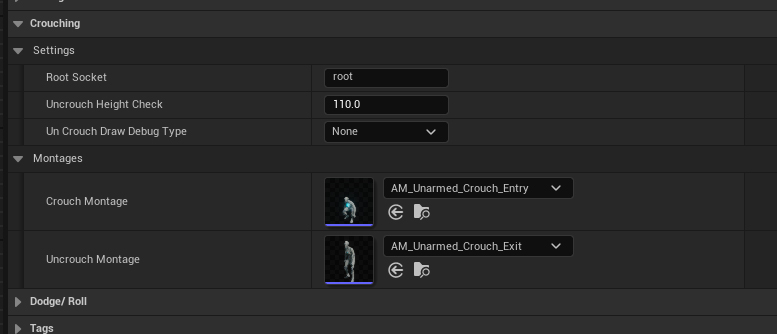
- Crouch Max Walk Speed: To set the crouch speed, visit the Movement Speed section of the State Component.
- Uncrouch: Before your character can stand up from a crouch, a trace is run to ensure nothing is blocking the way. In the settings, you can adjust your character’s root bone socket name and height. Use the Debug Type enum to test and ensure the height offset is correctly set.
- Animations: The transition into and out of a crouch uses montages for smooth animation. Crouched movement is handled with a 360° Blendspace and turn-in-place animations, particularly if utilizing Controller Rotation Yaw.
Smooth Crouch Transition #
To create a smooth transition from standing to crouching and vice versa, a timeline is utilized during the crouch montages. This timeline adjusts the capsule height and mesh location based on the ‘Crouched Half Height’ setting found in the Character Movement details tab.
Sliding #
Sliding in AAMS v2.0 is activated using the same controls as crouching but requires the character to be sprinting to initiate. The sliding mechanic employs physics-based principles to maintain momentum. Once sliding has begun, the character needs to be moving at a sprinting velocity or faster to continue sliding; otherwise, the slide will halt, and the player will either stand up or remain crouched if an overhead obstacle is present.
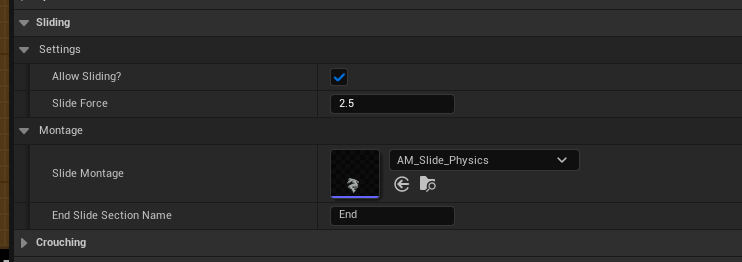
Sliding Settings #
- Allow Sliding: Toggle sliding on and off.
- Slide Force: The force applied to propel the character while sliding. The value is multiplied by 100,000.0.
Slide Animation #
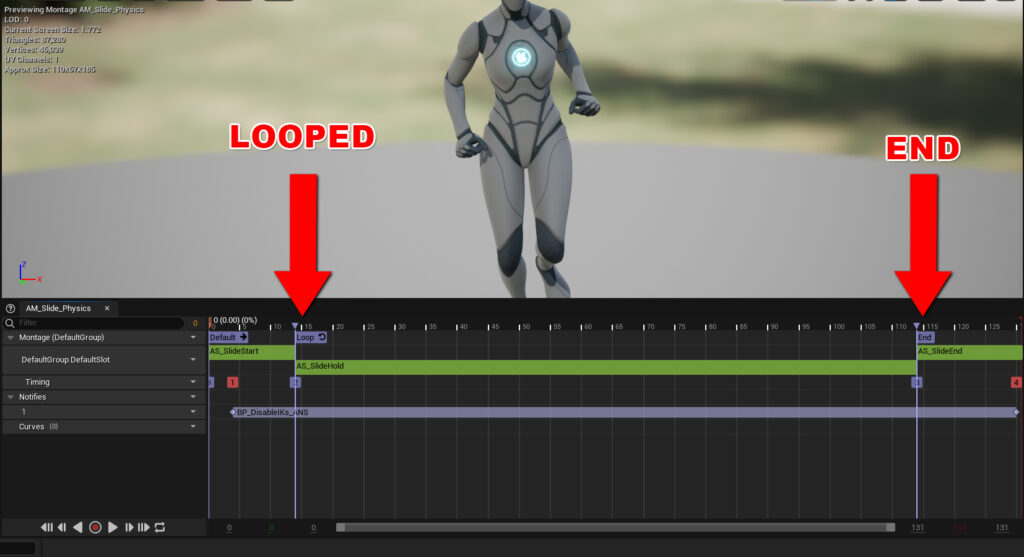
The slide animation in AAMS utilizes a physics-based montage with a looping section for active sliding. When sliding concludes, the montage transitions to an ‘End’ section to smoothly cap off the sliding motion.
Cancelling Slide #
In AAMS v2.0, sliding continues as long as the character maintains sufficient speed or is on a sloped surface. To prolong the slide, hold the crouch button; the slide duration extends for as long as the button is pressed. To cancel the slide before it naturally stops, you can trigger the Cancel Slide event.
In the provided Example Character setup, this event is linked to the release of the Crouch/Slide input. Therefore, releasing the button will immediately cancel the slide, allowing for responsive and dynamic control over the character’s movement.

Dodging/Rolling #
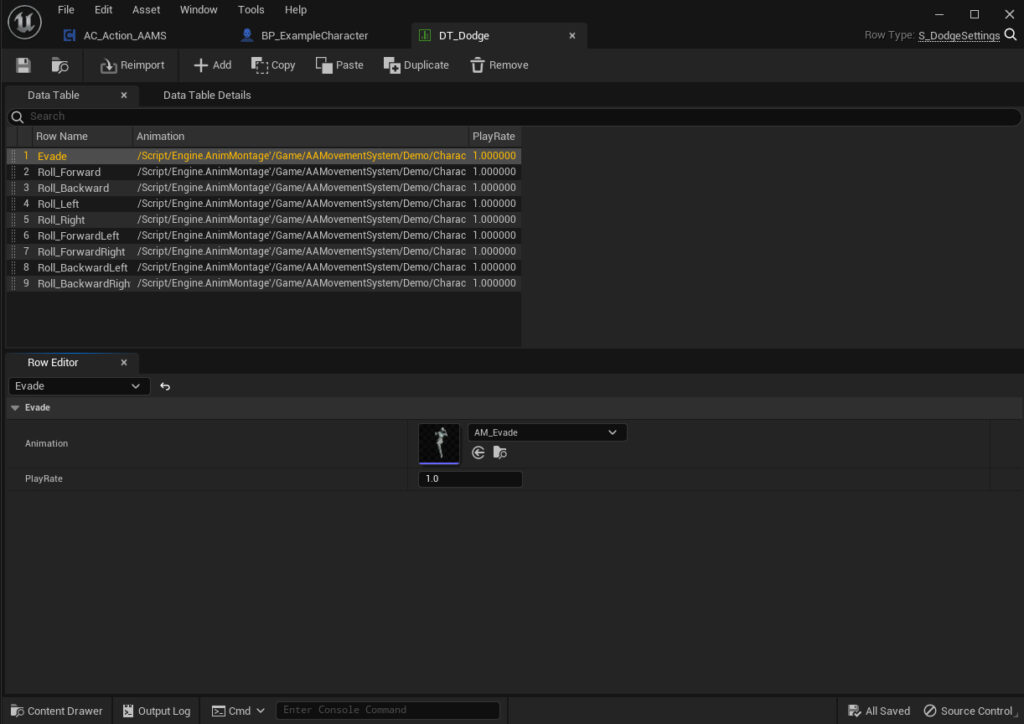
AAMS v2.0 introduces versatile dodging capabilities, featuring 8-way rolling animations if using Controller Rotation Yaw. If not using this setting, a forward roll is triggered that rotates the player toward the input direction. The 8-way rolling determines the appropriate animation based on the direction input by the player, using settings from the DT_Dodge DataTable. To configure the roll animations, access the DT_Dodge data table located in the Data Tables folder.
Evading #
When the player presses the Dodge button while in the air, an evade animation is triggered. Currently, evade is similar to a reverse dash, but any animation specified in the DT_Dodge DataTable can be used as a substitute.
Implementing Dodge/Evade #
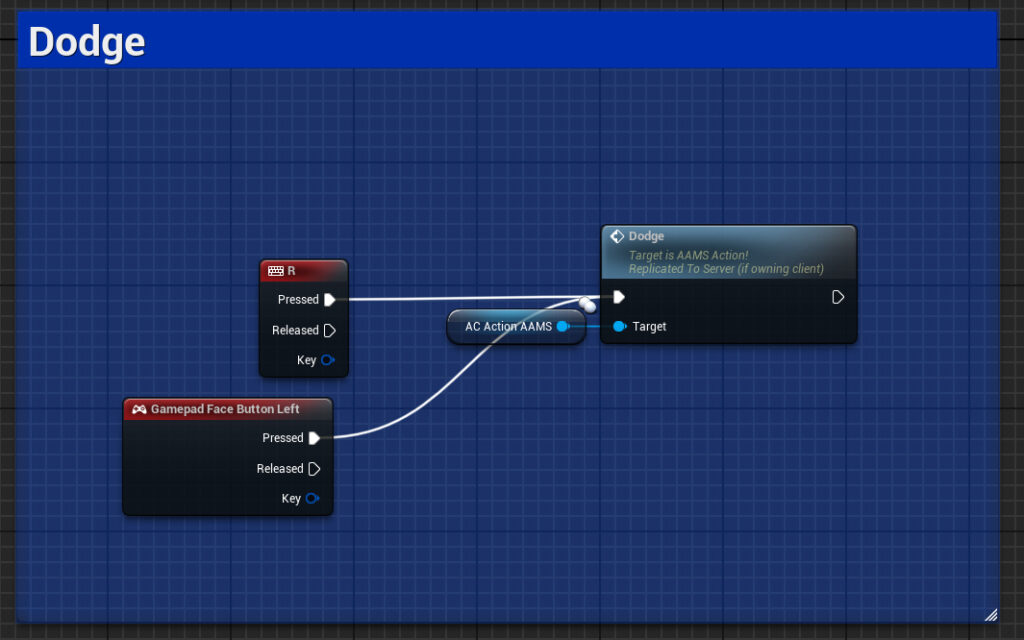
To incorporate the Dodge/Evade feature into your character blueprint:
- Add the AC Action AAMS component to your blueprint.
- Connect the Dodge event from this component to your desired dodge input action.
Customizing Dodge Animations #

To tailor the Dodge Data Table for different roll or evade animations per character:
- Open the Dodge/Roll section in the Action Component Details tab.
- Replace the Dodge Data Table slot with your preferred data table to change animations.
Push Objects #
The Push Object mechanic is a significant feature of the Action Component in AAMS v2.0, which includes examples like a dumpster and a boulder. The mechanics of pushing are distributed between the Action Component and the Push Object itself.
Configuration #
Most settings for the Push Object are configured within the object actor to allow for effects and speeds based on push object features such as weight and material. These settings include:
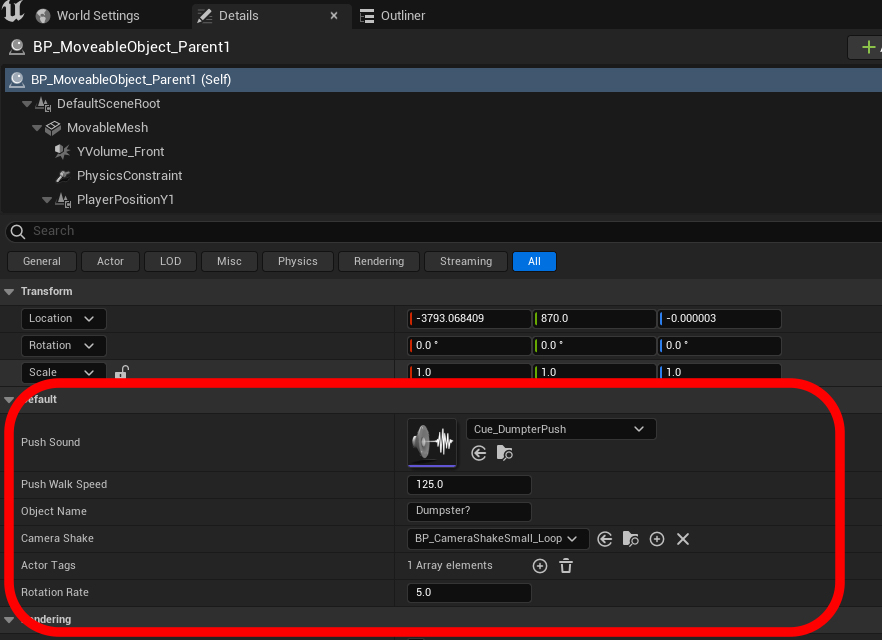
- Walk Speed While Pushing: Determines how fast the character moves when pushing the object, heavier objects would require a slower push speed.
- Sound Effects: Customizes audio feedback based on the object’s weight and material characteristics.
- Camera Shake: Adds a realistic camera shake effect to simulate the effort of pushing heavy objects.
- Rotation Rate: Adjusts how quickly the object rotates when being pushed, reflecting the object’s weight and size.
Each Push Object can have its own unique sounds and speeds, enhancing the realism and variability of the mechanic.
Action Component Setting #

- Invert Push Rotation: This setting allows you to control the rotation direction of the object. When not inverted, pressing left (A) will rotate the object left but make the character walk right as he maneuvers around the object. When inverted, the character walks left when left is pushed. This setting is accessible in the character blueprint details tab.
For more detailed information on Push Objects and their comprehensive settings, refer to the AAMS Actor section of the documentation.
Interacting with a Push Object #
The Push Object in AAMS v2.0 utilizes the comprehensive interaction system provided with the framework. This system allows characters to engage dynamically with objects based on pre-defined mechanics, including pushing.
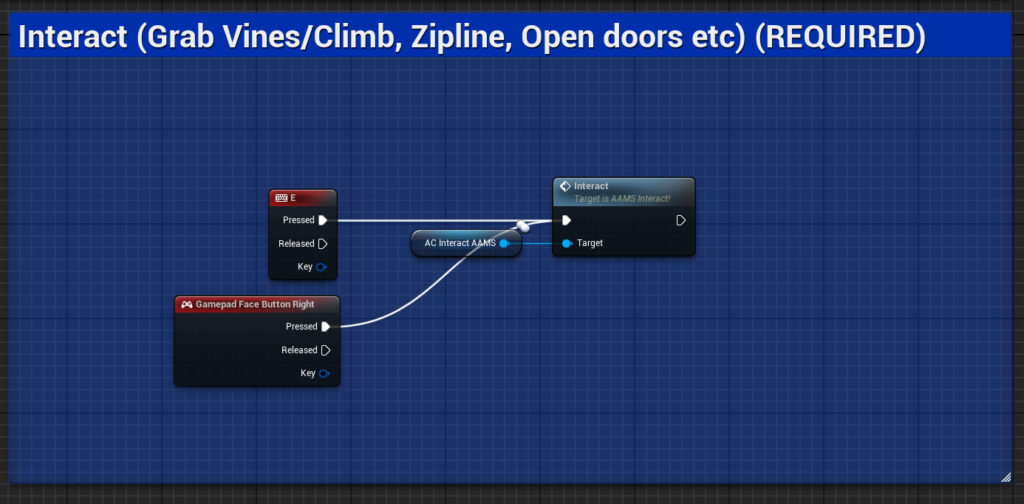
To fully understand how the interaction system facilitates these mechanics and to explore additional functionalities, please refer to the Interaction Component section of the documentation.
