Introduction to AAMS Actors #
AAMS Actors are specialized elements within the Action-Adventure Movement System (AAMS) that are integral to facilitating various movement states and interactive scenarios in the game. These actors play a pivotal role in defining the dynamics of movement and interaction, enhancing the realism and complexity of gameplay.
Types of AAMS Actors: AAMS Actors encompass a diverse range of objects that contribute to the game’s navigational and interactive features:
- Beams: Used for balance and traversal challenges.
- Grappling Guns: Enable players to reach distant points quickly.
- Ladders: Facilitate vertical movement.
- Narrow Passages: Allow for tight-space navigation and can be used for stealth or transitional sequences.
- Parachutes: Aid in safe descents from heights.
- Push Objects: Interactable objects that can be moved to solve puzzles or block paths.
- Ropes: Offer swinging or climbing mechanics to navigate between points.
- Slopes: Provide sliding sequences that can vary in speed and control.
- Vine Walls and Runnable Walls: Enhance vertical and horizontal movement options.
- Water: Adds swimming mechanics and challenges.
- Ziplines: Provide fast traversal across or between areas.
For interaction-specific actors such as Doors and Buttons, refer to the Interaction Actors Section of the documentation, where each actor’s functionalities and settings are discussed in detail.
Beams #
Introduction to BP_BalanceBeamSpline #

The Beam actor has undergone significant updates in version 2.0 to enhance the Beam Walk feature. This new version, BP_BalanceBeamSpline_NEW, uses strategically placed collision meshes along the length of the spline—both above and below the spline mesh—to interact dynamically with the player. As the player enters these collision volumes, crucial information such as the player’s location, the specific spline to be used, and whether the player is within the beam’s collision or hanging volume, is relayed to the Adventure Component.
This data is essential for the Adventure Component to accurately determine the player’s positioning on the beam and to adjust the gameplay mechanics based on the width and positioning of the beam mesh.
Beam Setup #
Creating a Custom Beam:
- Inheritance: Start by making a child of the BP_BalanceBeamSpline_NEW in your project.
- Configuration:
- Static Mesh: Select the appropriate static mesh for your beam.
- Material and Length: Assign a beam material and determine the length of the mesh from the static mesh’s asset details.
- Orientation: Set the ‘In Forward Axis’ to ensure the mesh faces the correct direction.
- Scaling: Adjust the scale settings to define the width and height of the beam along the spline.
- Placement and Adjustment:
- Level Integration: Place your beam actor within the game level.
- Spline Modification: Utilize spline points to define the beam’s path through the environment. To extend the spline, hold ‘Alt’ and drag the last spline point to create additional points.
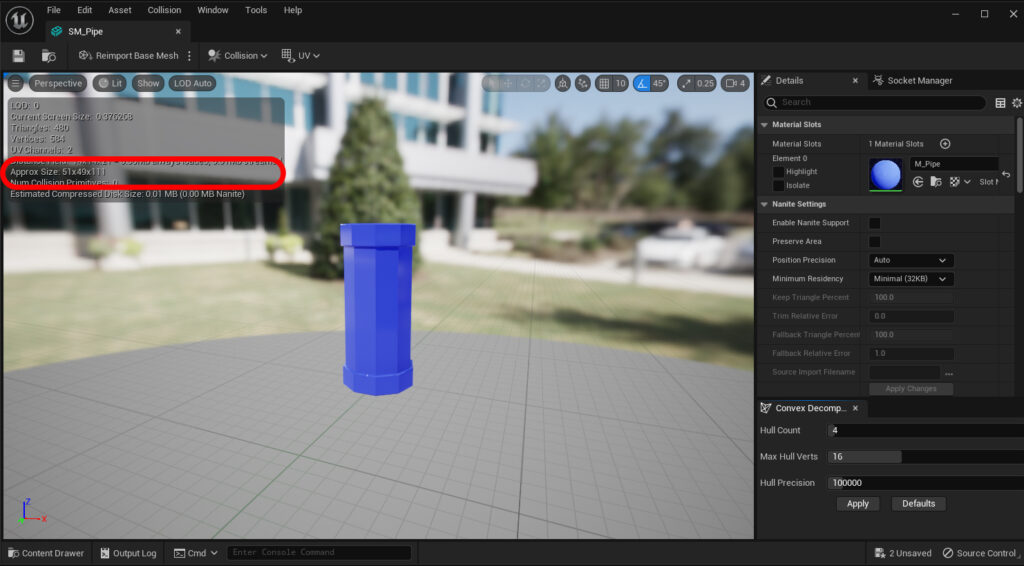
By following these steps, you can effectively implement and customize the BP_BalanceBeamSpline_NEW to fit the navigation and aesthetic requirements of your game environment, enhancing player interaction and the visual dynamics of level design.
Grappling Hook #
Introduction to Grappling Hook Actors #
The grappling hook feature in AAMS v2.0 relies on two critical actors: the BP_GrapplingGun and the BP_GrapplingHookLocation. These components work together to enable dynamic and visually engaging grappling mechanics that enhance player mobility and interaction within the game.

BP_GrapplingGun #
Overview: The BP_GrapplingGun serves primarily as the visual component of the grappling system, featuring the grappling gun, hook, and cable that visually represent the grappling action. While the system has been significantly overhauled in AAMS v2.0, the setup for the Grappling Gun remains consistent with previous versions, maintaining familiarity while introducing a slight visual upgrade.
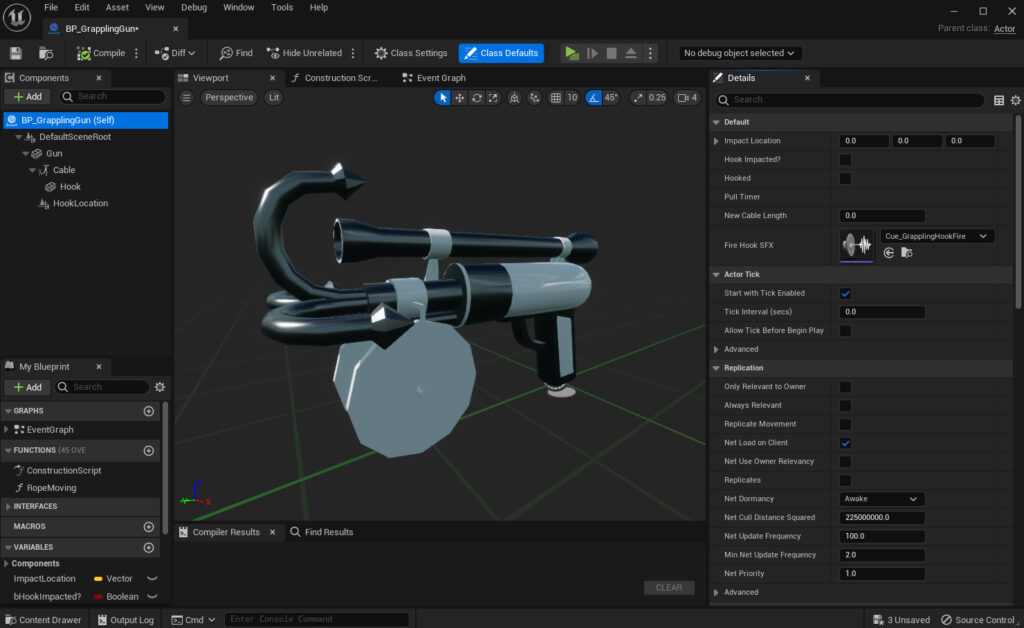
Creating Your Own Gun:
- Customization: Create a child of the
BP_GrapplingGunand customize it by setting your preferred meshes for the gun and hook. - Aesthetics: Adjust the materials for the gun, hook, and cable to match your game’s style.
- Effects: Configure sound and visual effects such as the gun firing sound, rope break sound, and gunfire effect to enhance the immersive experience.
BP_GrapplingHookLocation #
Overview: The BP_GrapplingHookLocation is a new addition in AAMS v2.0, designed to streamline the grappling process from a multi-step aim and fire sequence to a more fluid and automatic ‘Fire and Auto Pull’ system. This change accelerates the grappling action, making it more thrilling and keeping pace with the dynamic nature of AAMS.
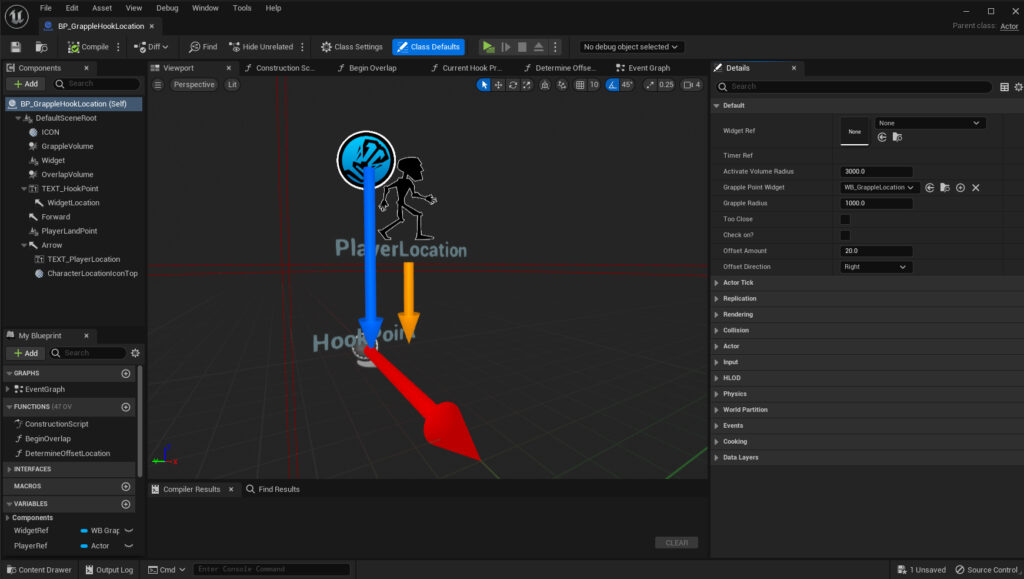
Setup:
- Collision Volumes: This actor includes two sphere collisions:
- OverlapVolume: Initiates the grappling widget and starts a distance timer to determine hook-ability.
- GrappleVolume: Signals the Adventure Component when the player is within grappling range and updates the widget to show grappling availability.
- Player Landing Point Configuration:
- Adjustable Landing: Set the desired landing point for the player, which can differ from the hook point to allow strategic placements like hooking to a rooftop but landing on a ledge below.
- Offset Settings: Use
Offset DirectionandOffset Amountto fine-tune the landing point. - Visual Guides: Includes a character icon and colored arrows in the editor to help visualize the player’s landing and hook points (these do not appear in the actual game).
These components together form a comprehensive grappling system that enhances player interaction with the game environment, allowing for rapid movement and engaging gameplay mechanics.
Ladders #
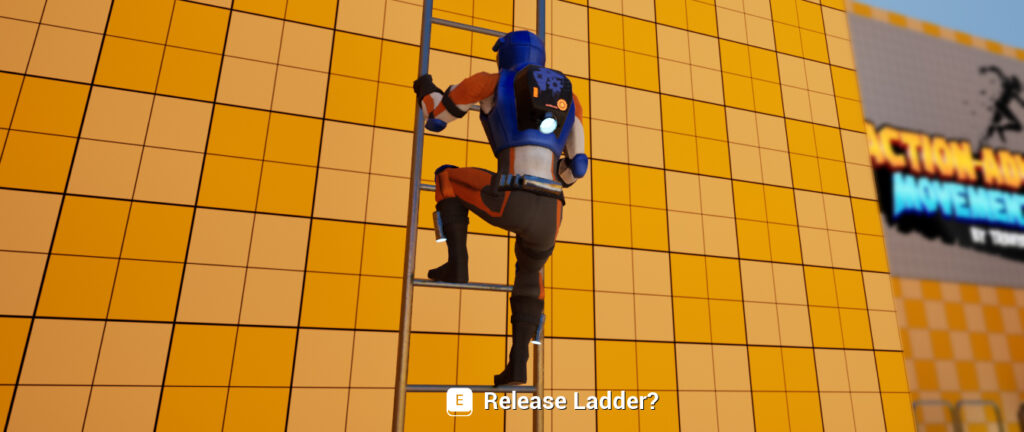
Introduction to the BP_Ladder #
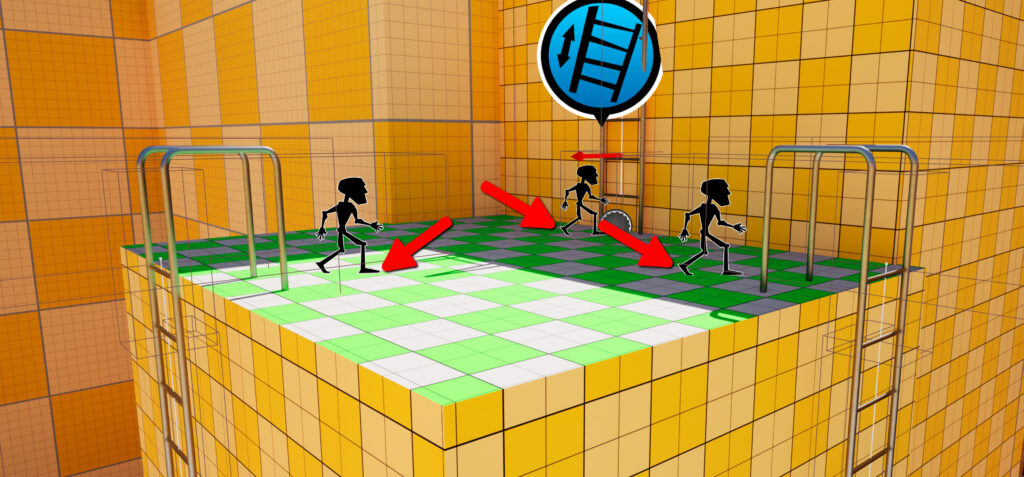
The ladder system in AAMS, while retaining much of its core functionality from earlier versions, has received several updates aimed at enhancing usability and realism. Notably, the integration of new animations and the introduction of character location icons significantly streamline the process of aligning ladders with ground levels in game environments.
Key Updates: #
- Character Location Icons: These visual aids are crucial for ensuring that the ladder is positioned correctly relative to the ground. By aligning the icons’ feet with the surface, developers can guarantee that the player’s animations will synchronize perfectly with the ladder during gameplay.
Setting Up a Ladder #
Basic Ladder Placement:
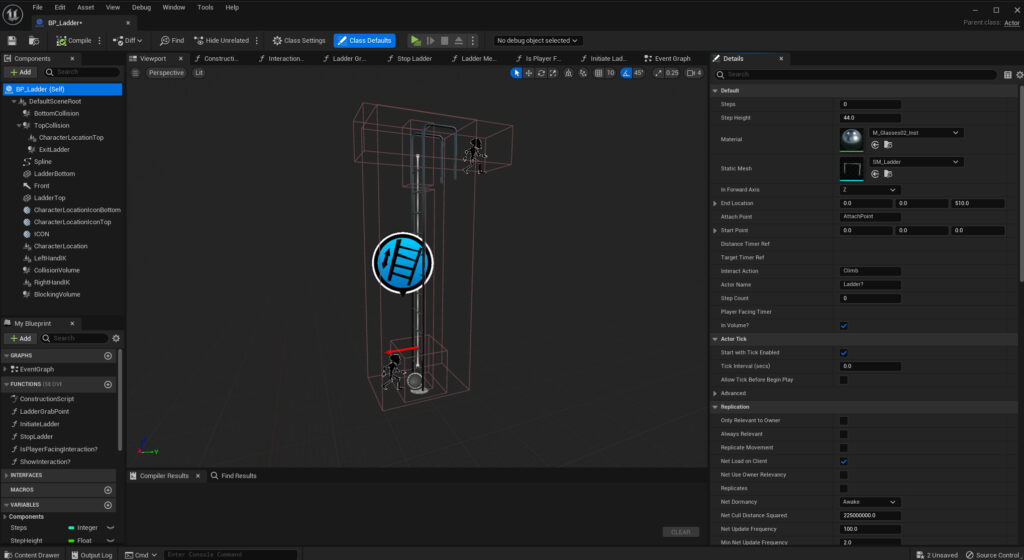
- Add the Ladder: Place the
BP_Ladderactor into your level. - Adjust Position and Orientation: Move the ladder to the desired location and set its rotation appropriately.
- Configure Height: Use the End Location 3D Widget to adjust the ladder’s height. Ensure the character location icons’ feet are level with the surface to ensure correct animation alignment.
Creating a Custom Ladder #
Steps to Customize:
- Create a Child Actor: Begin by creating a child of the
BP_Ladderactor. - Customize Mesh and Steps:
- Set your preferred ladder mesh as the step mesh.
- Adjust the Step Height to match the height of your chosen mesh.
- Apply the desired material to your ladder.
- Align IK Points: Carefully align the left and right hand Inverse Kinematics (IK) points to the poles of your ladder mesh to ensure hands grasp correctly during animations.
- Animation Testing: Conduct thorough testing to ensure that ladder animations are well-aligned with the physical structure of the ladder. Adjust the Character Location scenes as needed to perfect the animation sync.
Additional Considerations #
- Footstep Sounds: If your ladder is also used for producing footstep sounds, ensure that the ladder’s material is linked to a corresponding physical material that accurately reflects the sound of footsteps on the ladder.
By following these guidelines, you can effectively integrate and customize ladders within your AAMS environment, enhancing both the visual fidelity and the functional dynamics of game levels.
Narrow Passages #
Introduction to Narrow Passages #
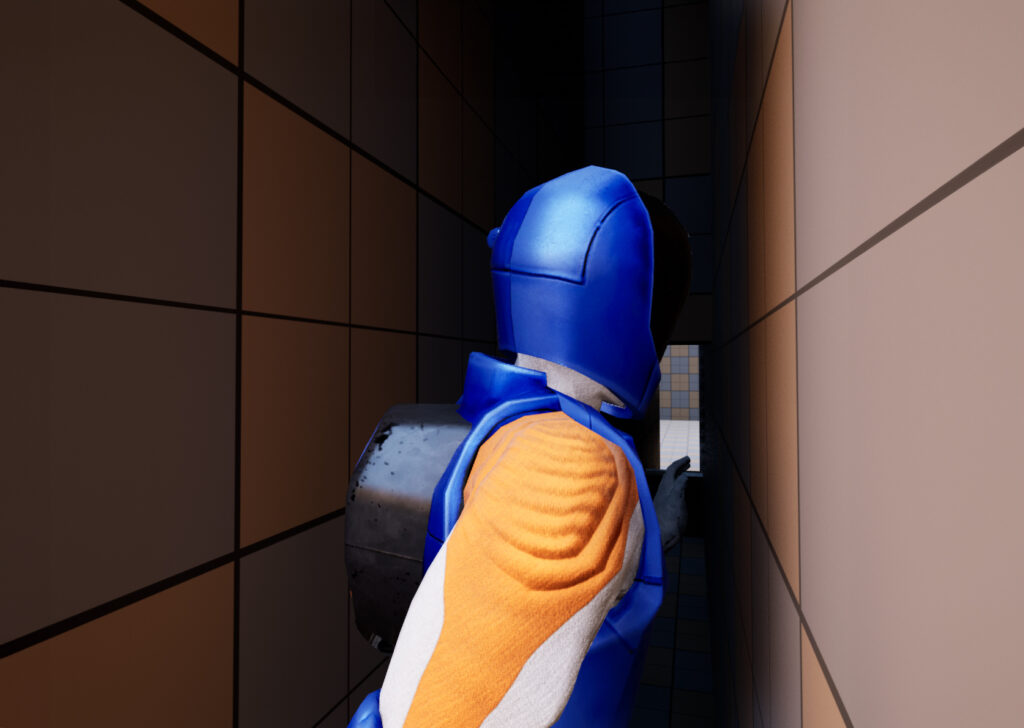
Narrow passages serve as an ingenious gameplay element, effectively breaking up levels and facilitating dynamic area loading and unloading without interrupting the player experience or resorting to load screens. By slowing down the player and restricting their line of sight, these passages cleverly mask the transitions between different sections of the game environment, maintaining immersion and continuous gameplay flow.
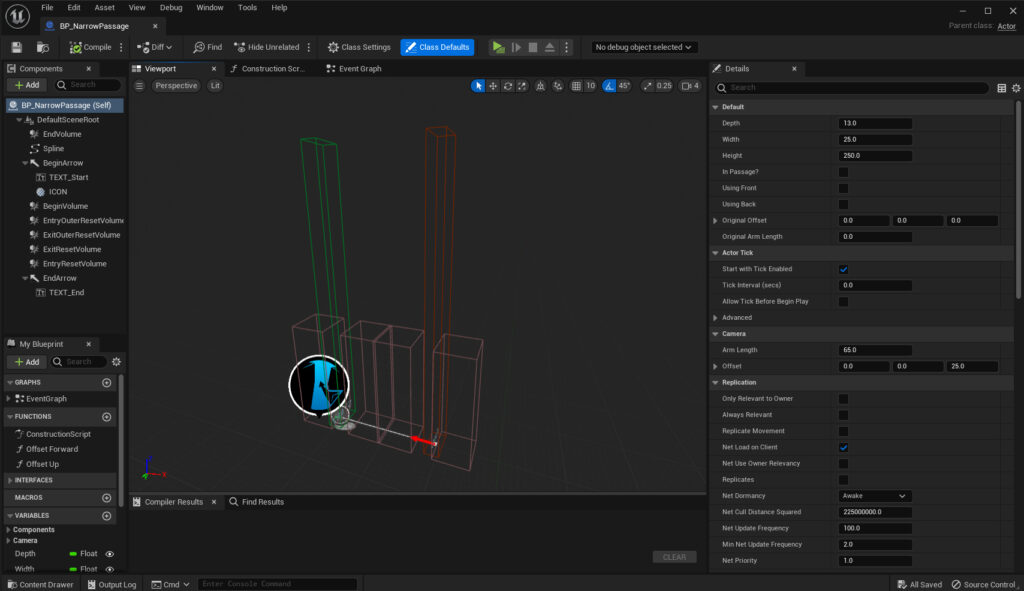
The BP_NarrowPassage actor, introduced in AAMS v2.0, utilizes a spline to guide the player’s character through the passage, smoothly rotating them to align with the curving path. The actor’s setup ensures that entry and exit points are meticulously aligned with the game environment, enhancing the realism and functionality of the transition areas.
Setting Up the BP_NarrowPassage #
Steps to Integrate a Narrow Passage into Your Level:
- Design the Passage:
- Begin by designing your passage using appropriate meshes within your level to create the desired path and architectural features.
- Place the Actor:
- Add the
BP_NarrowPassageactor to your level. Align the ‘Start’ marker at the opening of your passage.
- Add the
- Adjust the Spline:
- Select the end spline point and adjust it to the end of your passage. Ensure the spline curves appropriately to match the path you’ve laid out.
- Configure Passage Dimensions:
- In the actor’s details tab, set parameters such as depth, width, and height to ensure the passage dimensions accurately fit your designed space.
- Visual Guides:
- The entrance and exit points are clearly labeled and color-coded in the development environment to aid in setup. Although these labels are purely for developer reference and do not appear in the game, they are invaluable during the design phase for ensuring the passage functions correctly in both directions.
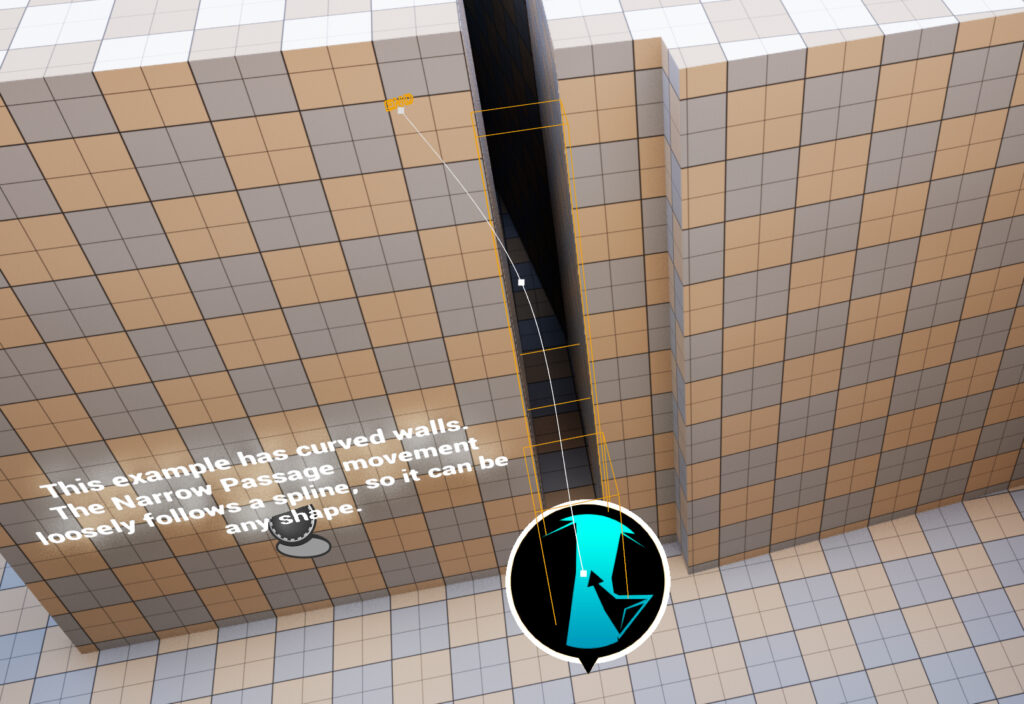
By incorporating these steps, the BP_NarrowPassage actor can be seamlessly integrated into any level, providing a strategic and visually unobtrusive method for managing game transitions and area loads. This setup not only enhances the player’s immersion but also leverages the environment to maintain a continuous narrative flow within the game.
Parachute #
Introduction to Parachute Actors #
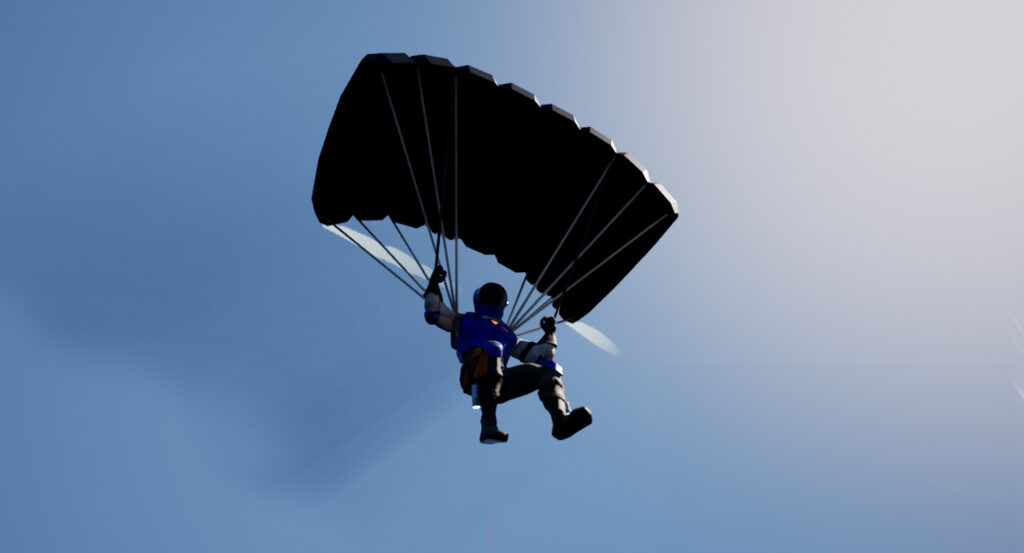
In AAMS, two specialized actors enhance the parachuting and gliding mechanics: the BP_Parachute and the BP_ParachuteLift. These actors contribute uniquely to the realism and dynamics of aerial navigation within the game.
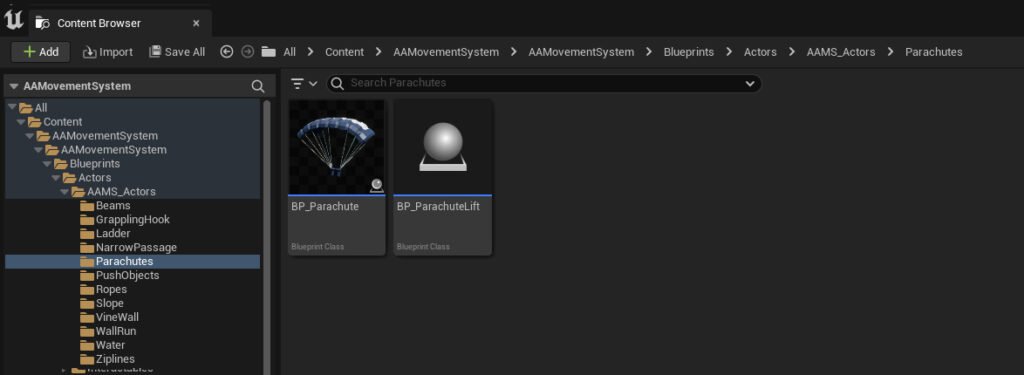
BP_Parachute #
Functionality: The BP_Parachute actor is designed to visually represent a parachute or glider. It does not directly control parachuting or gliding mechanics but adds depth through realistic visual and sound effects that activate during the parachute state.
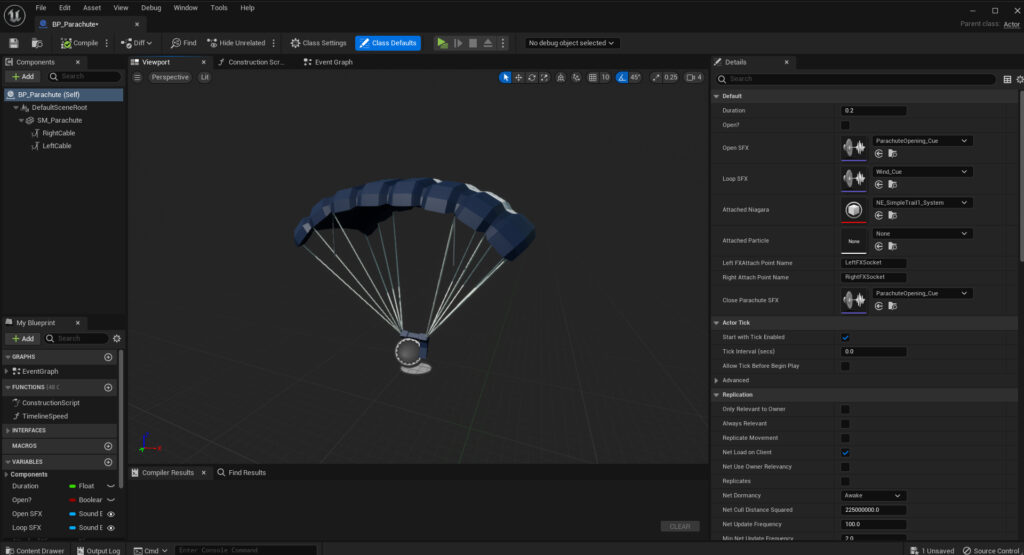
Creating a Custom Parachute:
- Create a Child Actor: Start by creating a child of the BP_Parachute.
- Customize Visuals: Change the parachute mesh to your preferred design.
- Configure Sound Effects: Set up audio for the parachute opening and a looping sound effect for the duration of the glide.
- Visual Effects: Assign a Niagara particle system for dynamic visual effects.
- Attachment Points: If your character’s model has predefined sockets, specify these in the ‘Attach Point Name’ variables. If not, add sockets to the character’s mesh where the parachute should connect.
- Finalize Settings: Choose the close sound effect and designate the parachute actor as your character’s parachute.
BP_ParachuteLift #
Functionality: The BP_ParachuteLift actor simulates upward air currents that interact with the player’s parachute, mimicking the effect of wind or fans to elevate the player, enhancing the gliding experience.
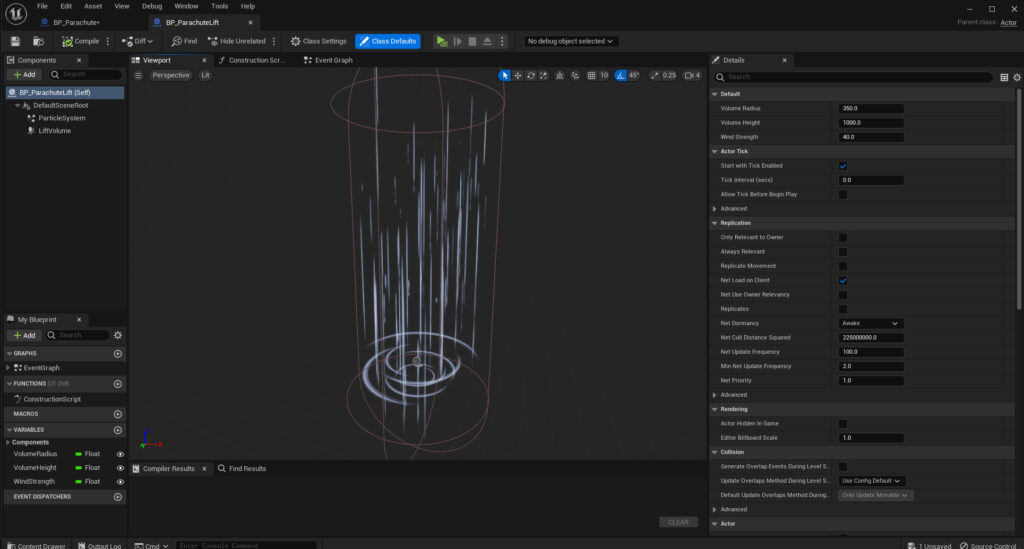
Setting Up a Parachute Lift:
- Placement: Insert the BP_ParachuteLift actor into your level at the required location.
- Adjust Dimensions: In the details panel, modify the volume radius and height to encompass your lift element (e.g., beneath a fan).
- Wind Strength: Set the strength parameter to control the intensity of the lift, affecting how high or quickly the player is elevated when entering the lift volume.
Integration Tips #
- Effect Coordination: Ensure the visual and sound effects are synchronized with your game’s aesthetic and environmental settings.
- Testing: Rigorously test both the parachute deployment and lift interactions to ensure smooth gameplay and realistic responses to player actions.
Moveable Objects (Formerly Push Objects) #
Introduction to Moveable Object Actors #
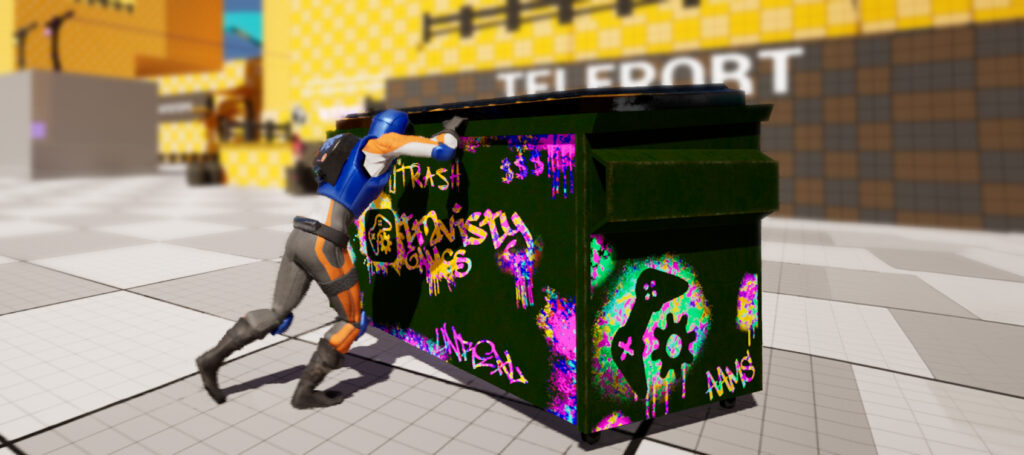
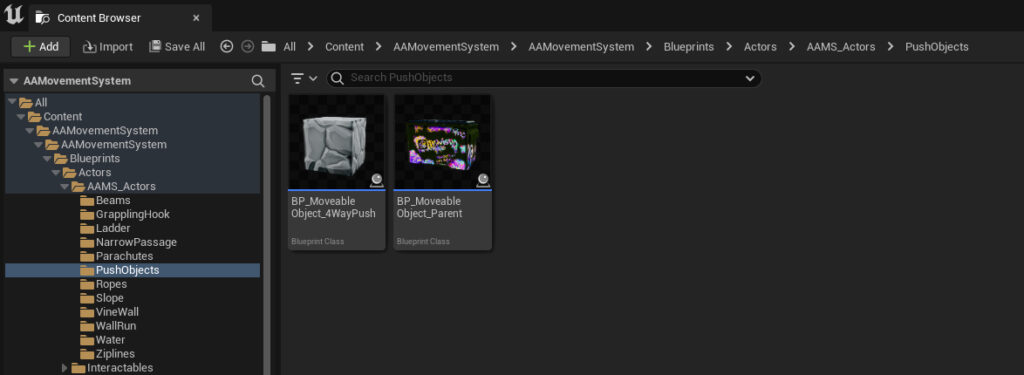
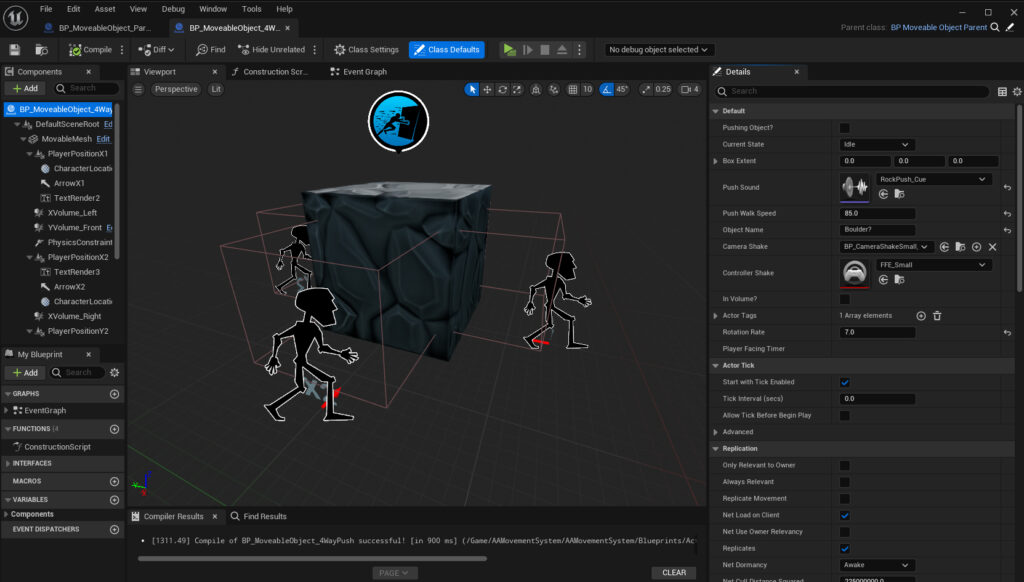
Previously known as Push Objects, Moveable Object Actors have been a part of AAMS since its inception. In version 2.0, these actors have undergone a significant overhaul to enhance their functionality and interactivity. While retaining the core events from previous versions, new functions and checks have been added to allow these objects to attach to the player and be pushed, pulled, and rotated. There are currently two types of moveable object actors in AAMS: the BP_MoveableObjects_Parent and BP_MoveableObjects_4WayPush. The BP_MoveableObjects_Parent comes with a dumpster mesh and allows movement from two sides, whereas its child, BP_MoveableObjects_4WayPush, supports manipulation from four sides.
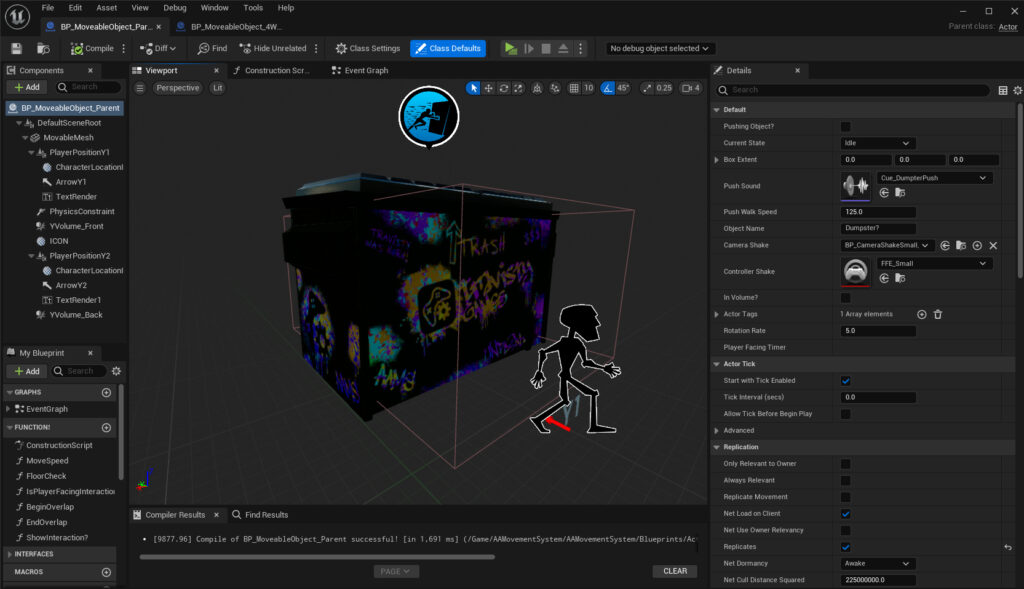
Creating Your Own Moveable Object #
Steps to Customize a Moveable Object:
- Choose the Base Actor:
- For a dual-push object, create a child of
BP_MoveableObjects_Parent. - For a four-way push object, opt for a child of
BP_MoveableObjects_4WayPush.
- For a dual-push object, create a child of
- Customize Mesh and Interaction Volumes:
- Replace the
MoveableMeshwith your desired mesh in the child actor. - Adjust the X and Y Volumes to align with your mesh. These volumes trigger interaction popups and convey push object information to the Action Component.
- Replace the
- Configure Interaction Points:
- Position the
Player Positionsmarkers at locations that align the player’s animations with the object during interactions.
- Position the
- Set Object-Specific Settings:
- Push Sound: Choose a sound that matches the object’s movement characteristics.
- Push Walk Speed: Set this based on the object’s perceived weight.
- Object Name: Define the object’s name for interaction popups.
- Rotation Rate: Adjust the rotation speed relative to the object’s size and the gameplay area’s spatial constraints.
- Actor Tags: Assign tags to enable interactions with specific elements like floor buttons.
- Camera and Controller Shakes: Set the intensity of shakes based on the object’s weight and characteristics.
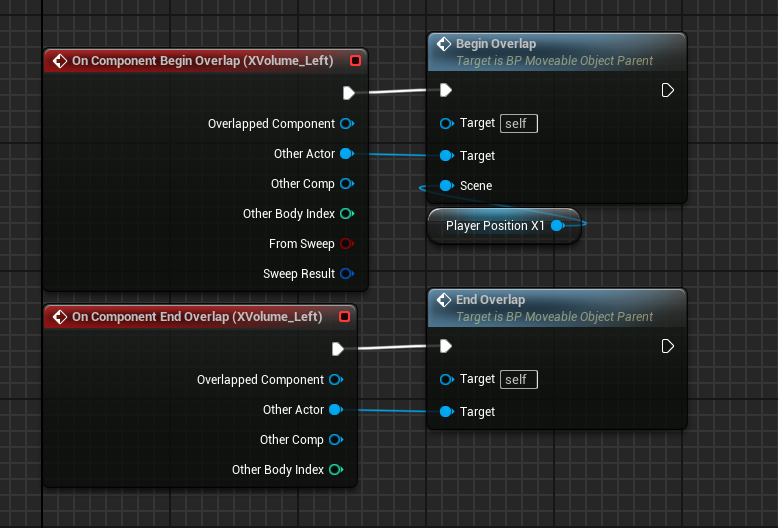
- Expanding Push Volumes:
- To add more interaction points, duplicate existing
Player Positionand Volume components, such asPlayerPositionX1orXVolume_Right. - Place these components at new interaction points.
- Connect the new overlaps to the corresponding events in the component’s event graph and adjust the Player Position to ensure alignment with character animations.
- To add more interaction points, duplicate existing
Ropes #
Introduction to Ropes #
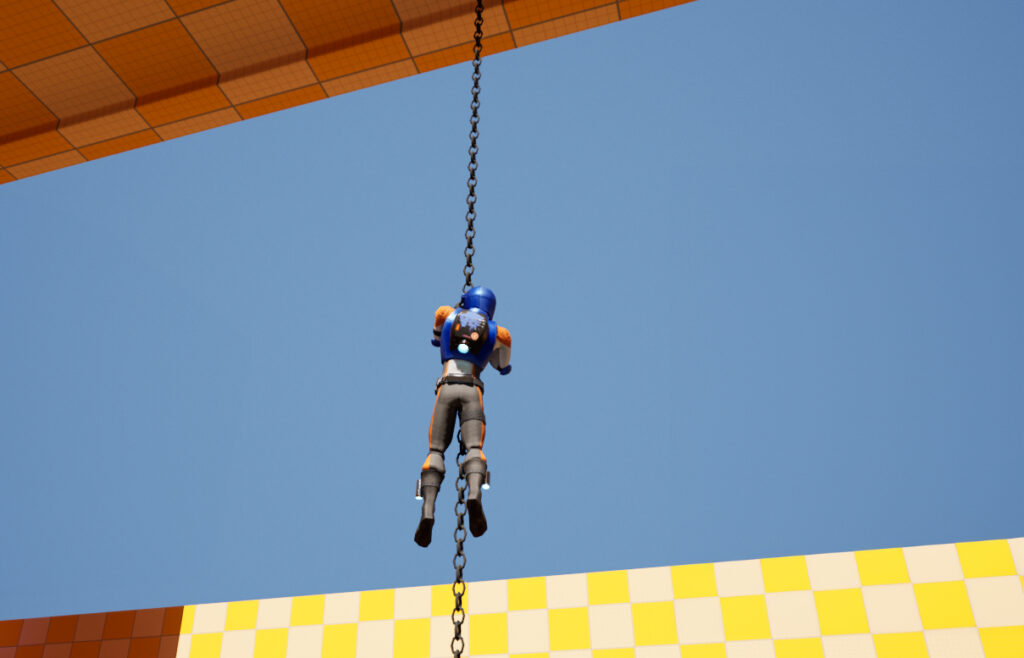
Rope mechanics in AAMS have been significantly revamped for version 2.0, transforming from simple swinging cables to more versatile skeletal meshes that are both climbable and swingable. The updated rope actor is one of the most complex elements within AAMS, employing a series of timelines and checks to ensure that player interactions—climbing and swinging—are executed with fluid and realistic movements. Version 2.0 introduces two example rope actors, BP_Chain and BP_Rope_500, with plans to expand this selection with various lengths in the upcoming version 2.1.
Types of Rope Actors: #
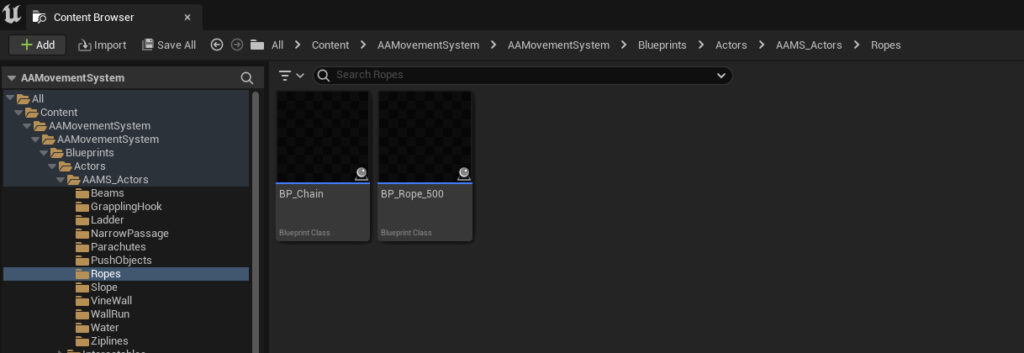
- BP_Chain: This parent actor features a long chain skeletal mesh suitable for extensive climbing and swinging.
- BP_Rope_500: Offers a shorter rope, ideal for more confined or less dramatic swings.
Creating Your Own Rope #
Steps to Customize a Rope Actor:

- Select a Base Actor:
- Choose either
BP_ChainorBP_Rope_500as the parent for your custom rope actor depending on your needs.
- Choose either
- Customize the Rope:
- In the child actor, navigate to the setup section of the Details Panel.
- Replace the default rope skeletal mesh with your chosen
New Rope Mesh.
- Adjust Climbing Mechanics:
- Set the
Climb UpandClimb Down Offsetvalues based on your rope’s design. These settings control how many bones the player moves per climbing action, which should correlate with the density of the bones in the rope mesh.
- Set the
- Sound Effects:
- Configure the
Grab Sound Effectto match the rope material—for instance, a chain rope might use a rattling chain sound. - Set the
Swing Loop Sound Effectto enhance the swinging experience. Include elements like rattling and wind blowing to simulate the ambiance of swinging through the air.
- Configure the
- Align the Rope Top:
- Ensure the top of your skeletal mesh aligns with the
Rope Attachcomponent and thePhysics Constraintat the top of the rope.
- Ensure the top of your skeletal mesh aligns with the
- Configure Physics Constraint:
- Link your mesh’s last bones as the constraint bones within the Physics Constraint settings.
- Adjust the physics settings to ensure the rope behaves realistically according to your game’s physics rules.
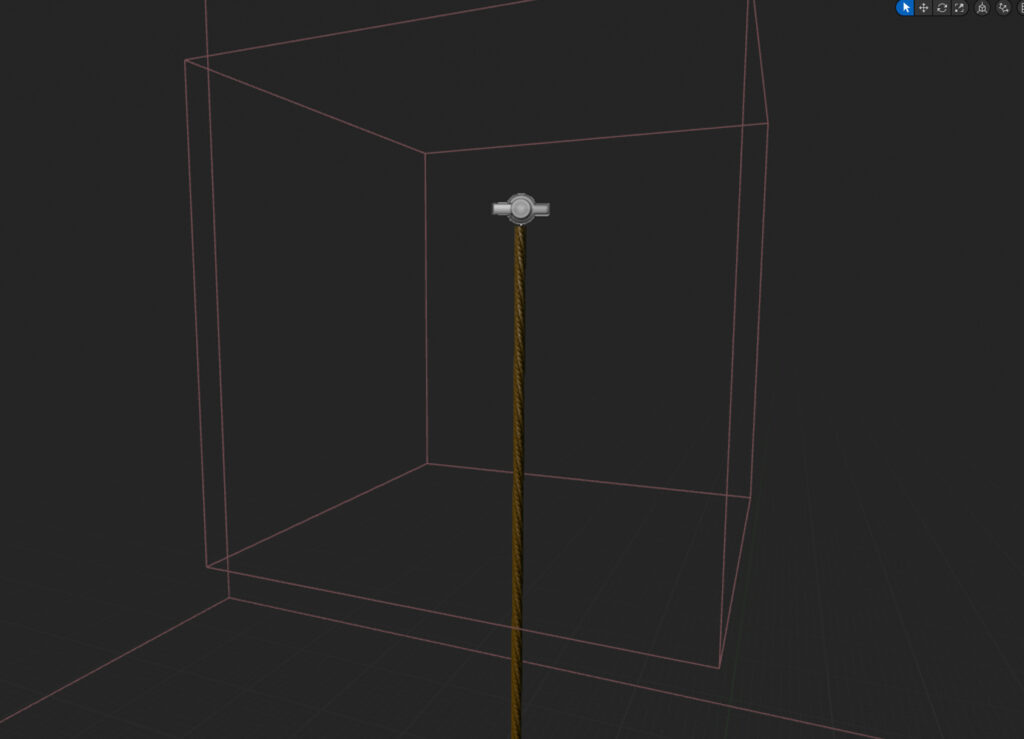
Practical Application #
With these settings, the rope actor not only adds a dynamic physical and audio element to your game environment but also enhances the interactivity and realism of player movements. Careful configuration of these elements ensures that the ropes act as more than just decorative parts of the game—they become integral components of the gameplay experience.
Slopes #
Introduction to Slopes #
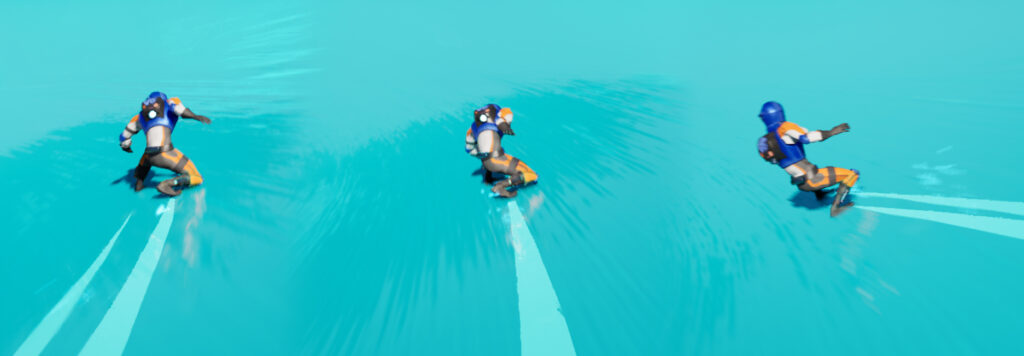
In AAMS v2.0, the BP_SlopeSlide_Spline_Parent has received updates that refine the player’s interaction with slopes, enhancing both functionality and game dynamics. While retaining much of its core design from previous versions, the key enhancement in version 2.0 is the ability to tilt slopes. This new feature allows for sharper curves in the slope’s path, maintaining player adherence to the slope during high-speed descents without the risk of the player inadvertently flying off.
Adding a Slope to Your Level #
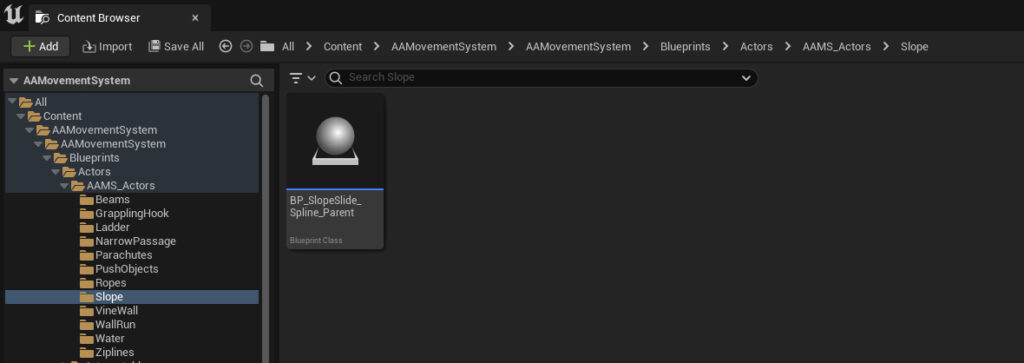
Steps to Implement a Slope:
- Place the Slope Actor:
- Drag the
BP_SlopeSlide_Spline_Parentactor into your game level. - Position the start of the slope at the desired beginning point of your slide.
- Drag the
- Configure the Slope Path:
- Select the last spline point of the slope actor.
- Drag this point along your intended path for the slope. To extend the path or create additional curvature, hold
Altand drag to create new spline points. This allows for a longer and smoother sliding path.
- Adjust Slope Settings:
- In the
Setupsection of the actor’s details panel, customize the settings to suit your specific requirements. - Mesh and Material: Choose the mesh and material that best fit the visual style of your level.
- Sound Effects: Configure audio effects for enhanced realism:
- Start SFX: Set this to play a sound effect when the player first makes contact with the slope.
- Loop Effects: These effects play continuously as the player slides down the slope, enhancing the sensation of movement and speed.
- In the
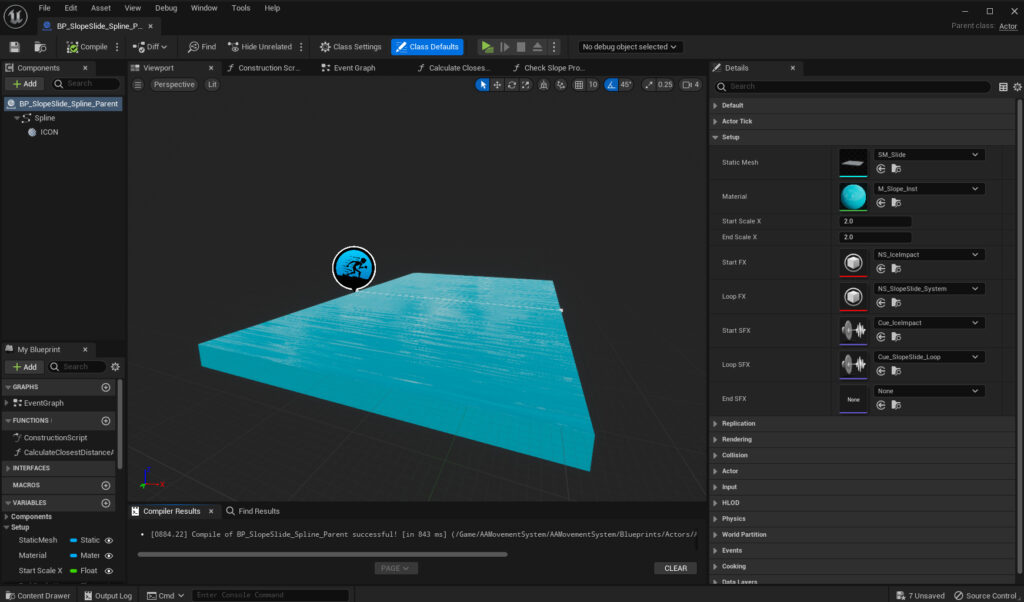
Practical Tips for Slope Configuration #
- Curve Management: When setting up curved slopes, consider the speed at which players will traverse the slope and adjust the tilt and curvature accordingly to prevent gameplay disruptions.
- Testing: Thoroughly test the slope with actual gameplay to ensure that the tilt and curvature settings provide a smooth and enjoyable experience without compromising the challenge or safety of the player.
Vine Walls #
Introduction to BP_VineWall #
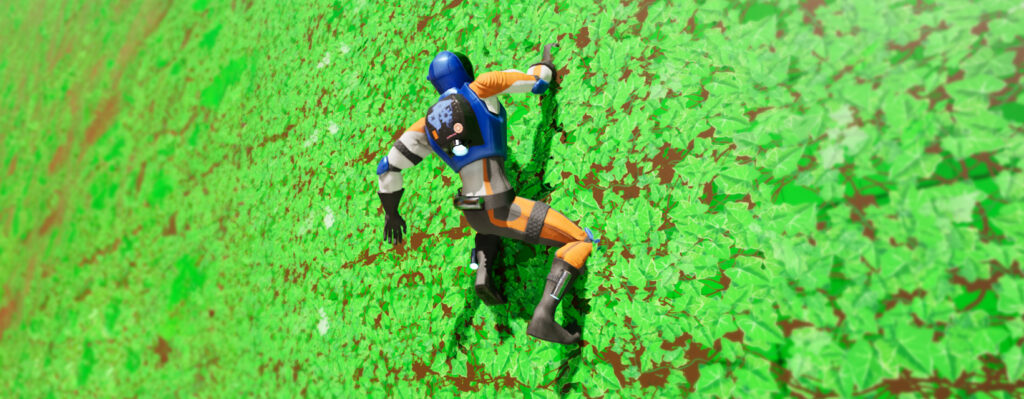
The BP_VineWall actor has been a component of AAMS since its inception, primarily serving as a crucial element for climbing interactions within the game. With the advancements introduced in version 2.0, climbing dynamics have been significantly enhanced. The system now supports automatic grabbing when a player jumps towards a vine wall, reducing the necessity for the BP_VineWall actor as a mandatory element in climbing scenarios. However, this actor still holds considerable value and can be utilized effectively within the game.
Utility of BP_VineWall: #
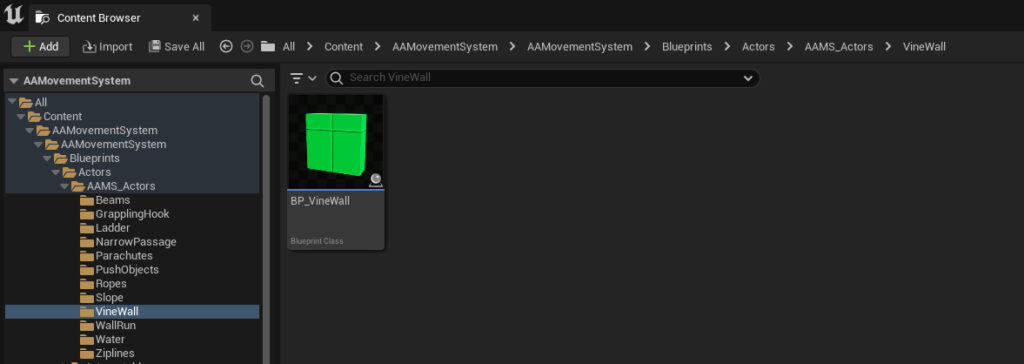
- Visual Consistency: Utilize the BP_VineWall to maintain a consistent and recognizable vine wall appearance across different game levels, aiding in player recognition and interaction.
- Optional Interaction System: For game designs that prefer manual interaction over automatic features, BP_VineWall includes an interaction system that supports manual grabbing and releasing of the vines. This allows for a more controlled and potentially challenging climbing experience.
Adding BP_VineWall to Your Level #
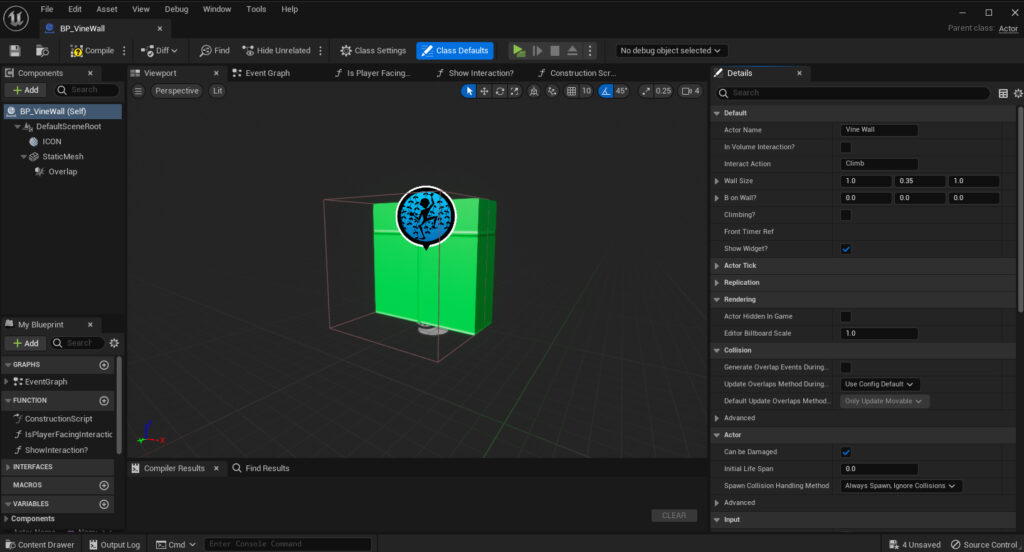
Steps to Integrate BP_VineWall:
- Placement:
- Drag the BP_VineWall actor into your game level.
- Position and rotate it to align with the designated vine wall area in your environment.
- Customization:
- Set the mesh and materials to reflect the desired appearance of your vine wall. This could be anything from lush green vines to a more rugged and aged vine appearance, depending on your game’s setting and aesthetic.
- Configure Collisions:
- Ensure the collision settings are adjusted to block both ‘Interaction’ and ‘VineWall’ trace responses. This is crucial for the interaction system to function correctly, allowing the player to grab onto and climb the vine wall effectively.
Best Practices #
- Testing and Adjustments: After setting up the BP_VineWall, conduct thorough testing to ensure that interactions are smooth and intuitive. Adjust the placement and collision settings as needed based on test outcomes.
- Integration with Gameplay: Consider how the vine wall fits into your overall level design. It should enhance the gameplay experience, offering strategic or explorative benefits to the player.
Wall Run #
Introduction to BP_WallRun in AAMS #

The BP_WallRun, a staple in AAMS from early versions, has transitioned in functionality with the updates brought by version 2.0. Similar to the BP_VineWall, the necessity of the BP_WallRun actor for enabling wall running mechanics has been reduced. With the latest updates, any wall set with the WallRun trace response to Block can be used for wall running, broadening the scope of dynamic movement across different environments in the game.
Purpose of BP_WallRun: #
- Simplified Level Design: The BP_WallRun actor facilitates quicker and more efficient level design by providing a ready-to-use wall that doesn’t require additional configuration for wall running capabilities.
- Visual Consistency: It serves an essential role in maintaining a visually consistent theme throughout the game, helping players quickly identify runnable walls, enhancing navigation and interaction.
Adding BP_WallRun to Your Level #
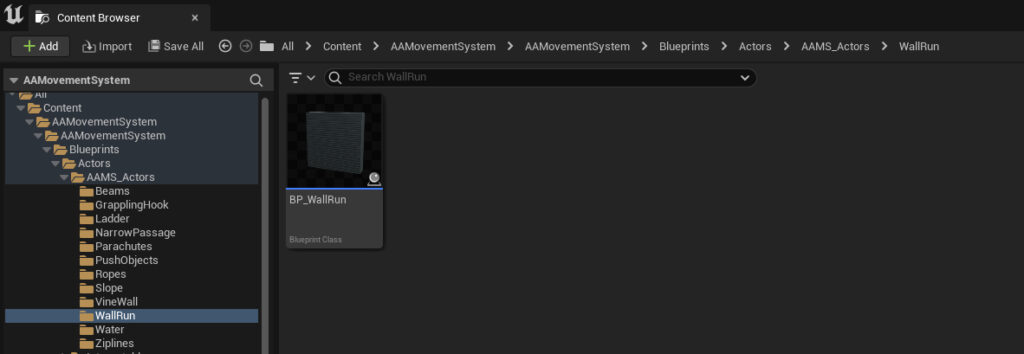
Steps to Implement BP_WallRun:
- Placement:
- Drag the BP_WallRun actor into your game level.
- Position and rotate it to align perfectly with the intended runnable area on your level.
- Adjust Dimensions:
- Resize the actor to match the dimensions of your target wall. The collision volume of the actor will automatically adjust to the scale of the wall, ensuring that the wall running mechanics are applied correctly over the entire surface.
- Configure Meshes and Collisions:
- When modifying or adding new meshes to the BP_WallRun, ensure that the Trace Response is set to Block for WallRun interactions. This setting is crucial for enabling the wall run mechanics on the new surfaces.
Best Practices #
- Consistency in Design: Use the BP_WallRun actor across various levels to maintain a consistent look and feel that players can easily recognize and interact with.
- Testing for Functionality: After placement, rigorously test the wall running interactions to ensure smooth and reliable player movement. Adjustments may be needed based on player feedback and testing results.
Water #
Introduction to BP_Water in AAMS #
The BP_Water actor plays a crucial role in enabling realistic swimming dynamics within AAMS. While not mandatory, using the BP_Water actor is highly recommended due to its specialized volumes and functions that significantly enhance the swimming experience. It facilitates various swimming states, such as surface swimming, and includes features like an underwater check. This function ensures that underwater sound effects are triggered when the camera submerges below the water’s surface, enhancing the realism of the swimming experience.
Adding BP_Water to Your Level #
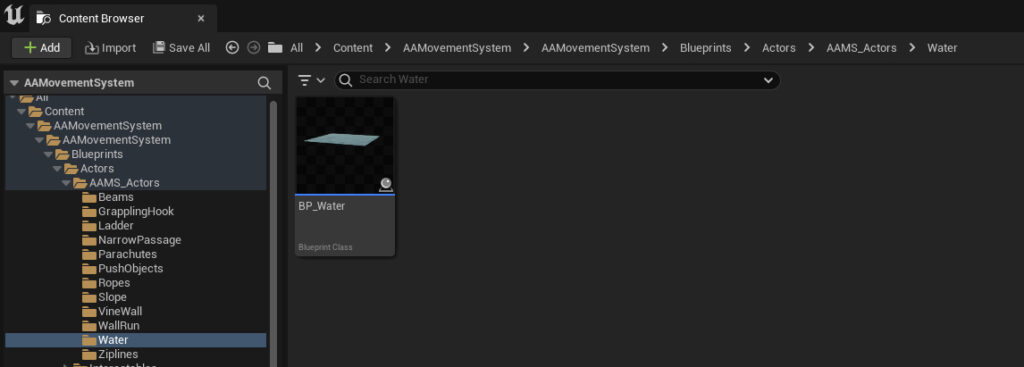
Steps to Integrate BP_Water:
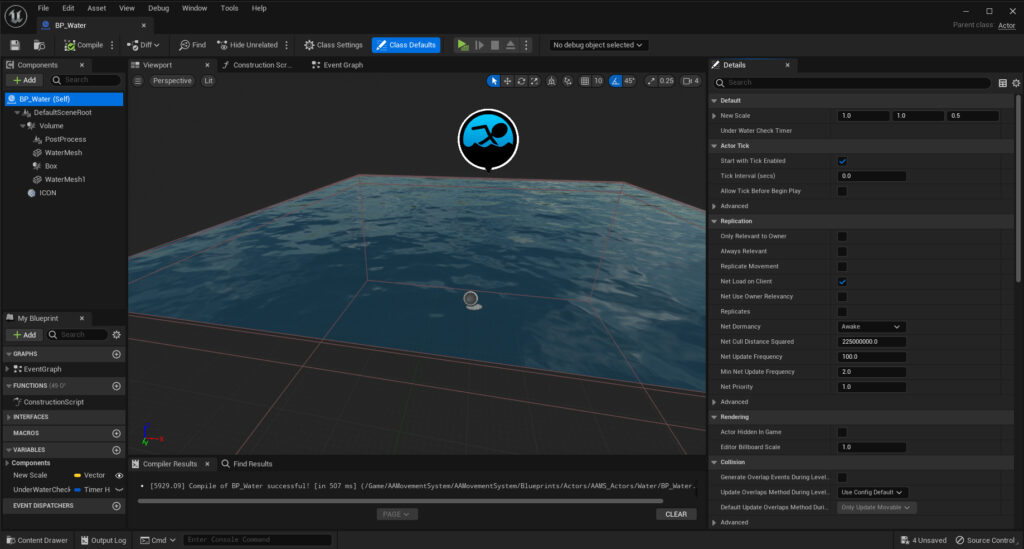
- Placement:
- Drag the BP_Water actor into your game level.
- Position the center of the actor where you want the body of water to be located.
- Adjust Size and Scale:
- Use the
New Scalevector in the actor’s details panel to resize the actor to cover the desired water area.
- Use the
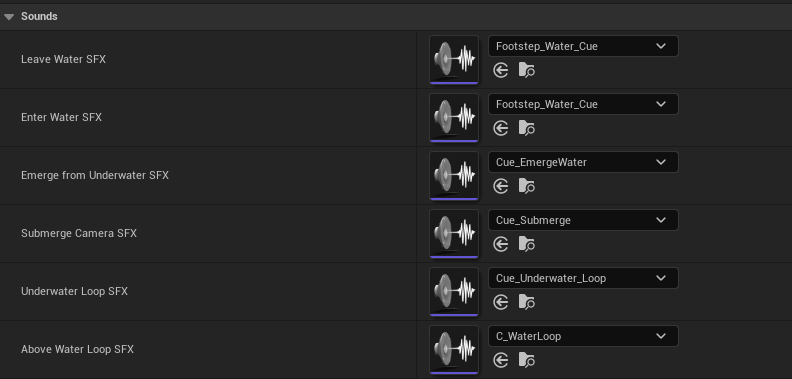
- Configure Sound Effects:
- Set the water sound effects in the details panel to match the thematic elements of your level and enhance the auditory realism of the water environment.
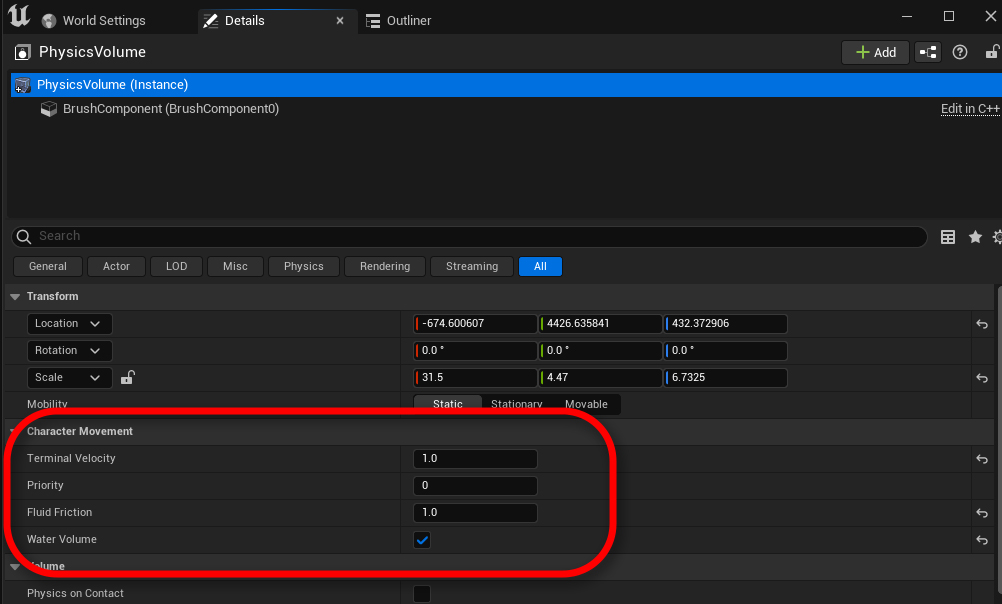
- Add a Physics Volume:
- Place a Physics Volume in your level that matches the location and size of the BP_Water actor.
- Configure the Character Movement settings within the Physics Volume to replicate realistic water movements. Ensure to set the Physics Volume property to
Water Volumeto true.
- Optimal Settings for Realism:
- While custom settings can be used, predefined settings (as shown in the associated imagery or documentation) are recommended for achieving the most realistic swimming behavior within AAMS.
Using Your Own Water System #
If you prefer to use a custom water system:
- Compatibility: Ensure your water mesh is set to block the Movement trace response and that the actor is tagged as
Water. - Integrate BP_Water Volumes: If you wish to maintain the functionality of BP_Water’s volumes while using a custom visual representation, set the Water Mesh within BP_Water to invisible and align this actor with your custom water body.
Best Practices #
- Testing and Adjustment: After setting up the BP_Water actor or your custom water system, conduct extensive testing to ensure that all swimming states and effects function as intended. Make necessary adjustments based on gameplay feedback and performance.
- Visual and Auditory Enhancement: Utilize the detailed configuration options available in BP_Water to fine-tune visual and auditory effects, creating a more immersive and engaging player experience.
Ziplines #
Introduction to Zipline Actors #

Ziplines have been a dynamic feature in AAMS from its inception, offering exciting aerial traversal opportunities within game environments. In version 2.0, ziplines have received substantial updates to improve reliability and functionality. Notably, the requirement for an interaction key has been eliminated; ziplines now automatically engage when the player’s hands are within grabbing range of the cable. This update ensures smoother transitions onto and off the zipline, enhancing player experience.
Moreover, ziplines in AAMS v2.0 are highly customizable, allowing developers to tailor the visual and auditory effects to match the material of the zipline cable. For instance, steel cables might feature spark effects and grinding sounds, while rope cables could be accompanied by dust effects and sliding noises. A new stylized zipline pole mesh has also been introduced, providing additional aesthetic options for game designers.
Adding a Zipline to Your Level #
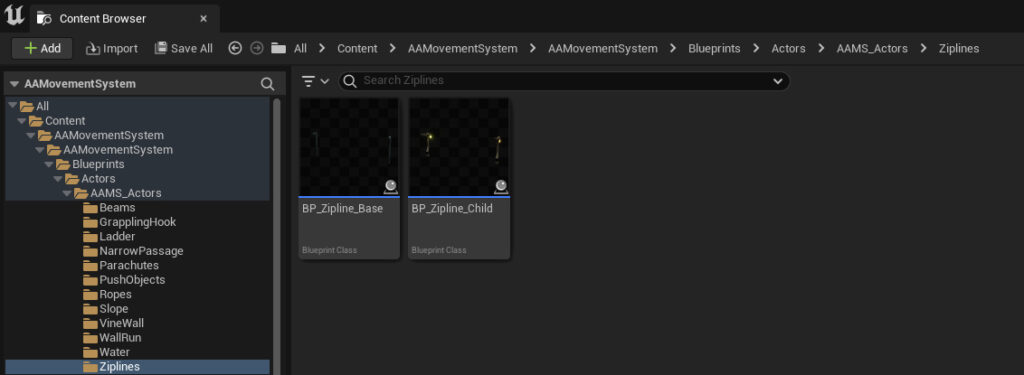
Steps to Integrate a Zipline:
- Placement:
- Drag either
BP_Zipline_BaseorBP_Zipline_Childinto your game level. - Position the start pole at the desired beginning point of your zipline.
- Drag either
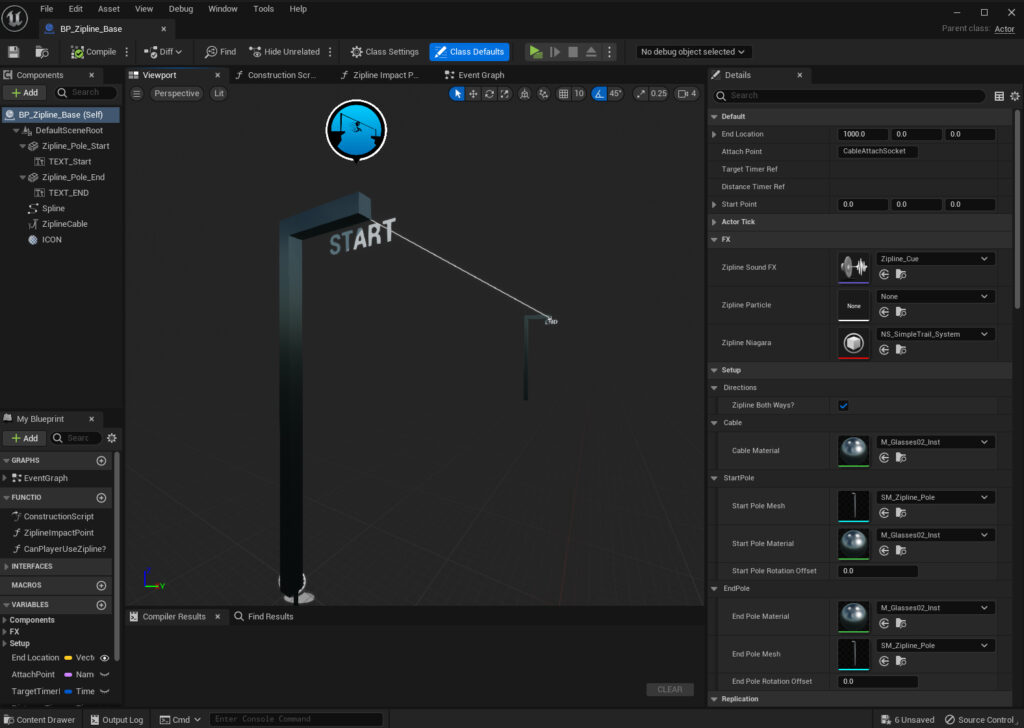
- Configure the Path:
- Use the
End Location 3D Widgetto position the end pole at the intended finish point of the zipline.
- Use the
- Directionality:
- Decide the directionality of the zipline:
- If
Both Directionsis set to True, players can zip both upwards and downwards along the cable. - If False, zipline movement will be restricted to one direction, from the start pole to the end pole.
- If
- Decide the directionality of the zipline:
- Customization of Poles and Cable:
- Select appropriate meshes and materials for each pole to align with the theme of your environment.
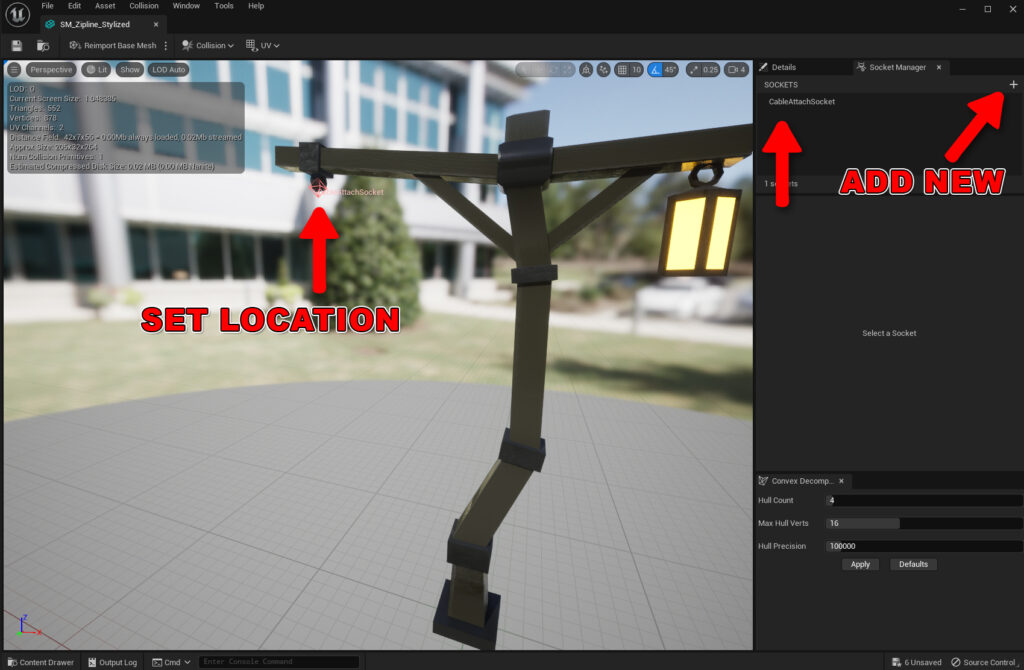
- Socket Configuration:
- If using custom meshes for the zipline poles, ensure a socket is added to each pole mesh where the zipline cable will attach.
- The socket can be named
CableAttachSocketor customized as per your preferences. Adjust theAttachPointvariable in the zipline’s details panel to match the socket name.
Best Practices #
- Testing for Smoothness: After setting up the zipline, rigorously test the interaction to ensure that the automatic grab and traversal mechanisms function smoothly across the entire length of the zipline.
- Visual and Sound Effect Matching: Tailor the effects to enhance realism. Ensure that the visual and sound effects are congruent with the physical properties of the zipline materials.
Icons #

In the complex and densely populated environments typical of modern game levels, quickly locating specific interactive actors can be challenging. To address this, AAMS incorporates custom icons for each actor and interaction actor within its system. These icons serve as immediate visual identifiers, simplifying the process of locating and differentiating among various elements during level design and editing.
Utility of Icons:
- Easy Identification: Each AAMS Actor, from BP_WallRun to BP_Water, is marked with a distinctive icon that clearly represents its functionality. This visual cue helps developers and designers quickly spot these actors in crowded scenes or detailed level layouts.
- Workflow Efficiency: The addition of character location icons, depicted as walking stick figures, further streamlines the development process. These icons are strategically placed to indicate where a player character will interact with the environment. For instance, in setups involving ladders or movable objects, the feet of the character location icon are aligned with the ground, providing a precise guide for positioning these elements within the game space.
Enhancing Developer Experience: The integration of these icons not only aids in the rapid identification and placement of interactive elements but also enhances overall workflow efficiency. By reducing the time and effort needed to search for and configure environment interactions, developers can focus more on creative and functional aspects of game design.
