
Introduction to the Adventure Component #
The Adventure Component is a crucial part of AAMS, focusing on air and sea exploration-related mechanics. This component enhances gameplay by integrating complex interactions with the environment, whether it’s navigating through water, air, or challenging terrains.
To fully utilize these adventure mechanics, additional actors are often required, which are available in the AAMS_Actors folder. For detailed information on each actor and their functionalities, refer to the AAMS Actors section of the documentation.
Included Mechanics: #
- Swimming: Navigate through water environments with realistic swimming mechanics.
- Ladders: Climb ladders to reach higher or lower areas.
- Ziplining: Traverse distances quickly using zipline setups.
- Grappling Hooks: Reach inaccessible areas or quickly move between points.
- Wall Running: Run along walls to bypass obstacles or reach new areas.
- Parachuting/Gliding: Descend from heights or glide across gaps.
- Slope Sliding: Slide down slippery surfaces.
- Beam Walking: Balance and walk along narrow beams.
- Climbing and Swinging from Ropes: Engage in complex climbing mechanics and swing from ropes to navigate the environment.
- Free Falling: Experience the thrill of free falling through open air.
- Exploring Narrow Passages: Maneuver through tight spaces to explore hidden or hard-to-reach areas, while giving new areas of the level time to load.
Each mechanic is designed to provide unique challenges and opportunities for exploration, making the Adventure Component a dynamic and essential element of the Action-Adventure Movement System.
Swimming #
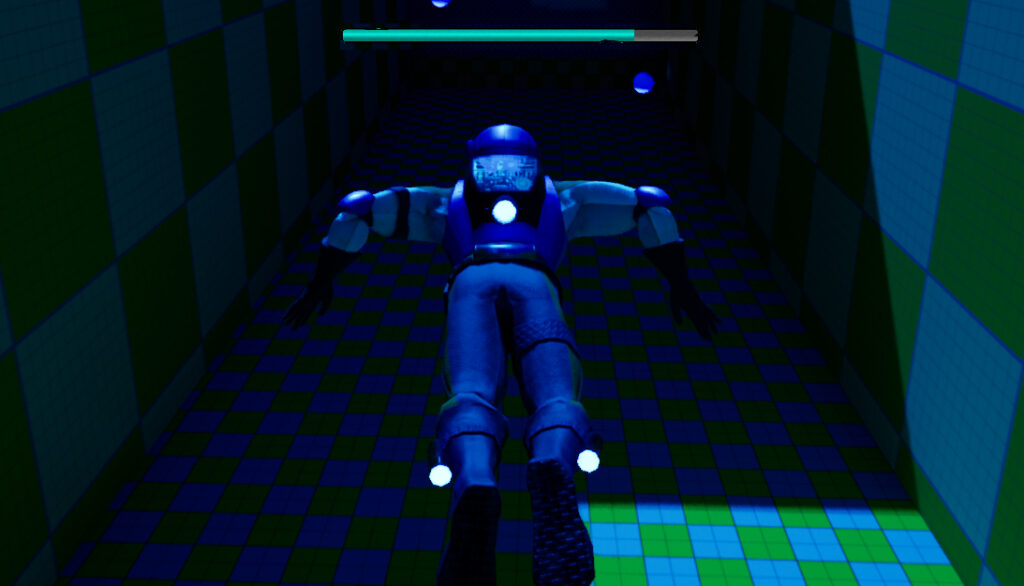
Swimming, a fundamental feature of any action-adventure game, has received significant updates in AAMS v2.0. The enhanced swimming mechanics include new traces and checks to increase realism and improve player interaction with water environments.
Key Updates: #
- Water Entry Check: A new check ensures that players do not enter the swim state until the water is sufficiently deep, preventing unrealistic transitions into swimming.
- Jumping Over Water Trace: A trace has been implemented to determine the type of water entry—whether it’s a cannonball, dive, or regular jump—based on the player’s approach and action.
- Exiting Water Check: When exiting the water, a check now assesses the water depth to determine if it’s appropriate to leave the swim state, ensuring smoother transitions between swimming and on-foot movement.
- Enhanced Swimming Inputs: Input responsiveness and control for swimming have been greatly improved, allowing for a more intuitive and enjoyable player experience.
- Breath Bar: With the added Stat Component comes a new breath meter when swimming under water.
Alongside these mechanical improvements, AAMS v2.0 introduces new swimming animations, enriching the visual fluidity and realism of water-based activities.
Setting Up Swim #
To enable swimming in your game, a physics volume designated as a Water Volume is required. This volume triggers the swim mode when the player enters the designated area.
Steps to Set Up Swimming: #
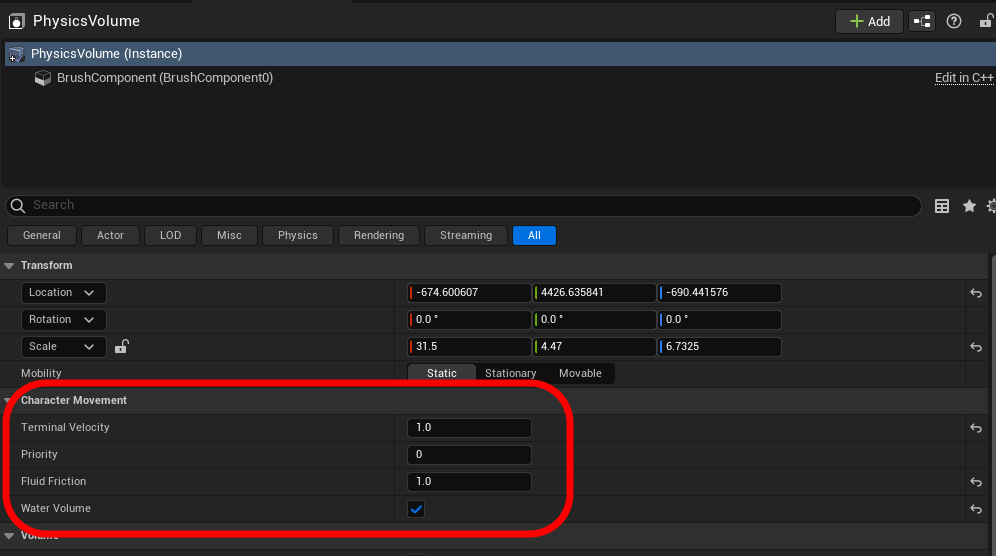
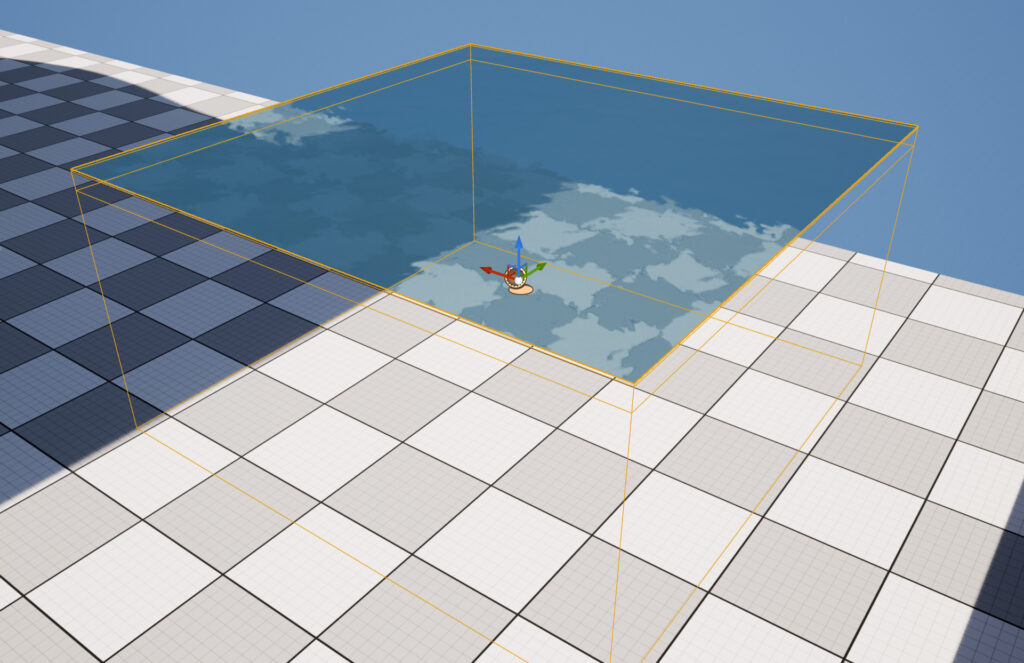
- Place Physics Volume: Insert a Physics Volume into your level wherever you want swimming to occur. Resize the volume to fit the intended water area.
- Configure Settings:
- Go to the physics volume’s details tab and adjust the character movement settings to simulate realistic water movement. While the settings shown in the provided image are recommended, they are not mandatory.
- Ensure the
Water Volumeproperty is set toTrue.
- Water Actor Recommendation: The
BP_Wateractor is recommended to fully utilize all AAMS swimming features, although it’s not strictly necessary for basic swimming mechanics. - Water Mesh Collision: If you are not using the
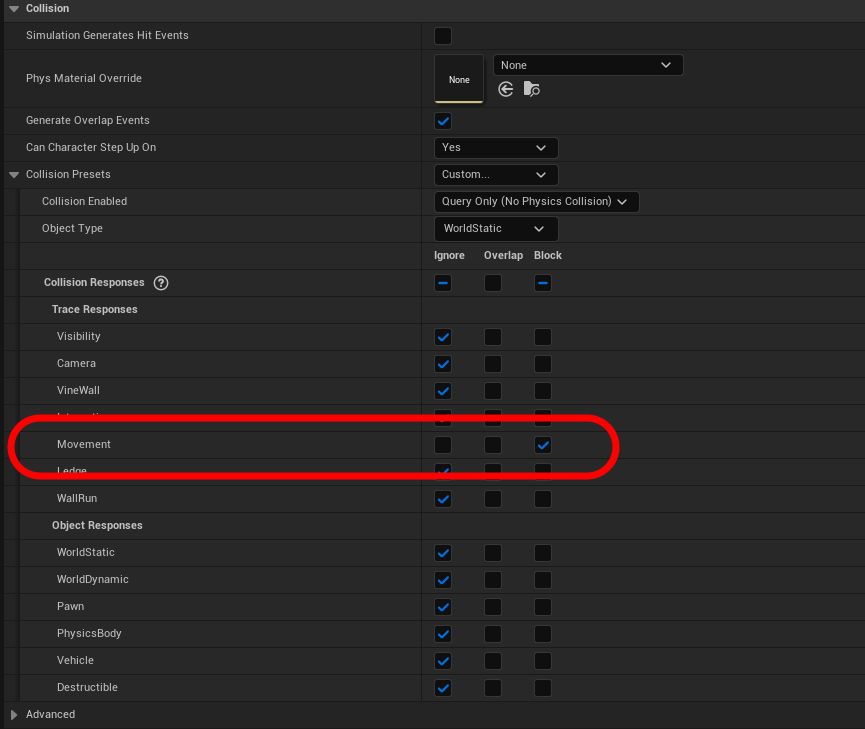
BP_Wateractor, it’s advisable to set your water mesh collision to block Movement to ensure proper interaction. - Further Information: For more detailed instructions and features related to the Water actor, refer to the AAMS Actors section of the documentation.
Swim Settings #
Abilities #
- Can Dive: This toggle allows players to swim below the water’s surface. You can enable or disable this feature depending on whether underwater swimming is appropriate for your game or if it’s an ability you want players to unlock.

Breath Alert #
- Breath Alert: This feature is part of the Stat Alert mechanic, which notifies the player when the character’s breath is running low and they are close to drowning. The Breath Alert is activated when the breath stat falls to a specified percentage. For example, in the Example Character setup, a default Breath Alert is set at 25%, meaning the alert activates when the player’s breath reaches this level and will continue until the breath stat rises above 25% or the player dies.
- Breath Ending Soundtrack: This is the sound effect that plays when the Breath Alert is triggered, enhancing the urgency and realism of the situation.
For a comprehensive understanding of how Stat Alerts function and their integration with other components, refer to the Stats Component Section of the Documentation.
Swim Animations #
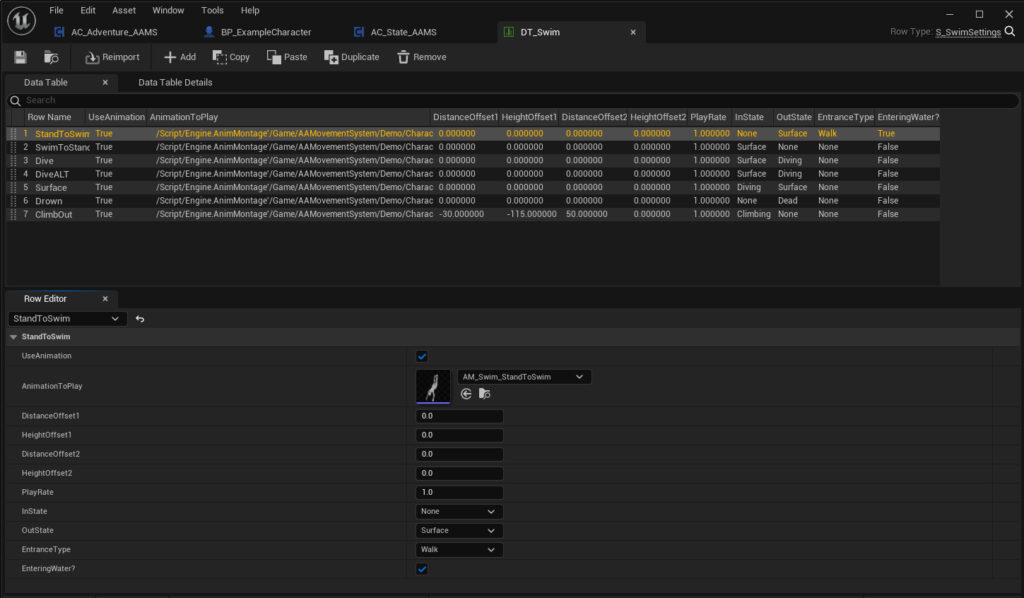
Swim animations within AAMS are dynamically managed using a Data Table to determine the correct animation, settings, and swim states. This approach ensures fluid transitions and appropriate responses based on the player’s actions.
How It Works: #
- Data Table Configuration: Each swim animation is linked to a specific row in the Swim Data Table. This row determines the current swim state as the “In State” at the beginning of the animation.
- Animation Triggers: When a swim animation is triggered, the Swim Structure is set to match the appropriate row from the Swim Data Table.
- State Transitions: At the conclusion of the animation, the swim state transitions from the “In State” to the “Out State” specified in the Data Table.
Example Implementation: #
- From Standing to Swimming: In the example, the “Stand To Swim” row is selected. This animation does not require offsets and starts with the “In State” set to none, as the player is initially standing in shallow water. The animation features a dive, transitioning the player to the “Surface” state as the “Out State,” indicating the player is now swimming on the surface.
- Diving: If the player then presses the dive button, the “Dive” animation’s “In State” would be “Surface,” and the “Out State” would be “Diving,” reflecting the player’s transition underwater after the animation.
Animation Details: #
- Montages and States: There are seven montages associated with swimming, including animations for climbing out of the water. Performing a cannonball, and various forms of diving and swimming movement animations are integrated within the Swimming State Machine in the Animation Blueprint, facilitating seamless transitions between different swimming actions.
This configuration not only provides a realistic swimming experience but also allows for extensive customization and adaptability in player interactions with water environments.
Ladders #
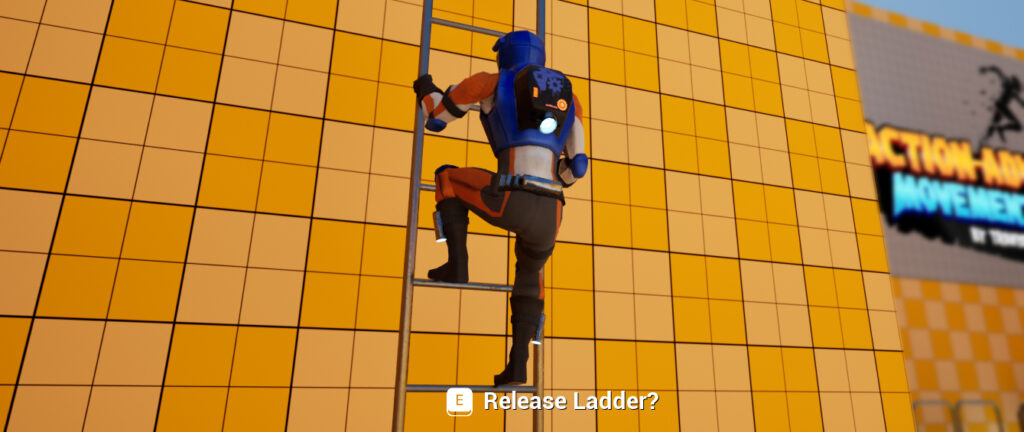
Ladders serve as a vital element in video games, providing a practical solution for introducing verticality and multiple levels within a game environment. By incorporating ladders, developers can expand the playable area and enhance the exploration possibilities, allowing players to navigate upwards and downwards smoothly and intuitively. This not only adds a dimensional layer to gameplay but also enriches the player’s interaction with the game world, offering new perspectives and challenges that can transform a flat and linear path into a more dynamic and engaging 3D space. In the latest update, AAMS v2.0, ladders have received significant enhancements, including improved functionality with added checks and fresh animations, ensuring a more realistic and responsive climbing experience.
Ladder Setup #
Ladders are implemented using the BP_Ladder actor or a child of it. They integrate with the interaction system for actions such as grabbing and releasing. While it is possible to use your own interaction system, adjustments will be necessary—either by replacing the main interaction event or by adding a call to your system.
Adding Ladders to Your Level: #
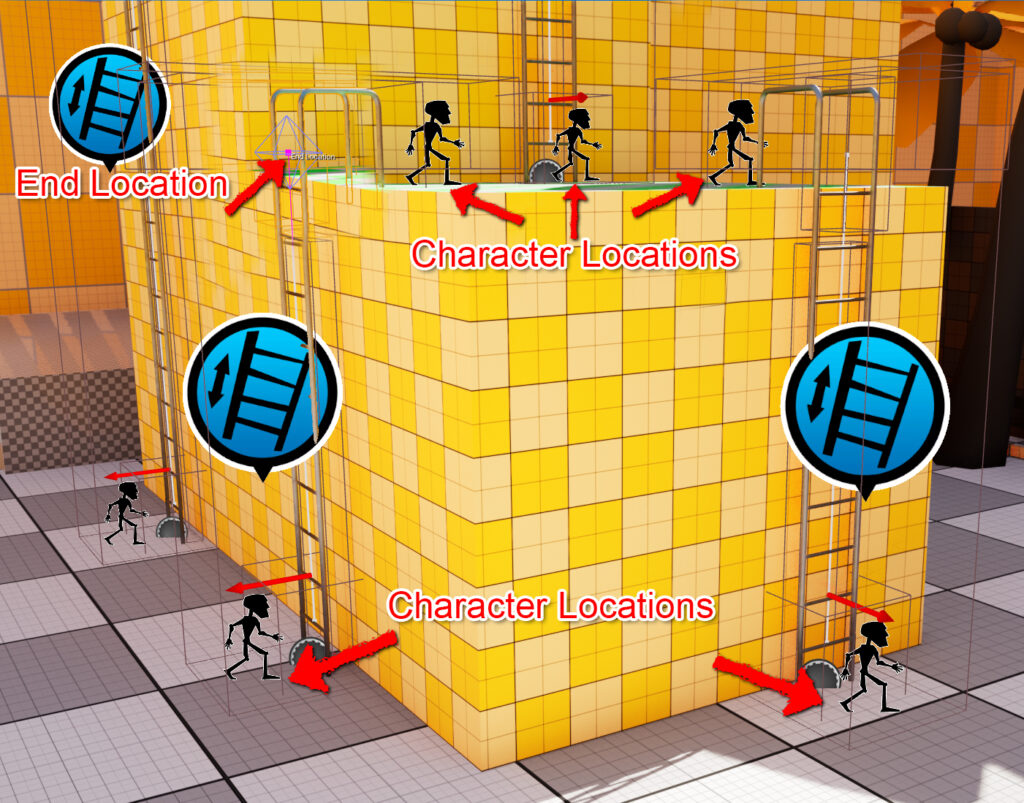
- Placement: Place the
BP_Ladderactor where you need a ladder in your level. - Adjustment: Adjust the “End Location” widget at the top of the ladder to extend or retract it. This will automatically add or remove rungs as needed.
- Character Alignment: Ensure the two Character Location icons are positioned so their feet are on the surface. This alignment guarantees that the player character is placed correctly, and animations sync precisely with the ladder.
Animations and Settings #
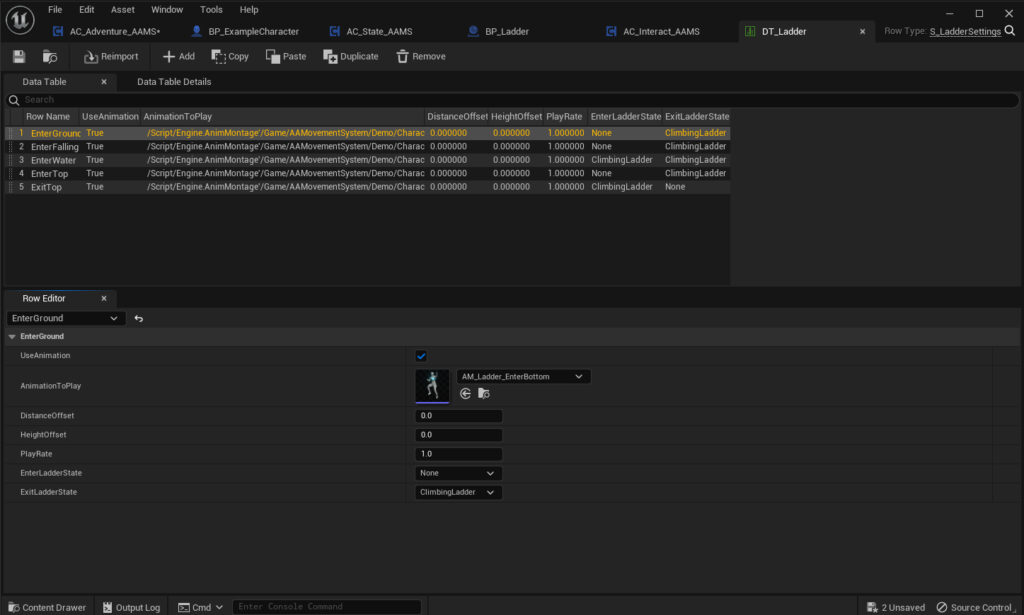
Unlike other components, the ladder does not have editable settings in the character blueprint. Instead, it uses a Data Table to manage all related animations and ladder state changes.
Configuring the Data Table: #
- Animations: Add the desired animation montages to the Data Table.
- Offsets and States: Set the necessary distance and vertical offsets to ensure animations align with the physical ladder. Define the Enter and Exit States for each animation to dictate whether the player is on the ladder at the start and end of each animation. For example, in the “Enter Ground” row, which is used for initiating ladder climbing from the ground, the player should not be climbing at the start (Enter State: None) but should be on the ladder by the end (Exit State: Climbing Ladder).
For more detailed information and advanced configurations, refer to the AAMS Actors section of the documentation.
Ziplines #
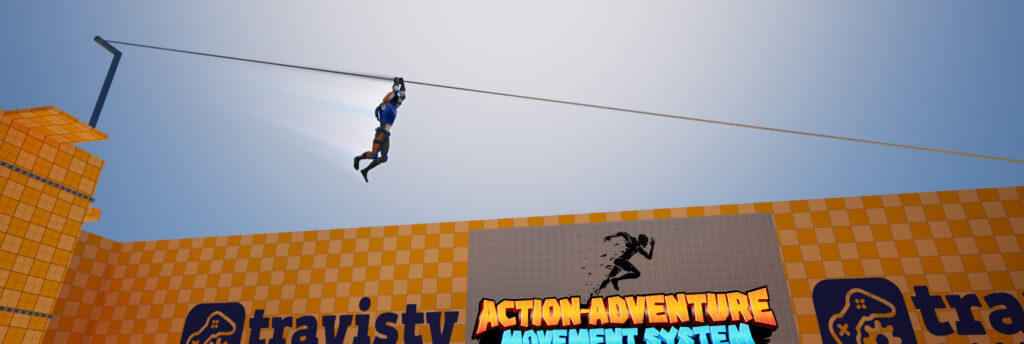
Ziplines offer a thrilling and efficient way for players to traverse from one location to another in games, effortlessly incorporating verticality and diverse levels into the game environment. This dynamic element not only adds a layer of fun but also expands explorative possibilities, enhancing the overall gameplay experience.
In AAMS v2.0, ziplines have received significant updates and improvements, including enhanced movement mechanics for smoother transitions, added checks for seamless ziplining, and new animations to further enrich the zipline experience.
Zipline Setup #
Ziplines in AAMS v2.0 feature an automatic grab mechanism, allowing characters to seamlessly latch onto the zipline simply by jumping towards the cable. To integrate ziplines into your game:
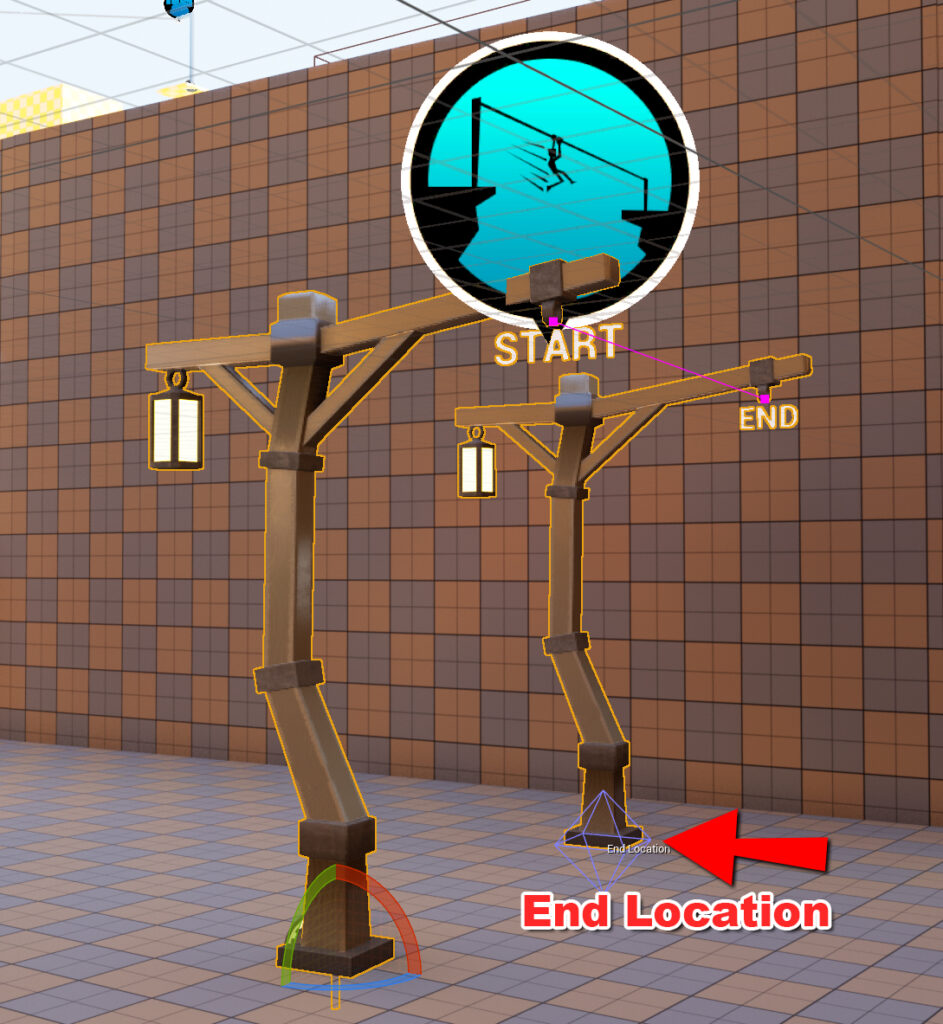
- Add the Zipline Actor: Place the
BP_Ziplineactor or a derivative of it in your level. - Configure Poles: Identify and position the Start and End poles of the zipline. The Start pole should be placed and rotated toward the desired endpoint. Adjust the End Location widget to position the End pole at the specific endpoint.
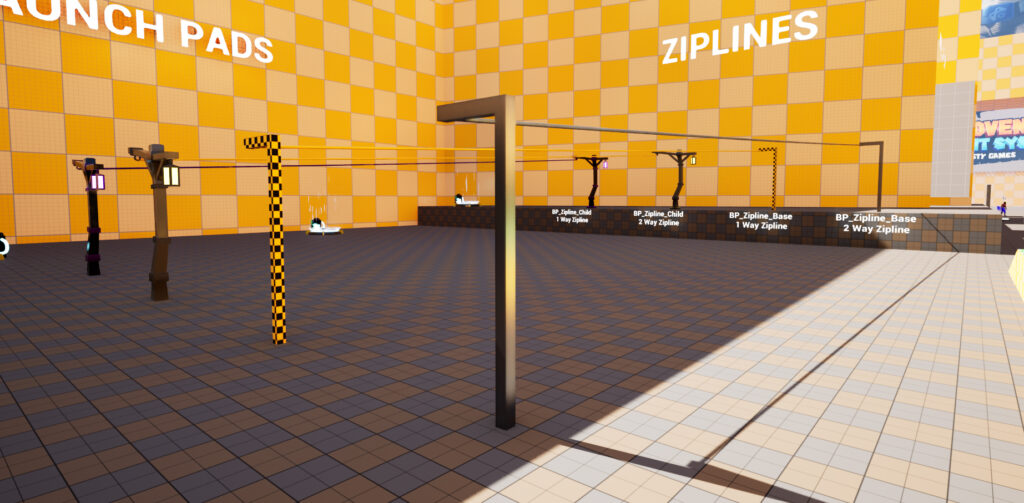
- Customization: For advanced setup options, such as changing meshes, sounds, effects, and bidirectional use, refer to the AAMS Actors section of the documentation.
Zipline Settings #
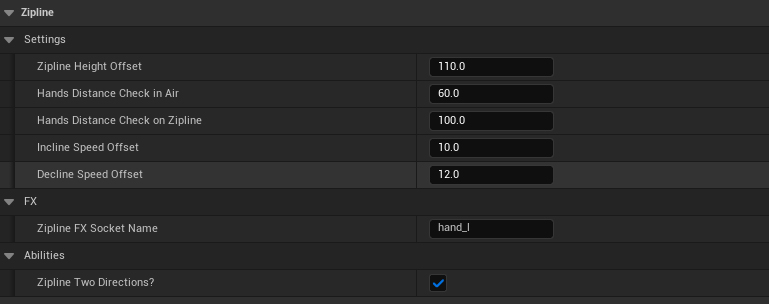
General Settings: #
- Zipline Height Offset: Adjust the vertical offset to align the character’s hands or tool with the zipline cable.
- Hands Distance In Air/On Zipline: Set the maximum distance from the zipline cable for a successful grab, enhancing the realism of the interaction.
- Incline Speed Offset: Specify a slower speed for ascending the zipline, simulating the effort of moving against gravity.
- Decline Speed Offset: Set the speed for descending the zipline, typically faster than ascending due to gravity assistance.
FX and Customization: #
- FX Socket Name: Assign the socket for zipline effects, which can vary based on the zipline type (e.g., steel cable vs. rope cable). Change the desired effects in the zipline actor
Abilities: #
- Zipline Two Directions: Configure each zipline actor for uni- or bidirectional use. Additionally, character-specific settings can determine if a character can use a zipline in both directions—useful for scenarios where equipment like a zipline tool affects capability.
Zipline Animations #
The zipline feature in AAMS v2.0 is supported by two key animations to ensure a seamless and engaging experience:
- Starting Animation: This animation triggers when the zipline is initially grabbed by the player. It serves to visually communicate the action of securing onto the zipline, setting the stage for the traversal.
- Looping Animation: Once the starting animation concludes, a looping animation takes over for the duration of the zipline journey. This animation continues until the player exits the zipline, providing a continuous, realistic depiction of zipline travel.
Both animations are integrated within the Zipline State Machine in the Animation Blueprint, ensuring they are correctly triggered and smoothly transitioned for an immersive gameplay experience.
This setup provides flexibility and customization, allowing developers to tailor the zipline experience to fit the gameplay style and narrative needs, ensuring a dynamic and engaging player interaction with the game environment.
Grappling Hooks #
Grappling hooks add a dynamic and exhilarating layer to gameplay, enabling characters to traverse game environments with thrilling agility and speed. By incorporating grappling hooks, developers can expand vertical and horizontal exploration possibilities, allowing players to reach areas that would otherwise be inaccessible. This not only enhances the sense of freedom and adventure but also introduces strategic elements to both combat and navigation, making the game experience more engaging and versatile.
In AAMS v2.0, the grappling hook mechanics have been significantly streamlined. The system now utilizes an automatic aim and pull functionality, as opposed to the manual aiming and firing required in versions 1.0 to 1.3. This update speeds up gameplay, making the use of grappling hooks quicker and more enjoyable. Additionally, it simplifies level design by limiting the areas where players can grapple, easing the development process while maintaining the thrilling essence of grappling action.
Grappling Hook Setup #
To integrate the grappling hook system into your game, you’ll need two specific actors from the AAMS library:

- BP_GrapplingGun: This actor represents the grappling gun itself, showing the hook and cable used to pull the player.
- BP_GrapplingHookLocation: This actor is used to designate the hook location and the endpoint where the player will be pulled.
Implementing the Grappling Hook: #
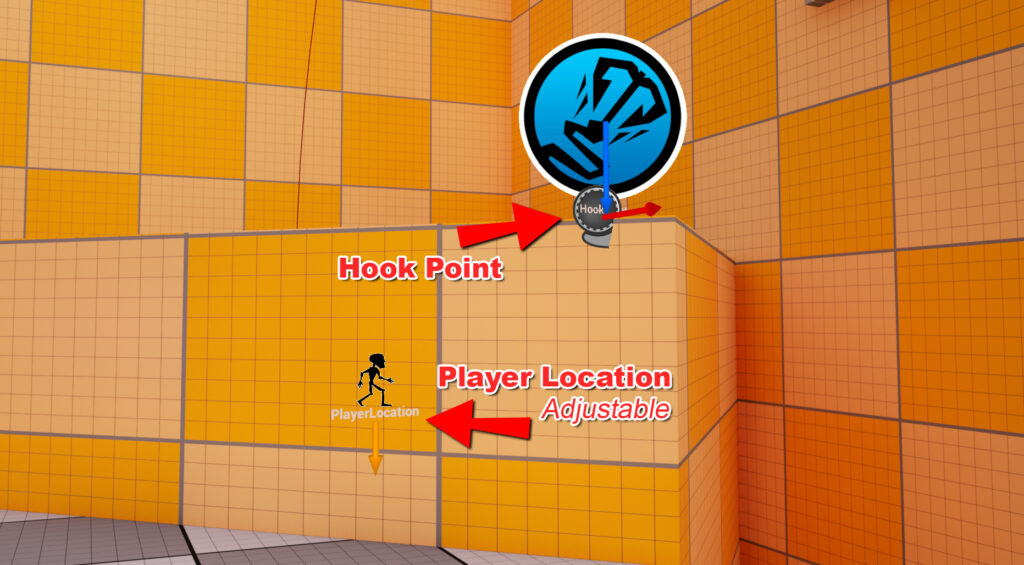
- Placement: Add the
BP_GrapplingHookLocationactor to any area in your level where you want the player to be able to use the grappling hook. - Configuration: While selecting
BP_GrapplingHookLocationin the actor details tab set the desired outer radius to activate the hook point icon and meter, indicating the player is approaching the hook radius. Adjust the hook grapple radius to define the area within which the player can use the grappling gun. - Grappling Gun Setup: You can either set the grappling gun via your inventory system or have it auto-equip when necessary. If Auto Equip is disabled, use the
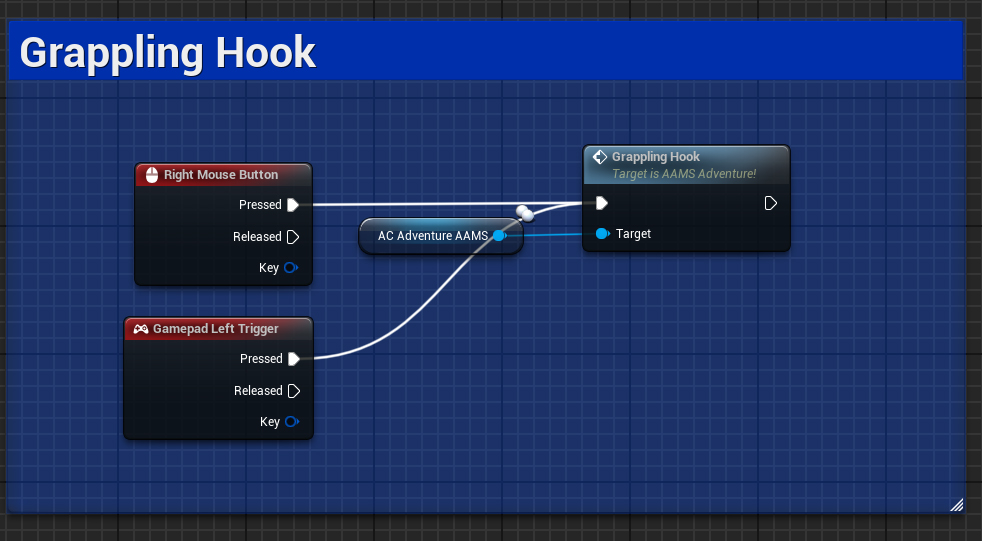
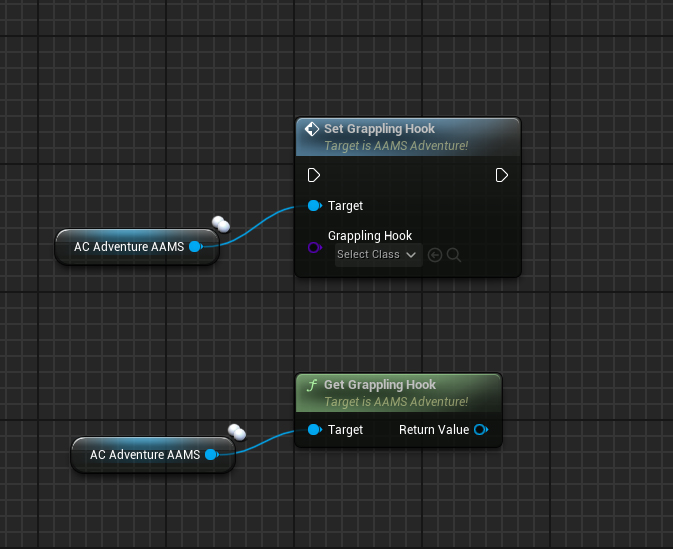
Set Grappling Hookfunction in the Adventure Component to manually equip the grappling hook.
For detailed information on the BP_GrapplingGun and BP_GrapplingHookLocation actors, refer to the AAMS Actor documentation.
Additionally, bind the Fire Hook event to your designated Grappling Hook input action key within your character blueprint to activate the grappling hook.
Grappling Hook Settings #
To customize grappling hook settings for individual characters, locate the Grappling Hook section in the character blueprint’s details tab.
Settings #
- Equip and Holster Sockets: Create sockets on your character’s skeleton to accommodate the grappling gun at the desired location.
- Auto Equip: This setting controls whether the grappling gun needs to be in the inventory or pre-equipped on your character to be used. If set to False, the
Set Grappling Hookfunction must be used to equip the grappling hook manually.
FX #
- GH Wind Loop SFX: This sound effect simulates the wind blowing as the player is pulled through the air, enhancing the immersive experience of grappling.
Grappling Hook Animations #
Similar to swimming and ladder mechanics, the animations for the grappling hook in AAMS v2.0 are managed through the DT_GrapplingHook data table. This allows for a flexible and dynamic animation setup tailored to the context of the player’s interaction with the environment.
Animation Selection Process: #
- Context-Sensitive Animation: The choice of animation depends on both the player’s stance (standing or falling) and the distance to the hook point.
- Distance Consideration: When the hook point is close to the player, the data table specifies the use of a “Short” version of the animation, ensuring that the visual response is appropriately scaled to the proximity of the target.
This system ensures that the grappling hook animations are not only visually appealing but also contextually appropriate, enhancing the realism and fluidity of the gameplay experience.
Wall Running #
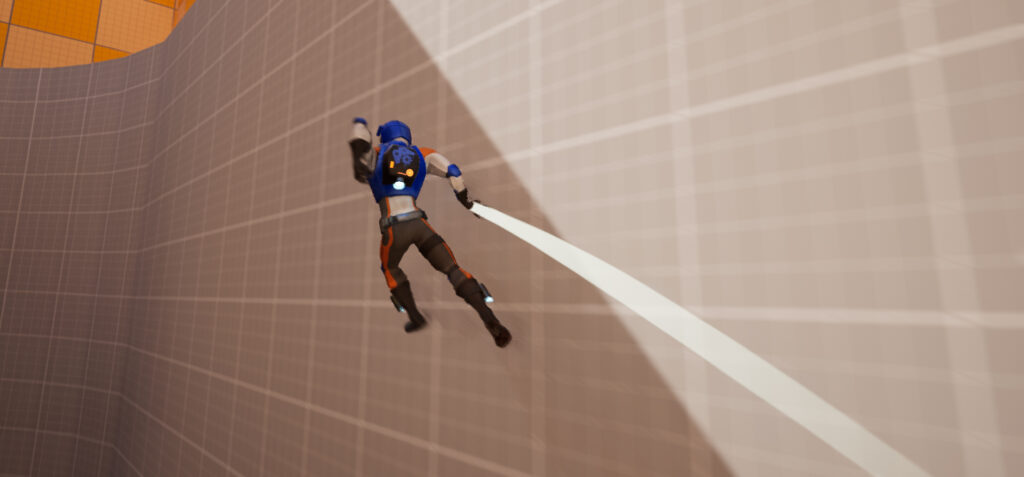
Wall running is arguably one of the most exhilarating features of AAMS, and it has become a staple not only in action-adventure games but also in first-person shooters and various other game genres. In version 2.0, wall running has undergone significant enhancements, making it smoother and more reliable than ever before. With the introduction of the “WallRun” collision channel, virtually any vertical surface becomes a runnable path, including even the most challenging rounded cylindrical surfaces. These improvements ensure that wall running can deliver thrilling gameplay dynamics and greater navigational freedom across a diverse array of game environments.
Wall Run Setup #
Setting up wall running in your game is straightforward. You can either use the BP_WallRun actor for a quick setup of a ready-to-run wall or modify any static mesh in your level. Simply set its collision to Custom and its trace response to WallRun as Block. This will make the surface suitable for wall running.
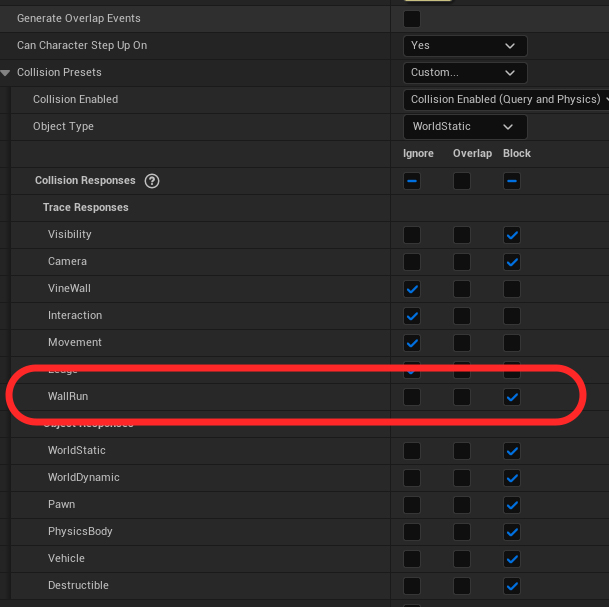
Wall Run Settings #
Configuration: #
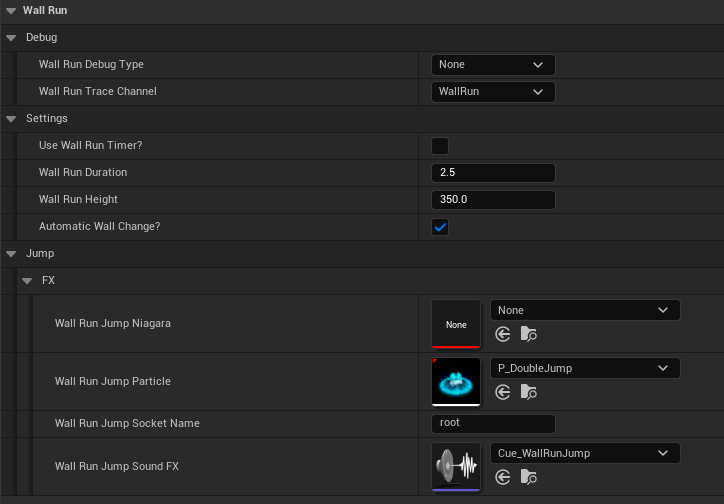
To customize the Wall Run settings for individual characters, access the Wall Run section in the character blueprint’s details tab. The settings include:
- Use Wall Run Timer?: This setting introduces a timeline at the start of the run, capping the duration a player can run on a wall. The timeline ends the wall run by making the player fall off as momentum decreases. It simulates a realistic wall run by moving the player upward initially and then downward as gravity takes effect.
- Wall Run Duration: Sets the length of the timeline in seconds (e.g., the default is 2.5 seconds).
- Wall Run Height: Specifies the height of the arc along which the character runs when the Wall Run Timer is active.
- Automatic Wall Change: This feature automatically detects an opposite wall to jump to when the current wall ends. For instance, if a player is running along a wall on their right and the wall ends, the system checks for a wall on the left and, if present, allows the character to jump to it automatically, eliminating the need for manual player input.
Effects: #
- Jump Effects: These are one-off effects that play when the character jumps from a wall, occurring at the location of a specified socket.
- Run Effects: These effects last for the duration of the wall run, such as dust falling off the wall or a simple trail effect to enhance visual realism.
Timeline Curve #
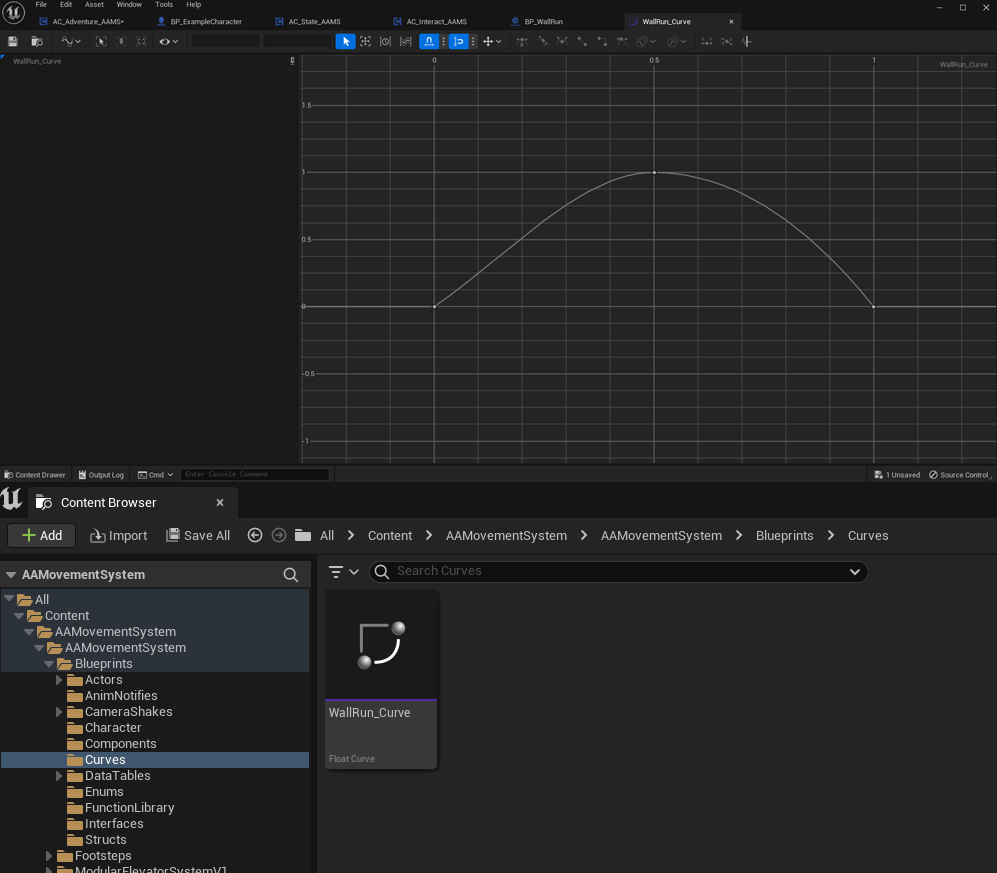
If the “Use Wall Run Timer” setting is activated, the timeline employs a curve to dictate the player’s arc while running along the wall. To modify this arc:
- Adjusting the Curve: Navigate to the
WallRun_Curvelocated in the Curves folder of your project. Here, you can tweak the curve to change how the player’s movement is arched during the wall run. - Important Note: Ensure that the last keyframe of the curve does not extend beyond the one-second marker to maintain timing accuracy and the intended gameplay effect.
Animations #
Animations for the wall run are managed within the Animation Blueprint and include various motions, such as a loss of momentum when the timer is utilized and the run approaches its end. This setup ensures dynamic and visually appealing wall running experiences, enhanced by accurately timed and executed movements.
Parachutes/Gliders #
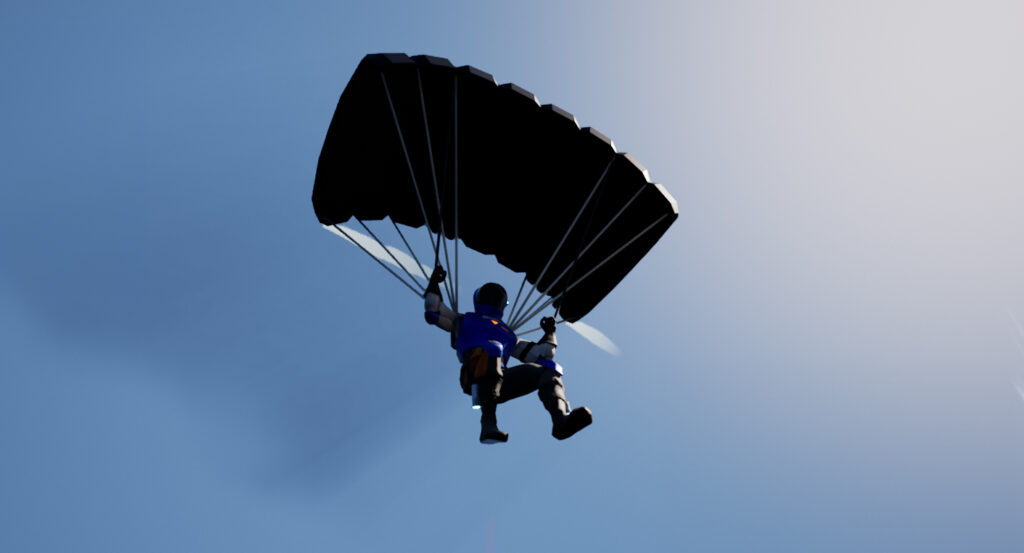
While parachutes and gliders may not be central to most action-adventure games, they introduce a delightful new dimension to gameplay and provide a critical safety net, saving players from unnecessary fall deaths. In AAMS v2.0, the mechanics of parachutes and gliders have been significantly enhanced. These updates include smoother movements and refined animations, making their use not only more effective but also more visually appealing. This enhancement ensures that players enjoy a more fluid and realistic experience when soaring through the game’s environments or making safe landings.
Parachute/Glider Setup in AAMS v2.0 #
Parachutes and gliders, while not essential, can significantly enhance the realism and excitement of parachuting actions in the game. Although the BP_Parachute actor is not required, it adds a layer of authenticity with its own visual and sound effects that simulate a real parachute opening.
Implementing Parachute/Glider Mechanics: #
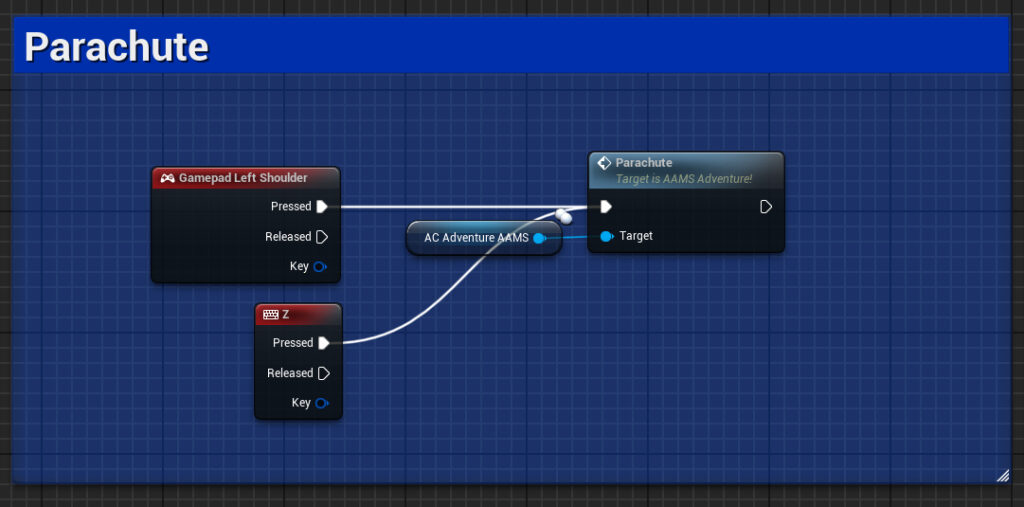
- Input Configuration: Assign the Parachute/Glider event to your preferred input action key to activate the parachute or glider.
- Inventory-Based Deployment: If you wish to deploy a parachute from your inventory, ensure you set up your parachute actor using your inventory system. Uncheck
Auto Spawn Chutein the parachute settings if you prefer manual deployment.
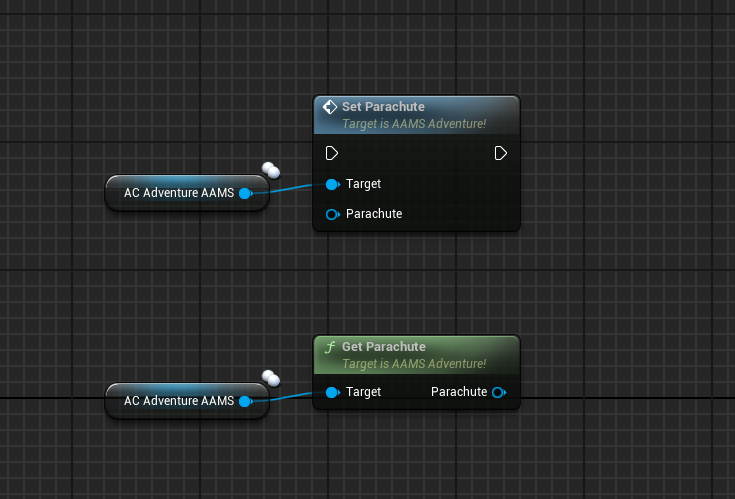
Additional Mechanics: Parachute Lift #
- BP_ParachuteLift Actor: An external actor, such as
BP_ParachuteLift, can be used to create air currents that lift the character. For example, using fans within the game environment can help extend airtime, challenging players to reach otherwise inaccessible areas by skillfully navigating through these lifts.
Parachute Settings #

- Parachute Rotation Speed: Controls how quickly the character rotates left and right when input commands are given. A slower rotation rate is generally more suitable for gliders.
- Auto Spawn Chute?: This setting decides if a parachute automatically deploys. When set to true, the designated parachute will spawn automatically, regardless of whether it’s in the inventory.
- Parachute Attach Socket: Specifies the socket on the character’s skeleton where the parachute mesh is attached, ensuring correct positioning and deployment.
Animations #
- Parachute State Machine: All parachute-related animations are managed within the Parachute State Machine in the animation blueprint, ensuring smooth transitions and realistic movements.
For detailed guidance on the BP_Parachute actor and further customization options, refer to the AAMS Actors section of the documentation.
Slope Sliding #
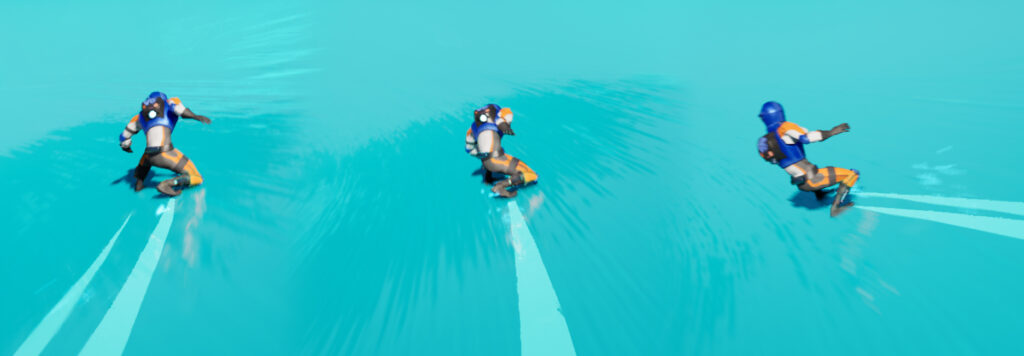
Slidable slopes offer a dynamic and entertaining method to transition players to new areas of your game while naturally restricting their ability to return to previous zones, compelling them to advance forward. To elevate the challenge, you can incorporate obstacles and turns along the slope, enhancing the gameplay complexity and excitement.
For inspiration, consider games renowned for their effective use of slidable slopes, such as Star Wars Jedi: Fallen Order, Mario 64, and Uncharted 4. These titles showcase a variety of creative and engaging ways to integrate slopes into level design.
In AAMS v2.0, slope sliding mechanics have been significantly enhanced. The updates include smoother movements and an added roll feature, which allows for sharper turns while maintaining stability on the slope. This improvement not only makes sliding more realistic but also more responsive, providing players with a more immersive and thrilling experience.
Slope Setup #
Slopes in AAMS require the use of BP_SlopeSlide_Parent or a child of it. This parent blueprint utilizes a spline mesh to shape the slope and a hidden spline mesh on top for handling collision events.
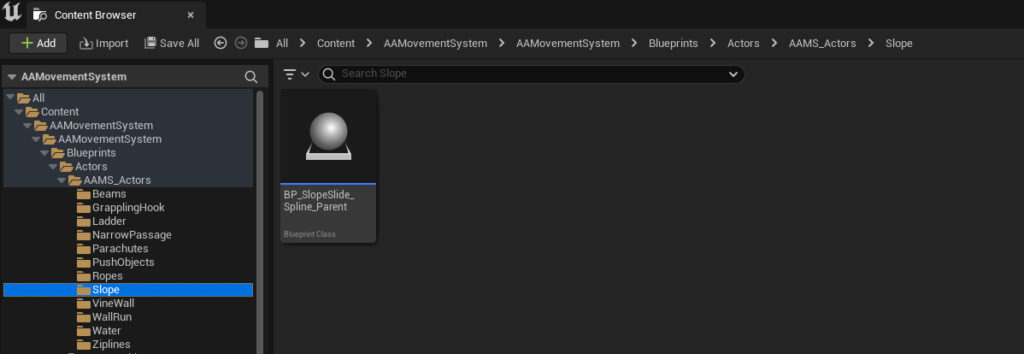
How to Set Up Slope Slides: #
- Placement: Add the
BP_SlopeSlideactor to your level at the point where you want the slope to begin. - Configuration: Select the last spline point and extend it towards where you want the slope to end. Hold Alt and drag the point to add new segments, allowing you to lengthen and curve the slope as needed.
- Adjustments: Rotate the spline points to facilitate sharper curves and ensure the player remains on the slope during gameplay.
- Customization: Set materials, effects, and sound effects for each slope directly in the
BP_SlopeSlideactor.
For comprehensive details on the BP_SlopeSlide_Parent and its functionalities, refer to the AAMS Actor section of the documentation.
Slope Settings #
Character Blueprint Settings: #

- Effect Socket Location: This is the only editable setting in the character blueprint related to slopes. Effects are specified per slope actor to customize the visual experience.
- Slope Speed Adjustment: If the character slides too quickly for your game’s design, access the
Slope Speed Inputfunction and adjust the Ground Friction values until the desired speed is achieved.
Slope Animations #
Animations for slope sliding are managed within the Slope Slide State Machine in the Animation Blueprint. A blendspace is used to dynamically choose between lean, speed up, slow down, or idle animations based on the character’s movement and interaction with the slope.
Free Falling #
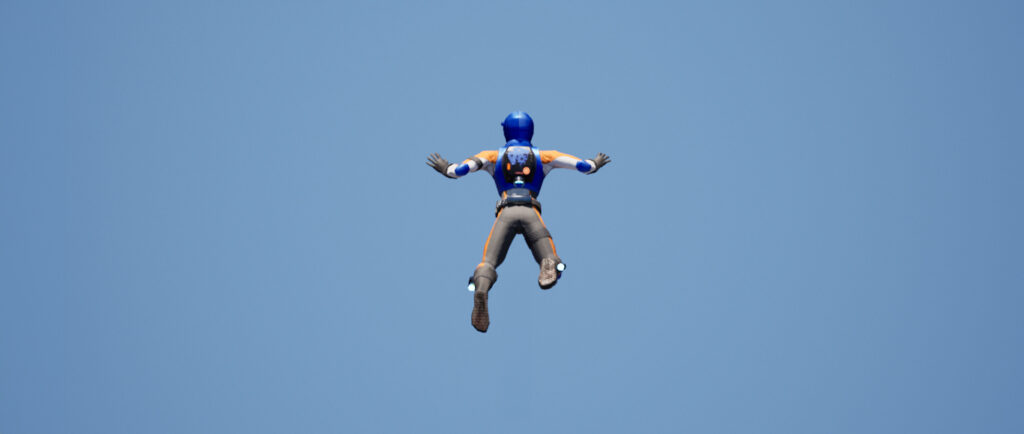
Free Falling is an exhilarating new feature in AAMS, designed to enhance high-altitude gameplay experiences. This mechanic activates when a player jumps from a significant height and reaches a predetermined falling velocity. *Cue the Tom Petty song…
Mechanics of Free Falling: #
- Velocity Cap: Once the set falling velocity is reached, the system caps it to prevent acceleration beyond a certain point.
- Immersive Effects: The initiation of free fall triggers camera shakes and controller rumbles, mirroring the intense sensation of real-life free falling.
- Control Inputs: Similar to the parachute mechanics, lateral movements allow the player to rotate left or right. Pressing forward during free fall engages a dive, increasing the descent speed and temporarily restricting rotational control.
Games with Notable Free Falling Mechanics: #
- Assassin’s Creed – Features dynamic leaps and controlled descents from great heights.
- Gravity Rush – Known for its unique gravity-based falling and navigation mechanics.
- The Legend of Zelda: Tears of the Kingdom – Incorporates vertical exploration and falling as key elements of gameplay.
These games serve as inspirations for integrating free falling into various game types, offering players thrilling moments of aerial maneuverability and strategic descent.
Setting Up Free Falling #
Free Falling in AAMS is streamlined to integrate easily into your game, requiring no external actors, which simplifies the setup process significantly. To change the free fall settings open the Free Fall section of the character blueprint details tab.

Configuring Free Fall Options: #
Choose from one of the four available free fall options for your character:
- None: The character experiences normal falling without any special free fall effects.
- Free Fall: Once the designated fall velocity is reached, the character enters free fall mode, enhancing the visual experience of the descent.
- Reset: The character automatically respawns at the last safe jump point upon falling.
- Parachute: This option triggers an automatic parachute deployment to safely bring the character to the ground. Note: If the parachute’s auto-equip setting is disabled and the player does not have a parachute equipped, this option will not activate.
Velocity Settings: #
- Free Fall Z Velocity: Set this parameter to define the velocity threshold that triggers free fall mechanics. This velocity is the downward speed at which the various free fall animations and mechanics will activate.
Animations #
Free Fall animations are managed within the Free Fall State Machine in the Animation Blueprint. This setup ensures that all related animations are smoothly triggered and managed based on the character’s falling dynamics and the selected free fall options.
Beam Walking #
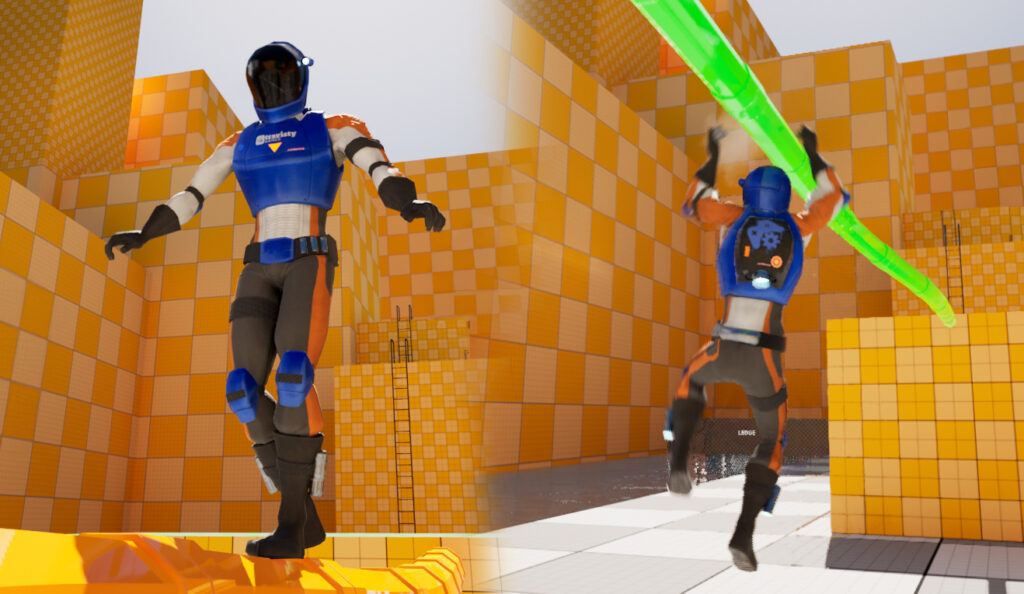
Beam walking has received a significant overhaul in AAMS v2.0, introducing advanced mechanics to enhance player interaction with beams. The system now utilizes the beam’s spline to guide the player, ensuring movements along the beam are more precise and fluid. This update not only improves the experience of navigating beams but also aligns movements more closely with realistic balancing and walking dynamics.
New Features in Beam Walking: #
- Beam Hanging: A new feature in version 2.0 allows players to transition from walking atop a beam to hanging beneath it. This capability enables players to navigate along the underside of beams, adding a layer of complexity and challenge to the gameplay. Players can then climb back up to resume walking along the beam, offering versatile movement options and strategic gameplay possibilities.
- Level Design Possibilities: These enhancements open up new avenues for level design, allowing for the incorporation of obstacles that players must skillfully navigate by climbing over or dropping under along beams. This addition enriches the gameplay, providing more dynamic and engaging player interactions.
Games for Inspiration: #
Consider the beam walking mechanics found in games like God of War, Jedi: Fallen Order, and Prince of Persia for inspiration in your level design. These titles are known for their intricate environmental puzzles and challenging movement mechanics, offering valuable insights into how beam walking can be effectively integrated into game levels.
Setting Up Beam Walking #
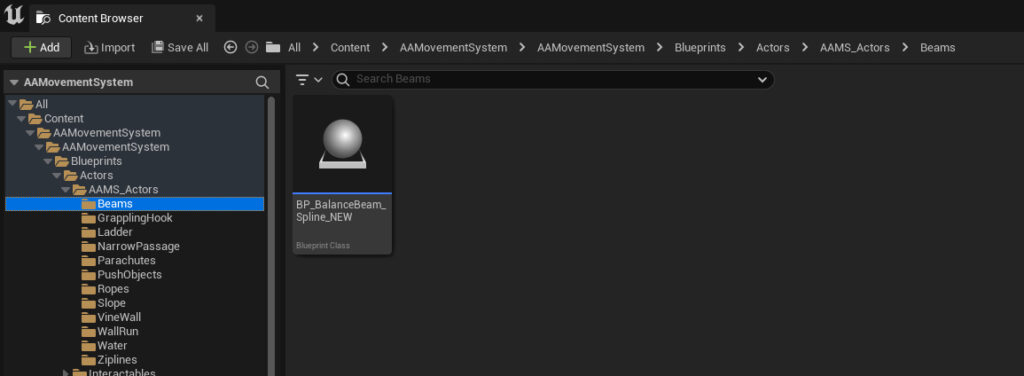
Beam walking in AAMS requires the use of the BP_BalanceBeamSpline actor. This actor utilizes a spline mesh to create a path that guides the character’s movements along the beam, ensuring precise and realistic balancing actions.
How to Implement Beam Walking: #
- Placing the Beam Actor: Drag the
BP_BalanceBeamSplineactor into your level at the desired location for the beam. - Configuring the Spline: Shape the spline to match the intended path of the beam. This path dictates how the player will navigate along the beam.
- Customizing the Beam: You can customize the beam by replacing the default mesh, adjusting materials, and setting the beam width directly in the beam actor’s properties.
For detailed information about the Beam actor and its comprehensive settings, refer to the AAMS Actors section of the documentation.
Settings #

Walking and Hanging Offsets: #
- Adjustment: These settings are used to modify the vertical position of the character when walking atop or hanging from the beam. For instance, if the character appears too high while hanging, adjust the
Beam Hang Z Offsetto lower the character to a more appropriate height.
Animations #
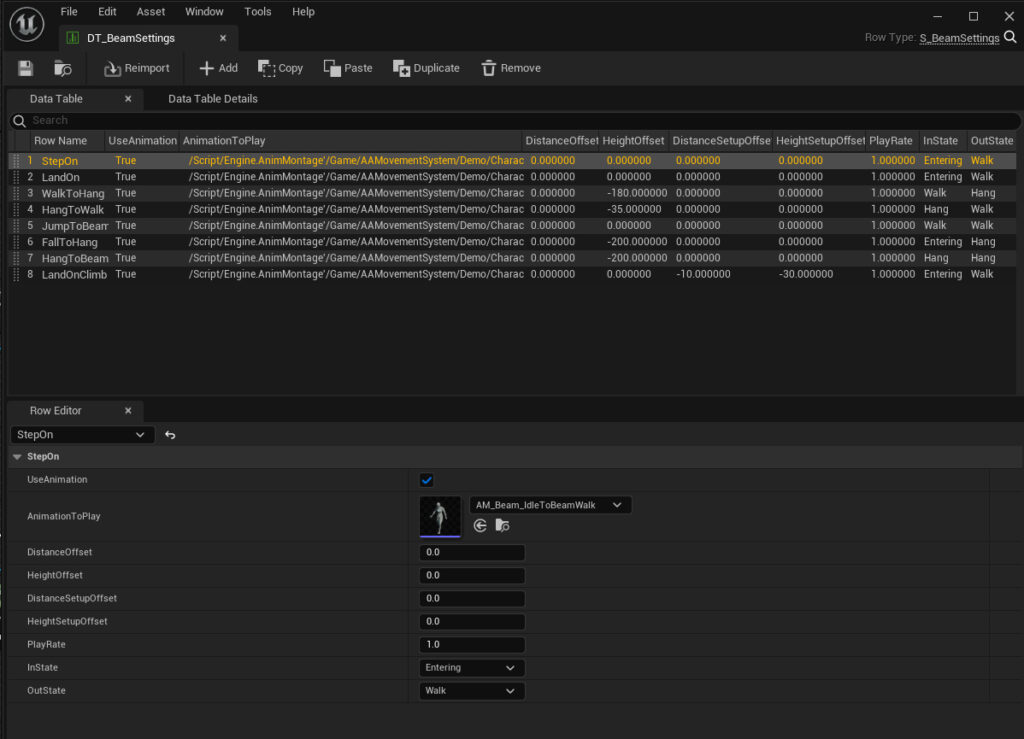
The animations for beam walking are managed similarly to those for swimming and ladder interactions:
- Data Table Management: The
DT_BeamSettingsdata table specifies the appropriate animations, offsets, and beam states for different actions. - Animation Blueprint: Walking and hanging animations are looped within the Beam Walk State Machine, ensuring smooth and continuous motion as the player navigates along the beam.
Ropes #
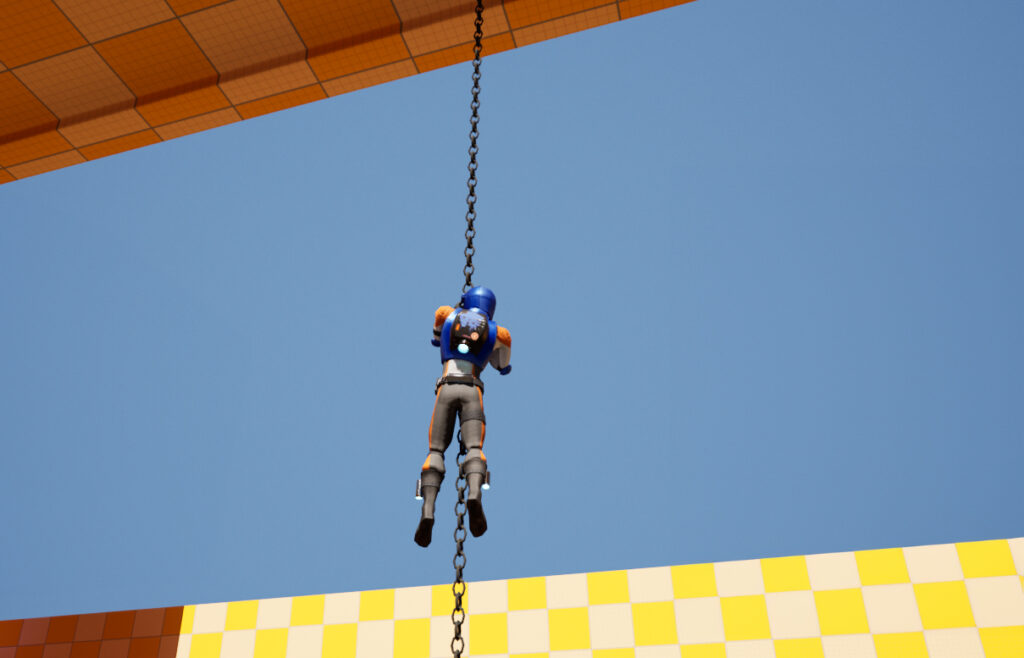
The rope system in AAMS v2.0 has been completely revamped from the ground up to enhance interaction and realism. The updated system replaces the previous cable models with rope skeletal meshes, providing a more authentic and visually appealing rope appearance.
Features in the Rope System: #
- Climbing: Players can now climb up and down the ropes, adding vertical movement and expanding exploration possibilities within the game.
- Swinging: The system includes a dynamic swinging mechanism, allowing for more engaging and strategic movement across areas.
- Rope Jumping: A new feature enables players to jump from one rope to another, increasing the complexity and skill required in navigating these segments.
These improvements make the ropes smoother and more reliable, ensuring a seamless and enjoyable experience for players.
Games for Inspiration: #
For level design ideas and to see effective rope mechanics in action, consider games like Pitfall, Tomb Raider, and The Last of Us. These titles are renowned for their innovative use of rope mechanics to create memorable and challenging gameplay environments.
Setting Up Ropes #

The rope system in AAMS utilizes specialized actors such as BP_Chain or BP_Rope_500 to implement ropes in your game environment. Future updates will include more rope actors of varying lengths to provide additional flexibility.
Placing Rope Actors #
Position the rope actors within your level where you desire the ropes to be accessible for climbing or swinging.
Settings for Rope Interaction #
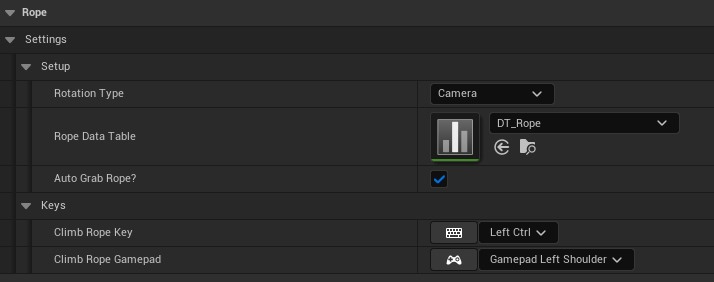
Change these settings in the Rope Swing section of the details tab in the characters blueprint.
Camera Rotation Options #
- Camera Rotation: This setting aligns the player’s forward vector with the camera’s orientation, requiring the player to face the camera in the direction they wish to move.
- Key Rotation: This option allows the player to turn using left and right input keys, enabling the camera to orbit around the player without affecting their rotation.
Auto Grab Rope #
- Auto Grab Rope?: When enabled, the player will automatically grab the rope if they are within range and airborne. If disabled, the player must use the interact key to grab the rope.
Movement Keys #
- Swinging: Use the forward and back keys to swing on the rope.
- Climbing: To climb the rope, press an additional key (default: Left Ctrl for keyboard, Left Shoulder for gamepads) while using the forward or back keys.
Animations #
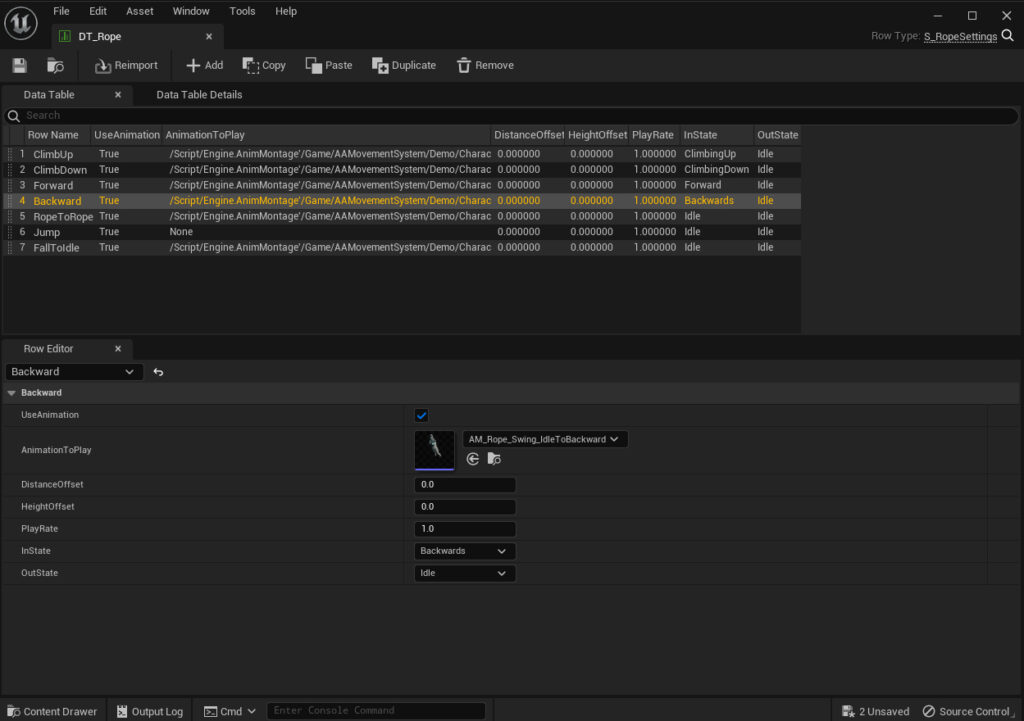
Rope animations in AAMS are managed through the DT_Rope data table, which specifies necessary offsets and states for action animations. The Animation Blueprint handles looping animations, ensuring fluid motion while the player interacts with the ropes.
Narrow Passages #
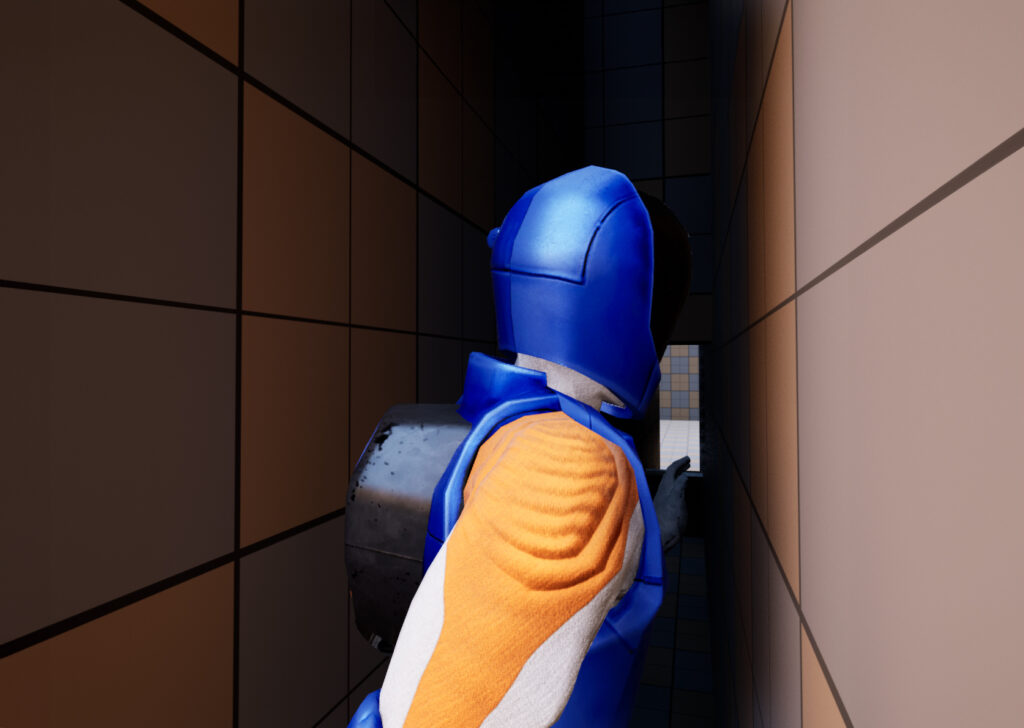
Narrow Passages are an exciting new feature in AAMS, designed to enhance level design and optimize gameplay flow. These passages are particularly useful for discreetly managing level streaming, allowing new areas to load seamlessly without interrupting player engagement. By facilitating movement through spaces that are typically inaccessible due to capsule collision restrictions, Narrow Passages add a layer of realism and challenge to the game environment.
Functionality and Utility: #
- Level Design Integration: Narrow Passages are invaluable for breaking up the monotony of a level while simultaneously handling background loading of new game areas.
- Gameplay Dynamics: In version 2.0, navigating through Narrow Passages involves dynamic checks for stepping over low obstacles and ducking under obstructions at eye level, enhancing the interactive experience.
Future Updates: #
- Version 2.1 Enhancements: Plans for the next update include the addition of crawling prone under obstacles within passages, further expanding the range of player actions and interactions within these confined spaces.
Inspiration from Popular Games: #
For those looking to incorporate Narrow Passages into their level designs, consider drawing inspiration from titles like Jedi: Fallen Order, Tomb Raider, and Ghost of Tsushima. These games effectively use narrow passages to enhance storytelling, manage gameplay pacing, and enrich the player’s exploratory experience.
Setting Up Narrow Passages #
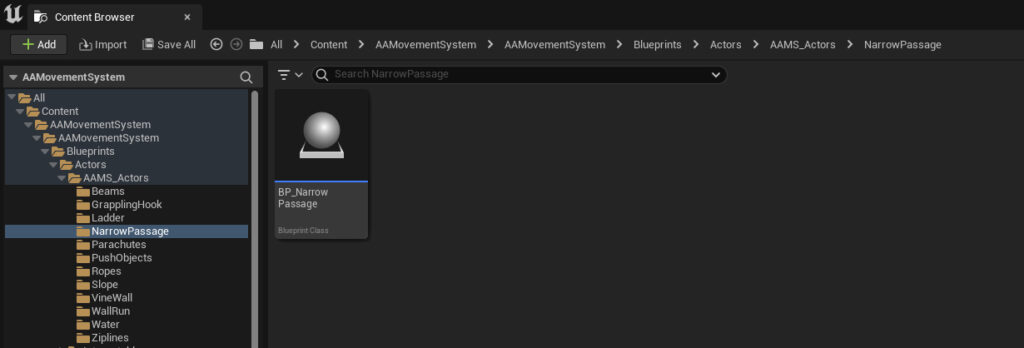
Narrow Passages are implemented using the BP_NarrowPassage actor, which can be found in the Narrow Passage folder of AAMS. This setup allows for a seamless integration of passage mechanics into your game environment.
Implementing Narrow Passages: #
- Placement: Add the
BP_NarrowPassageactor to the area in your level where the passage has been planned. - Configuration: Set the actor’s starting location at the entrance of your passage. Utilize the spline component to trace the path through the passage, adjusting the spline to end at the exit opening.
- Character Navigation: The character will follow the rotation of the spline path while navigating through the passage, ensuring that movement aligns with the physical layout of the passage.
Settings #
Character Blueprint: #
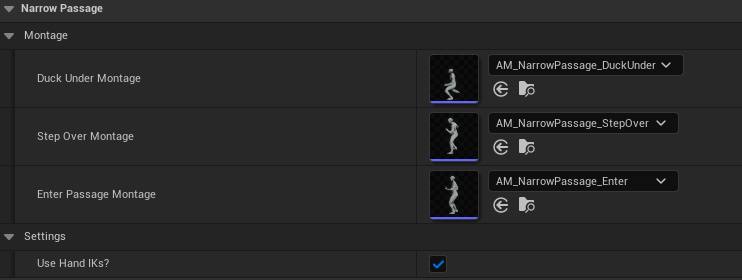
- IK Usage: The current editable setting in the character blueprint involves the use of Inverse Kinematics (IKs) on the character’s hands to make them adhere to the passage walls. This adds a layer of realism to the character’s interactions within the confined space.
Passage Configuration: #
- Customization: To adjust specific settings for each Narrow Passage, navigate to the details tab of the
BP_NarrowPassageactor within your level. - Documentation: For comprehensive details on configuring and using the
BP_NarrowPassageactor, refer to the AAMS Actors section of the documentation.
Animations #
Animation Blueprint: #
- Custom Montages: Unlike other components of the Adventure Component, Narrow Passages have their custom animations managed directly through the character’s details tab, including actions like ducking under and stepping over obstacles as well as entering the passage.
- Looping Movements: The ongoing movement animations for navigating the passage are handled by the Narrow Passage State Machine within the Animation Blueprint, ensuring smooth and continuous motion.
